Throughout the period of my prolonged illness, I agonized whether I'd lost my passion for food.
Unsurprisingly, the overburden of fever, cough, headache, nausea, and congestion had left my appetite suppressed. Food-centric content simply wasn't consumed the same way. The enthusiasm had withered, which pained my heart as much as it had numbed my gut.
Alas, when the desire to bake was recovered, I nearly jumped with joy. My YouTube feed could be regarded with enthusiasm once more.
1) Cookie Choux
The first item to be attempted was none other than Sunday Baking's latest release: Choux Pastry with Diplomat Cream.
In truth, it was a rather intrepid foray after weeks of absence from the kitchen. But my love for custard was boundless, as was intrigue for choux. Ever since the initial failure of Cooking Tree's edition (and the incredulous excess of mango whipped cream), I had banished the idea of homemade cream puffs ever again. That is, until Sunday's upload.
 |  |
All proper recipe research commences with meticulous review of the available resources, firstly for familiarity and secondly to prevent careless errors. Beyond viewing the video twice, the various components were written out separately for ease of reference, with key points marked out in colour.
The entire project comprised of four components:
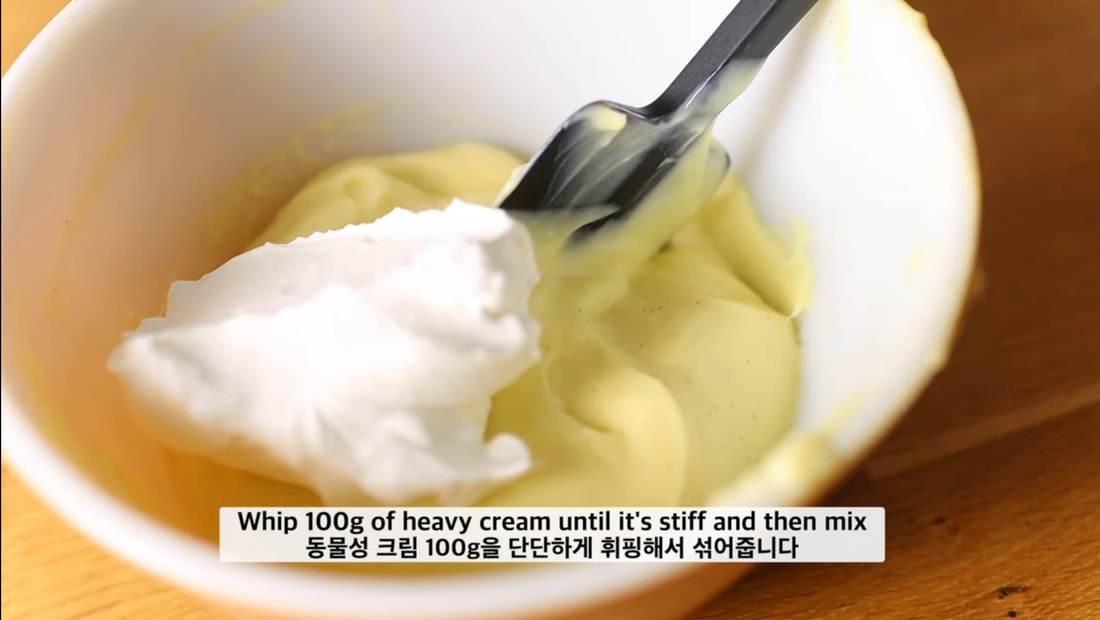
in which (1) pastry cream would be folded with unsweetened heavy cream whipped to stiff peaks to form (2) diplomat cream.
The entire project comprised of four components:
- Pastry Cream (Custard)
- Diplomat Cream
- Craqueline (Cookie Coating)
- Choux Pastry
in which (1) pastry cream would be folded with unsweetened heavy cream whipped to stiff peaks to form (2) diplomat cream.
Against my better judgement, an unlevel aluminum pan was utilized for the preparation of the custard, otherwise known as crème pâtissière, or "pastry cream", in the baking world. The formula came together easily, though I had taken care to measure out 80 grams of yolk with precision, rather than merely relying on unit count. Five small eggs were required to obtain the specified amount - one more egg than Sunday.
Despite vigorous whisking and keeping a watchful eye on the formula, the poorly lubricated centre scorched. The mistake was apparent from the moment small brown bits began to surface in the once pale yellow, speckled mixture. My best attempt at straining the burnt pieces weren't very successful. Though, the sumptuous eggy flavour hadn't been compromised whatsoever. I would proceed to cover and chill the mixture while preparing the other components.
At a later point in time - four hours to be exact - 100 g of heavy cream would be summoned for incorporation.
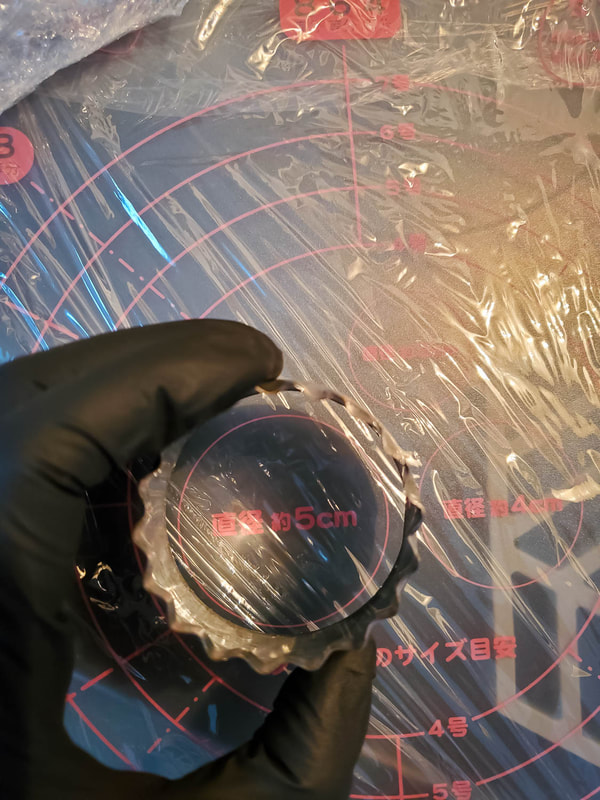
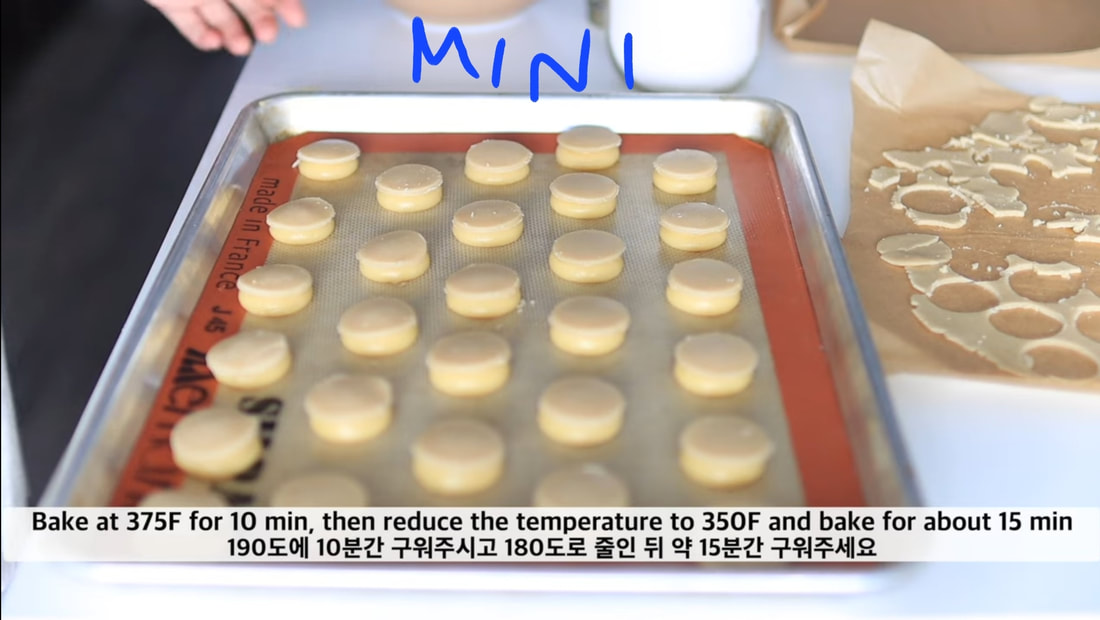
Sunday has tested two sizes of choux pastry, providing dimensions, ingredient quantities, and baking times for each. The smaller version measured 3.5 cm in diameter, while the larger 4.8 cm in diameter. North American baking tools are often bulkier than their Asian counterparts: the smallest double-ended fluted cutter at my disposal was one measuring just wider than 5 cm in diameter. Minor adjustments would need to be made to the "standard choux" option. In hindsight, a round cookie cutter could have facilitated the process, however I was keen to enjoy copious amounts of pastry cream should the trial be graced with success.
It is important to be mindful that the size of the choux dictates not only the baking time but amount of diplomat cream to be piped within: 25 g for the small and 50 g for the standard.
It is important to be mindful that the size of the choux dictates not only the baking time but amount of diplomat cream to be piped within: 25 g for the small and 50 g for the standard.
 |  |
Source: Sunday Baking | Step by Step Easy Choux Pastry Recipe
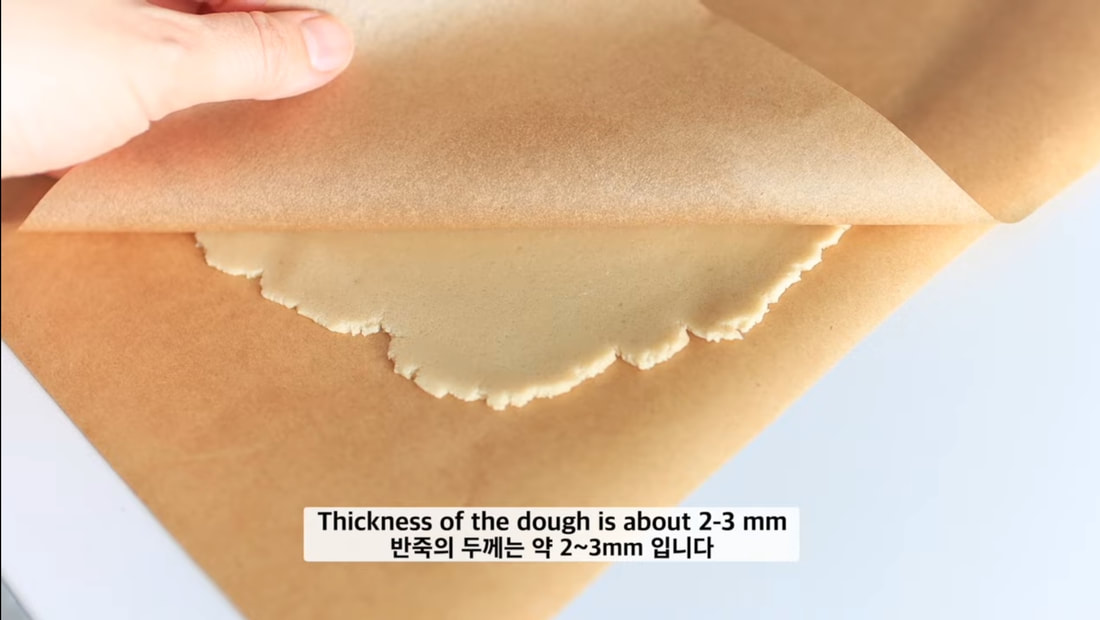
Being just softened butter, brown sugar, and AP flour, the craqueline topping was decidedly fragile. While the dough did not tear, its thin nature (2-3 mm in thickness!) demanded great care. Working near heat, I opted to indent the dough without removing any of the craqueline pieces. The sheet was then transferred to the fridge to firm up while I moved onto the next step.
The decision was been well-informed, for the discs were still relatively pliable after chilling. Excess craqueline was formed into a sphere once more, re-rolled, and baked on its own, ultimately yielding a brittle, caramel-looking thing of sorts.
The decision was been well-informed, for the discs were still relatively pliable after chilling. Excess craqueline was formed into a sphere once more, re-rolled, and baked on its own, ultimately yielding a brittle, caramel-looking thing of sorts.


At long last, I had arrived at the pâte à choux. Working quickly but carefully, the first few steps were executed on the stovetop. A nonstick medium-large saucepan was selected as the vessel of choice. All appeared to be going smoothly, until the addition of flour. The butter oozed while the formula began forming fine lumps. In the absence of the "yellow film" that Sunday had described, I continued to cook the butter-milk-water-flour mixture, amplifying the heat in hopes of quicker moisture dissipation. Ultimately, the batter was still greasy, but began to show increasingly apparent lumpiness.
Transferring the batter to a wide-brimmed bowl to cool slightly, I set out to prepare my beaten egg mixture. The specified 110 g equated to roughly 4 and 1/3 eggs. My smaller dozen offered specimens weighing in at 30 g each or slightly under, thus five eggs were required to surpass the minimum (5 eggs x 30 g = 150 g). The excess of 40 g was transferred to the fridge.
Transferring the batter to a wide-brimmed bowl to cool slightly, I set out to prepare my beaten egg mixture. The specified 110 g equated to roughly 4 and 1/3 eggs. My smaller dozen offered specimens weighing in at 30 g each or slightly under, thus five eggs were required to surpass the minimum (5 eggs x 30 g = 150 g). The excess of 40 g was transferred to the fridge.
Slow incorporation of the egg was apparently vital to the success of choux pastry. Consequently, I began with small trickles of eggs, folding the liquid binder into the dough fully before the next addition. An approximate total of 7-10 additions later, my hand, wrist, and forearm were surely sore. That said, I did not regret not switching to a hand mixer; the manual process allowed me to identify the texture of the batter at varying levels of absorption.
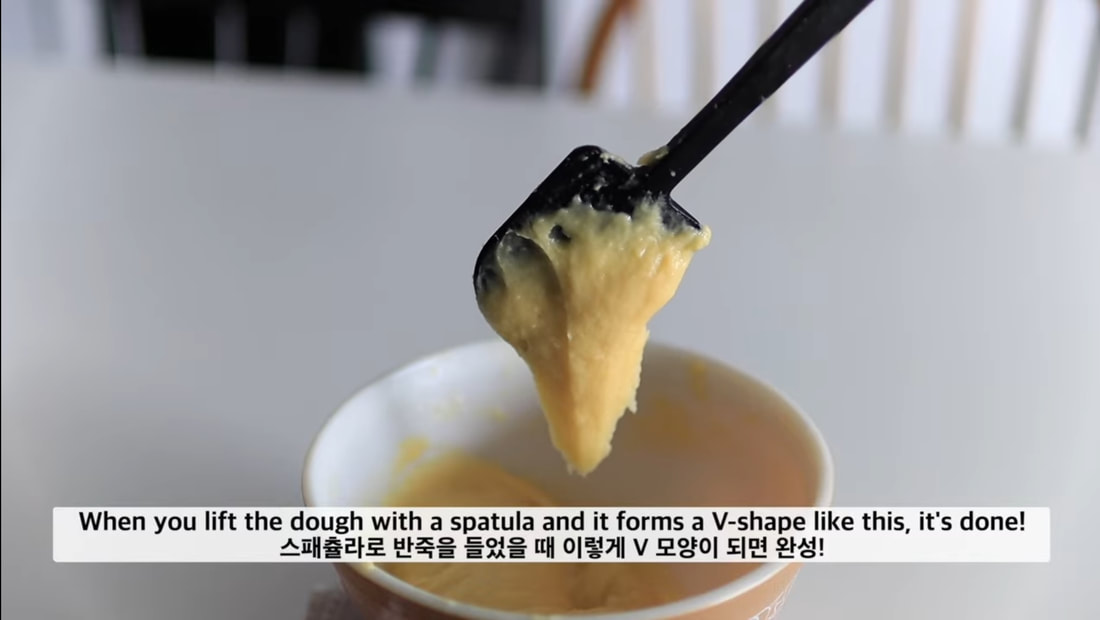
Alas, even after the extent of my beaten egg mixture had been depleted, the batter failed to display the specified "V" shape. It was dry and chunky, but oddly peeled away from the bowl easily.
Panicking, I turned to my remaining 40 g of egg for hydration. The additional quantity assisted in recovering a sense of smoothness, along with a block-shaped - "U-shaped"? - trail when lifted from the bowl. It was improvement enough for me. I set out to pipe.
Source: Sunday Baking | Step by Step Easy Choux Pastry Recipe
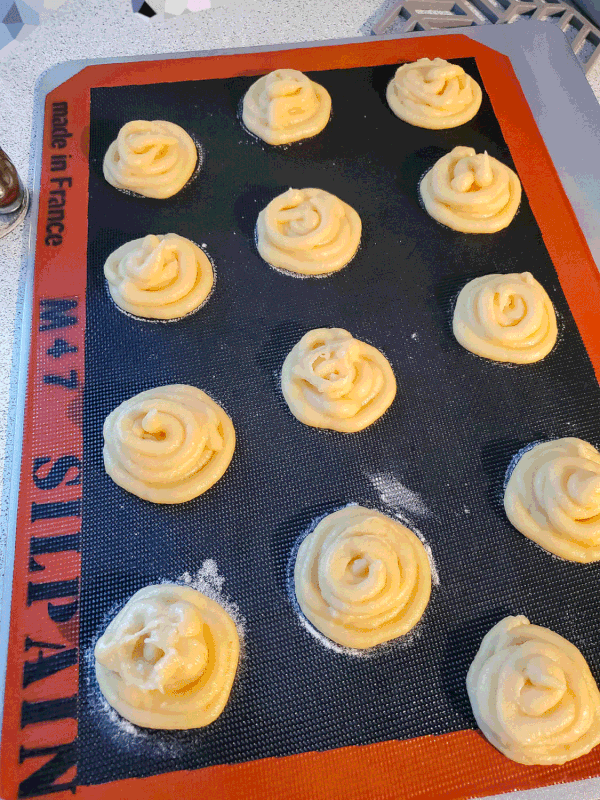
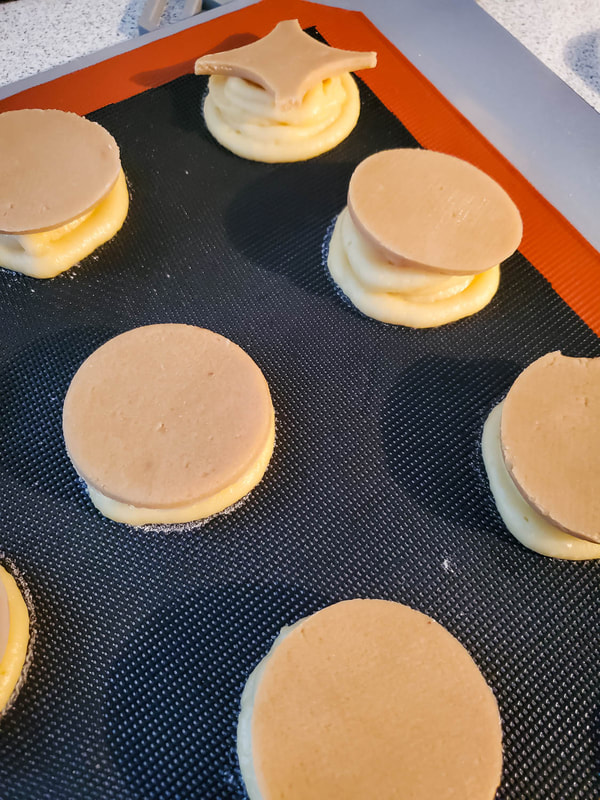
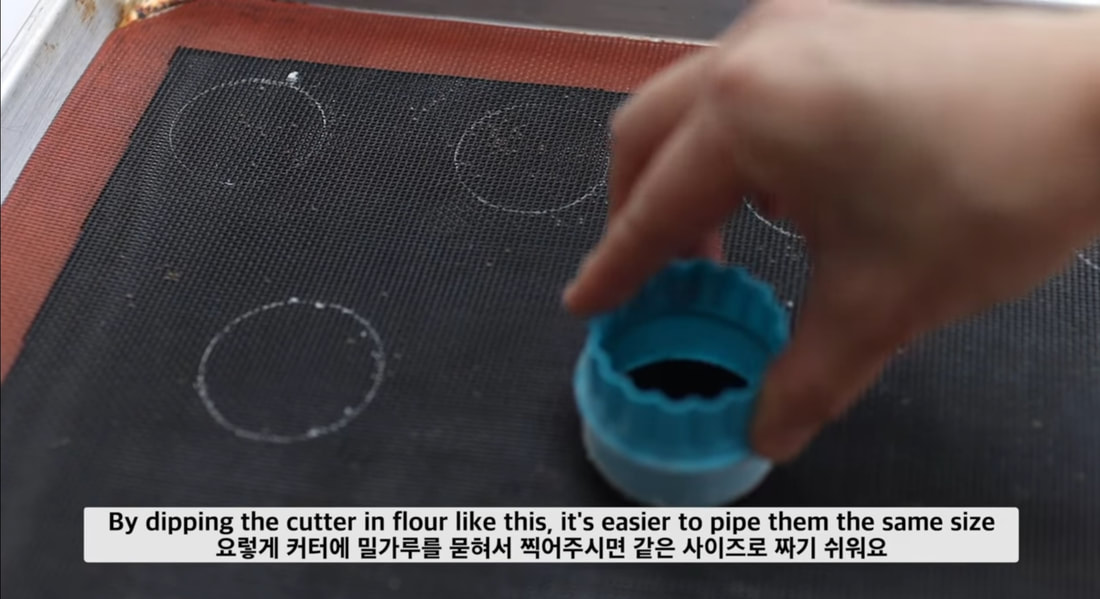
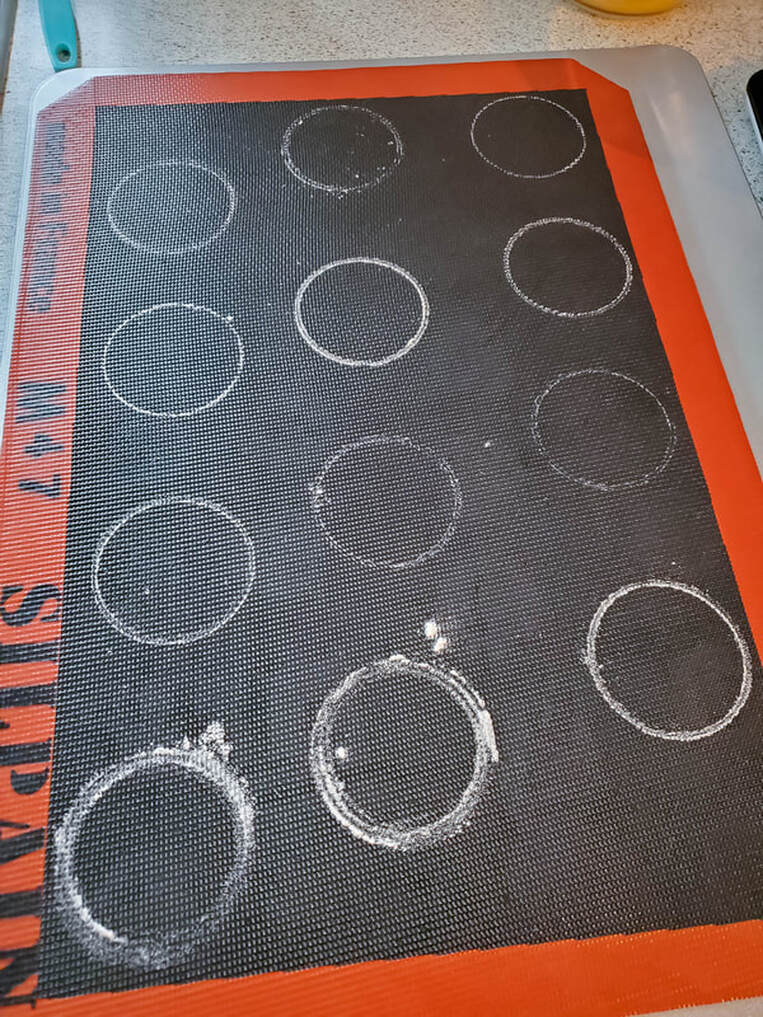
A grand tip bestowed upon all viewers in her Choux video was the dotting of flour circles on the baking mat. For those that struggle immensely with uniform sizing (me), the nifty trick was appreciated immensely! Of course, that is not to say that my rounds were perfectly uniform, for they were not.
Source: Sunday Baking | Step by Step Easy Choux Pastry Recipe
Some had been piped slightly beyond the flour guidelines, while others on the line. My not-so-round piping tip would cut the dough too thin, prompting a second round of piping to make up for too-thin portions.
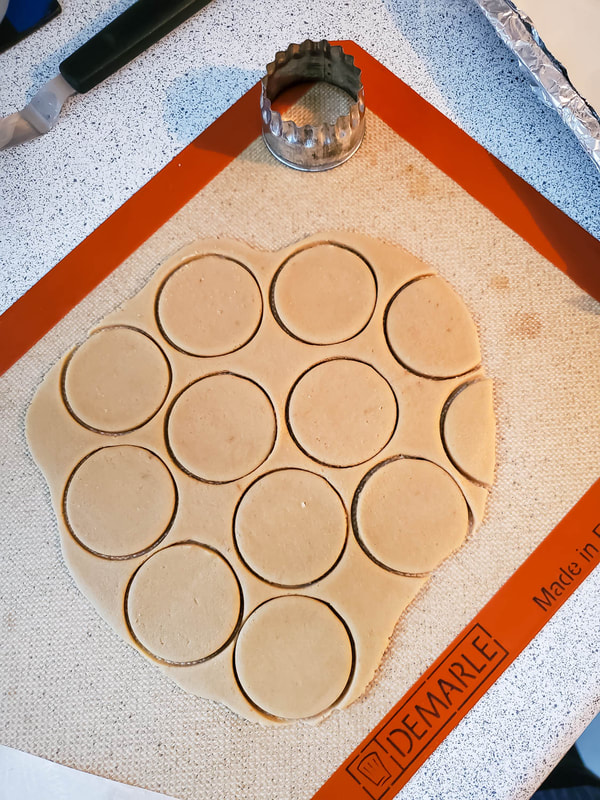
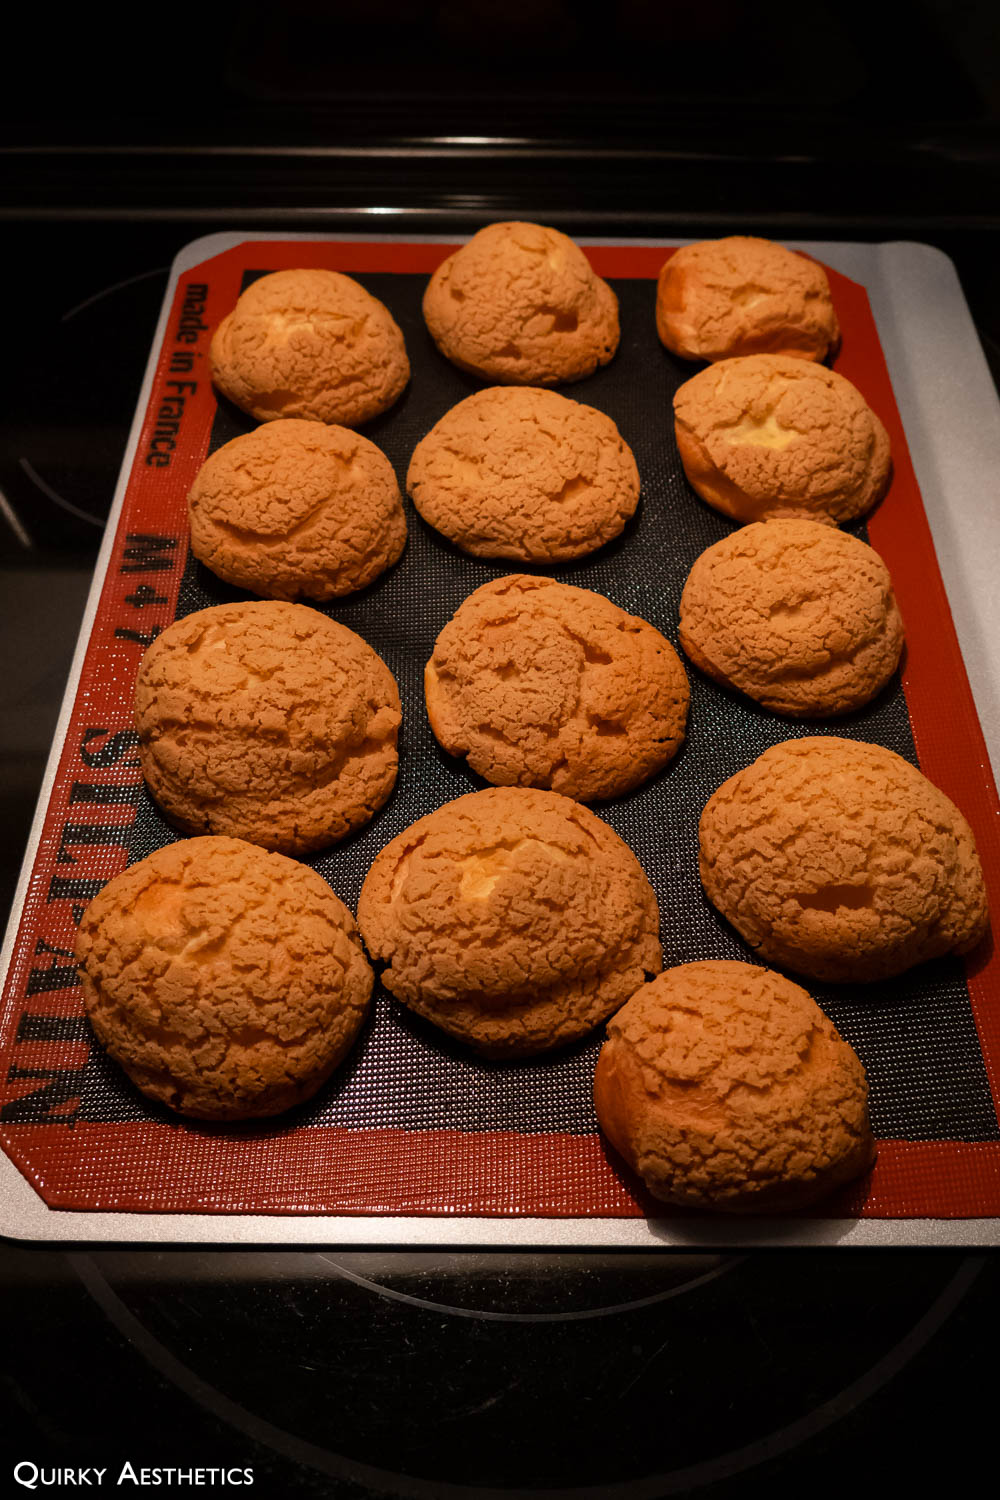
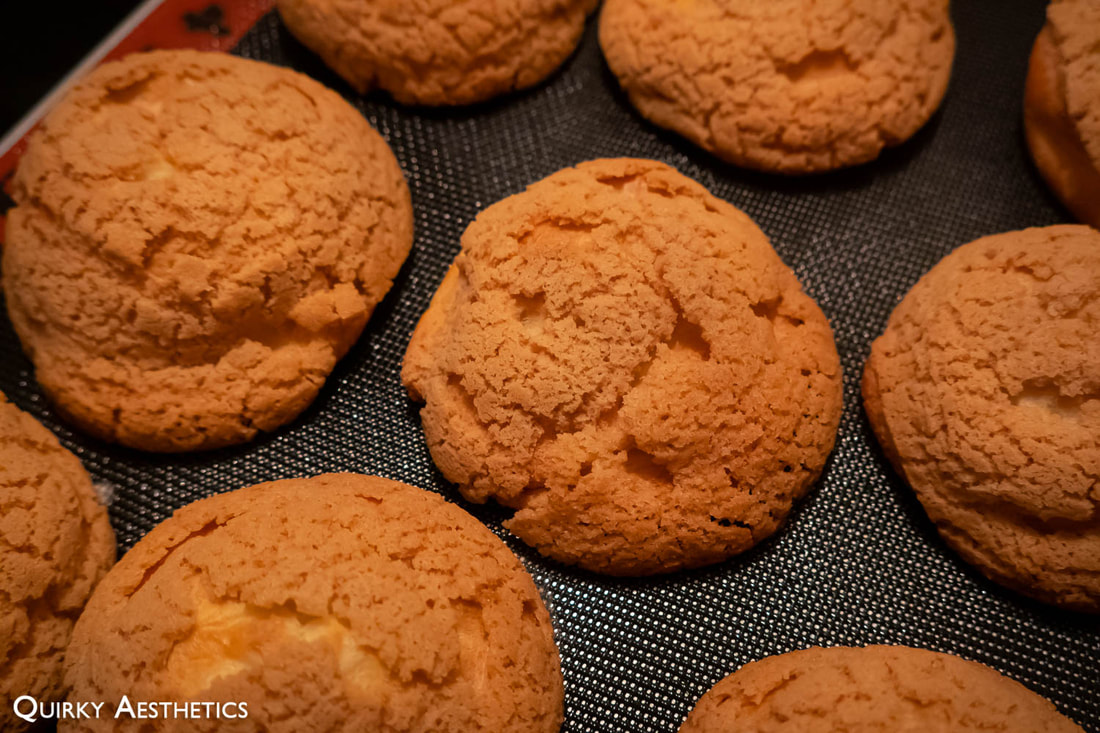
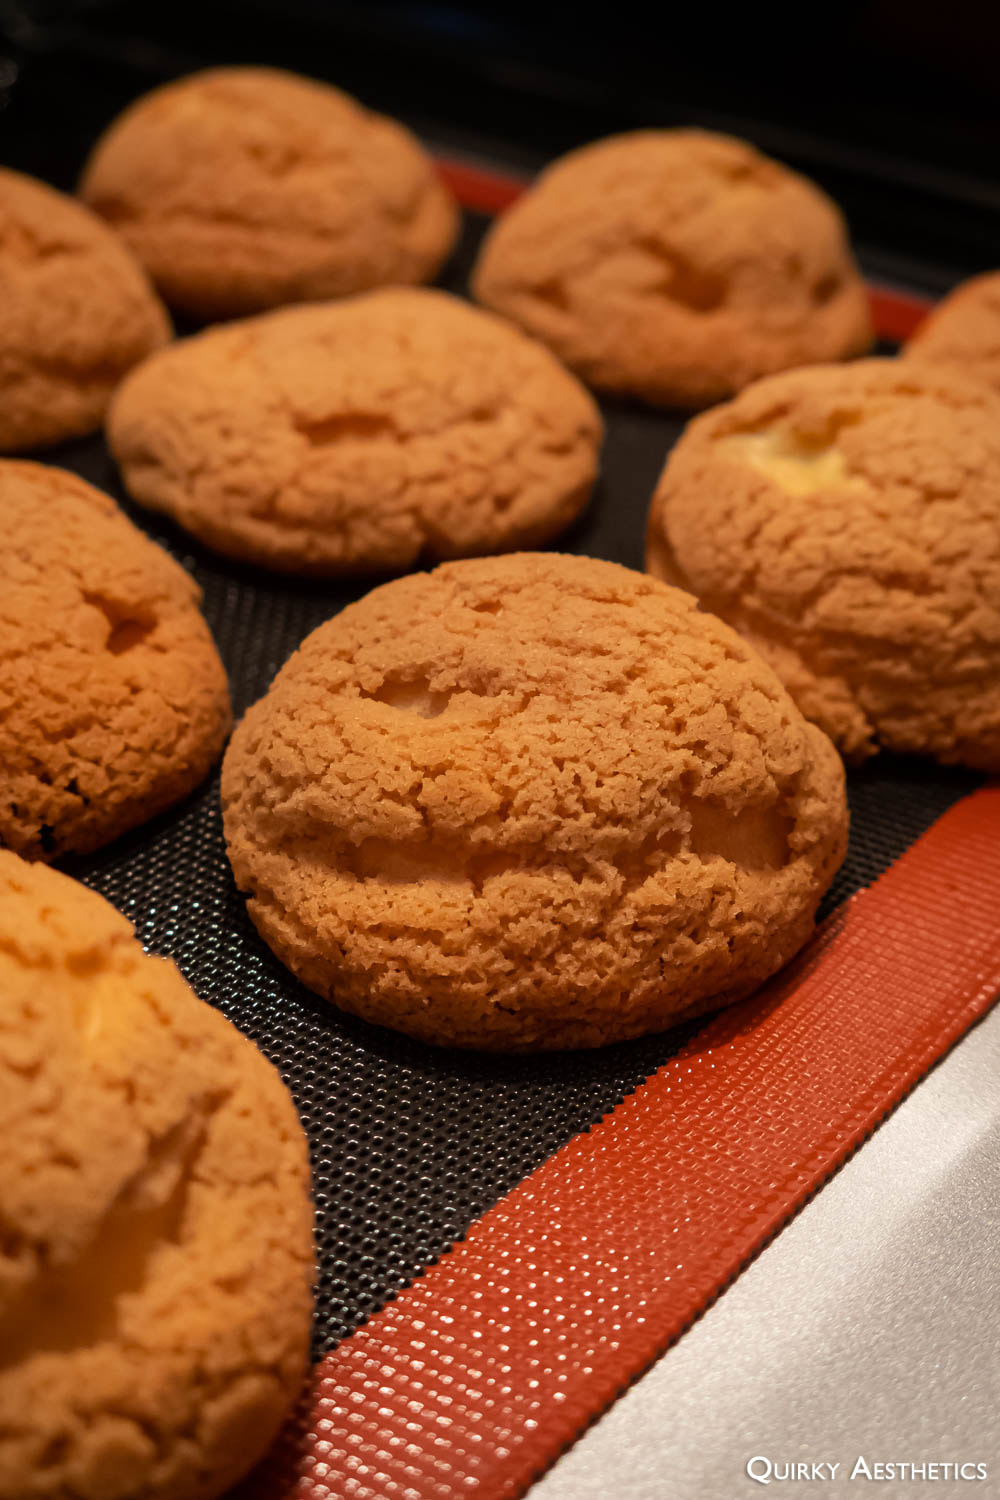
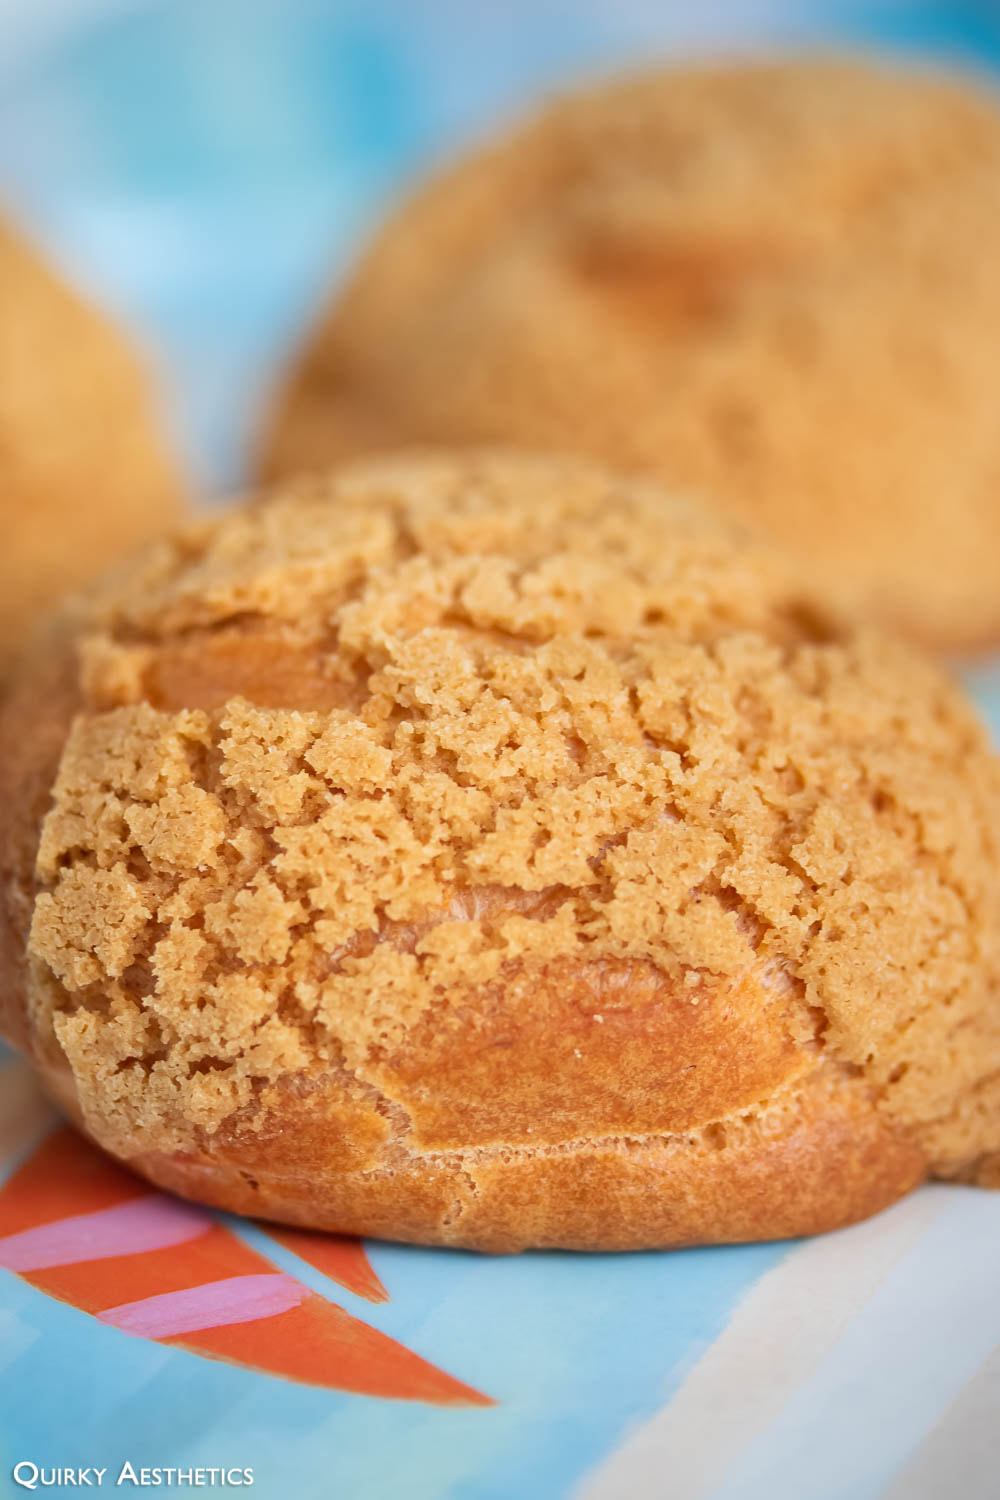
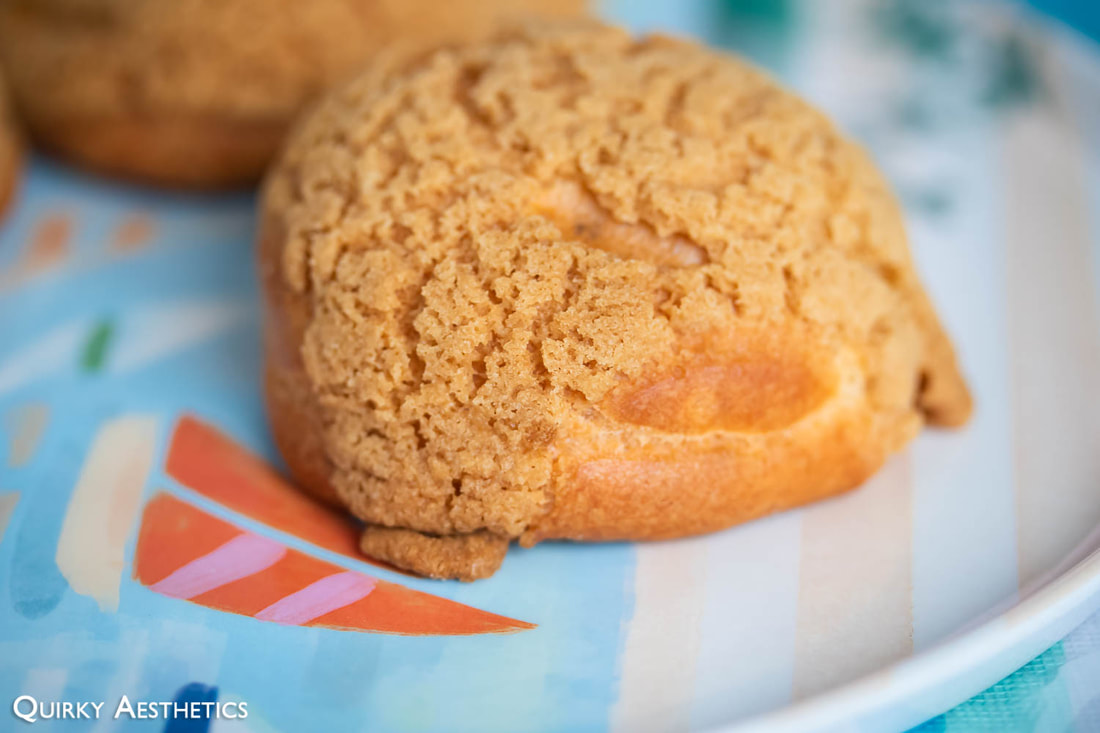
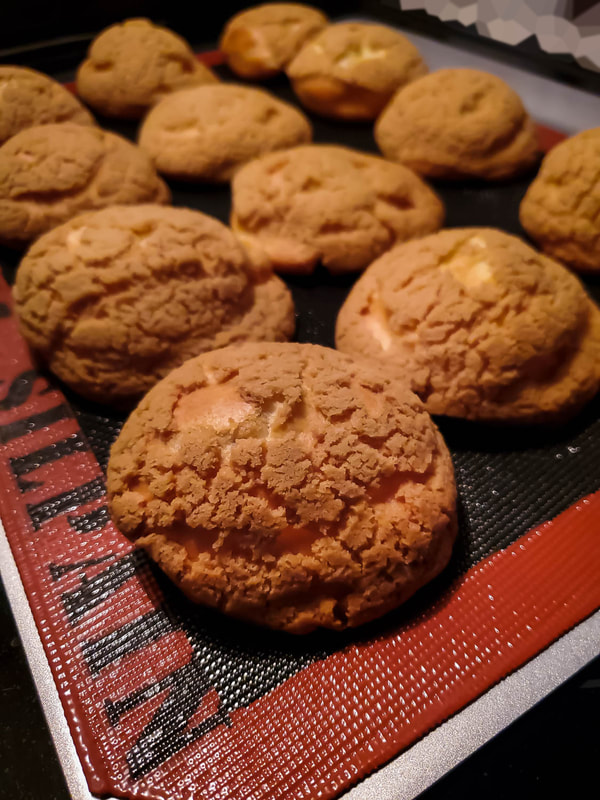
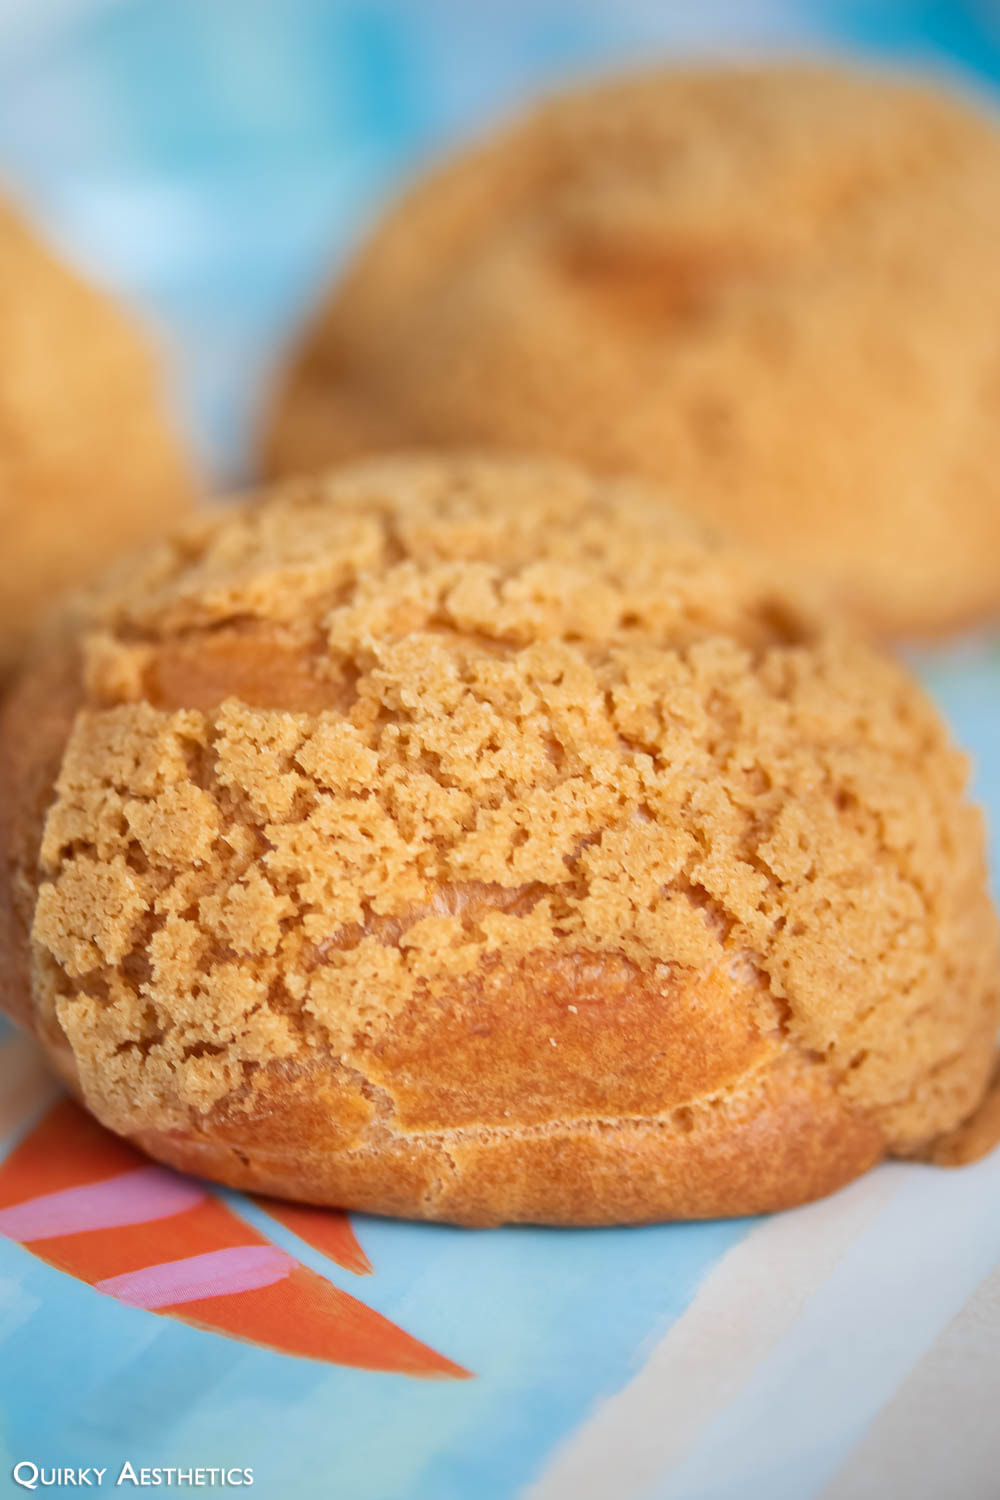
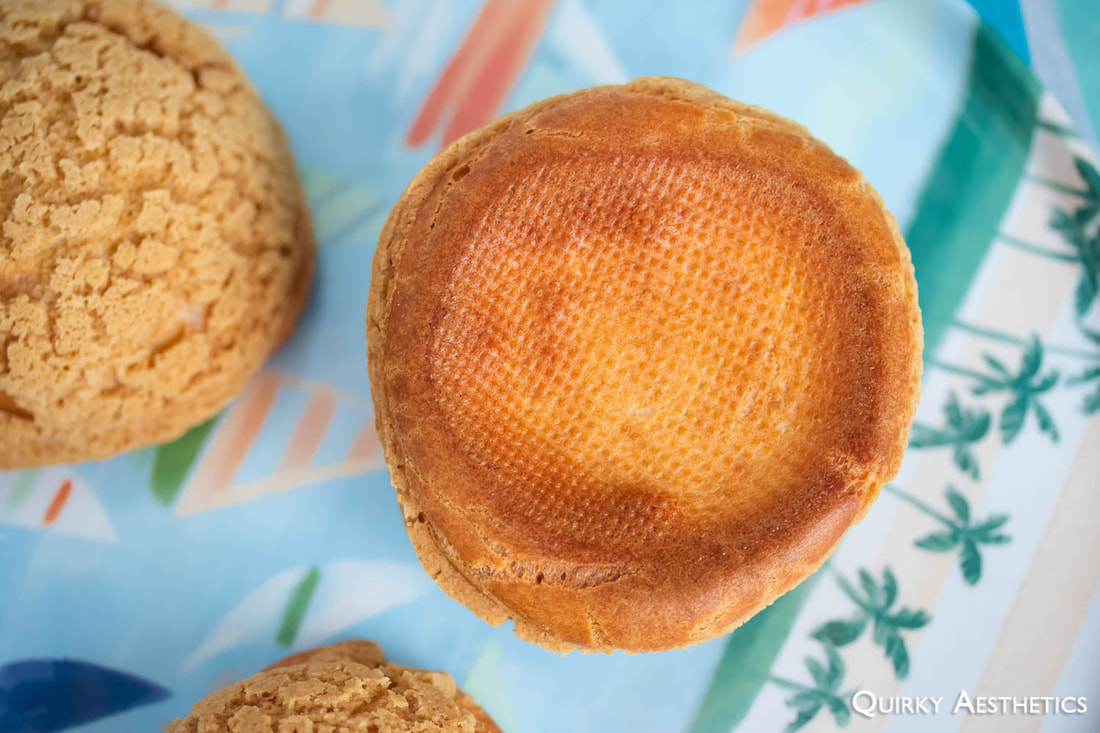
I obtained 13 choux in total: 12 measuring 5 cm in diameter (or slightly more) and 1 tinier one, which I placed at the edge of the baking sheet.
Ten were topped with uniform craqueline discs. The remaining three were either subject to a broken disc or asymmetrical sections of the remaining dough.
I obtained 13 choux in total: 12 measuring 5 cm in diameter (or slightly more) and 1 tinier one, which I placed at the edge of the baking sheet.
Ten were topped with uniform craqueline discs. The remaining three were either subject to a broken disc or asymmetrical sections of the remaining dough.
 |  |
The standard-sized choux called for baking at 375 F for 15 mins, then 350 F for 12-15 mins. I'd adhere to this prescription, erring on the latter end of the second baking stage in consideration of size.
Warned we were to refrain from opening the oven in the first 15 minutes of baking, as the insulation of heat was crucial for the choux to rise and expand. I followed suite with these instructions, further keeping a watchful eye on my frustratingly fluctuating oven temperature and raising it as necessary.
Warned we were to refrain from opening the oven in the first 15 minutes of baking, as the insulation of heat was crucial for the choux to rise and expand. I followed suite with these instructions, further keeping a watchful eye on my frustratingly fluctuating oven temperature and raising it as necessary.

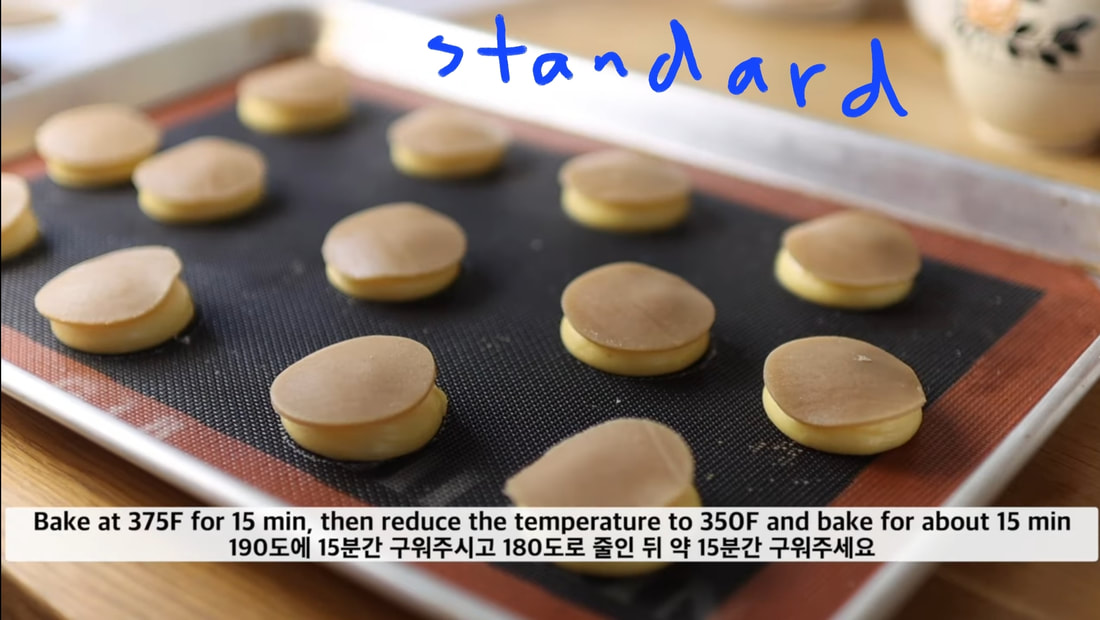
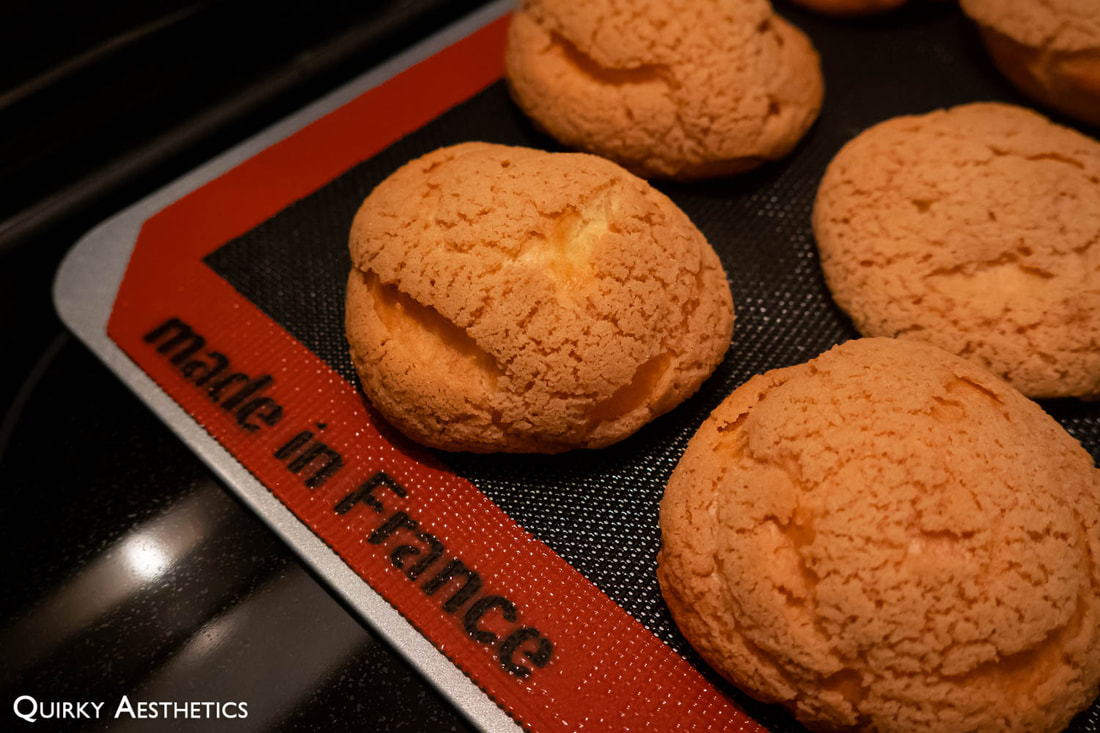
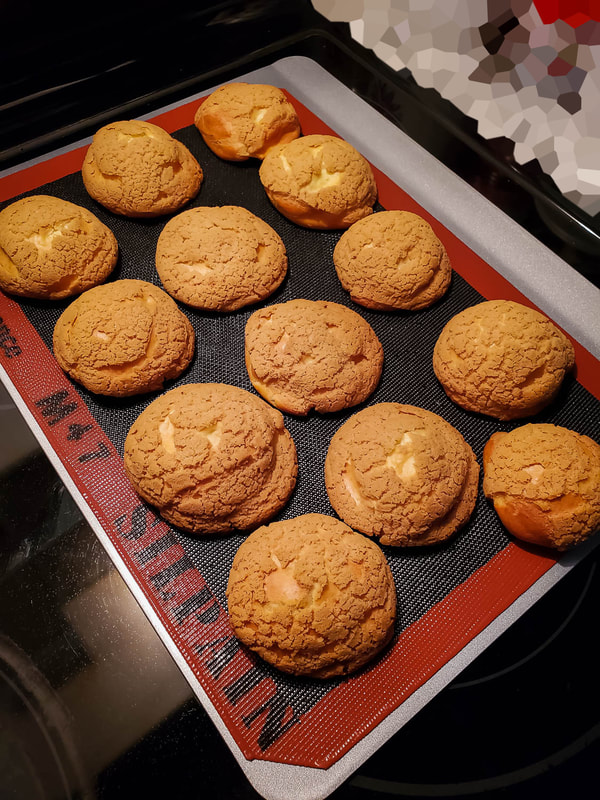
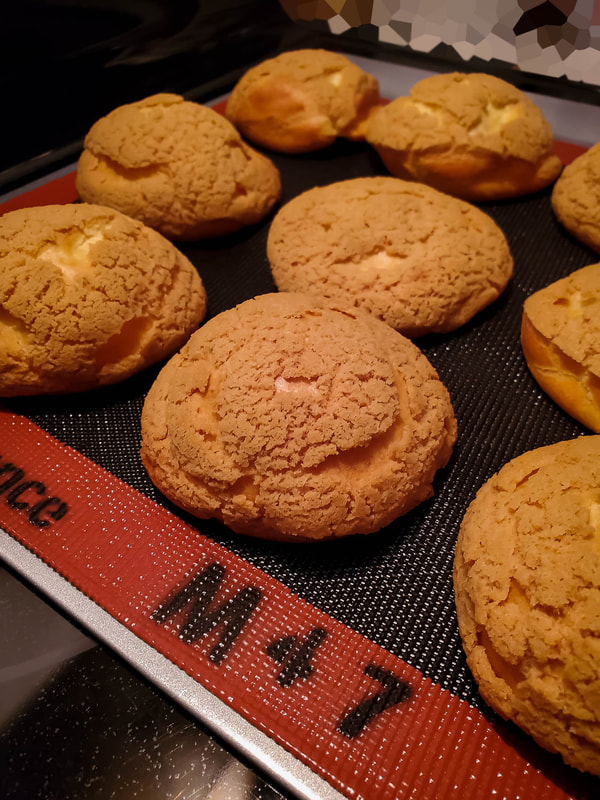
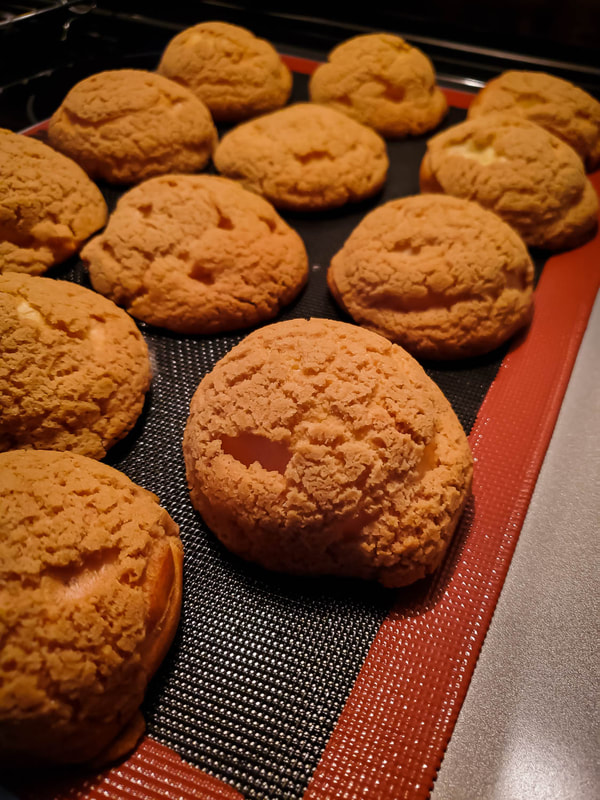
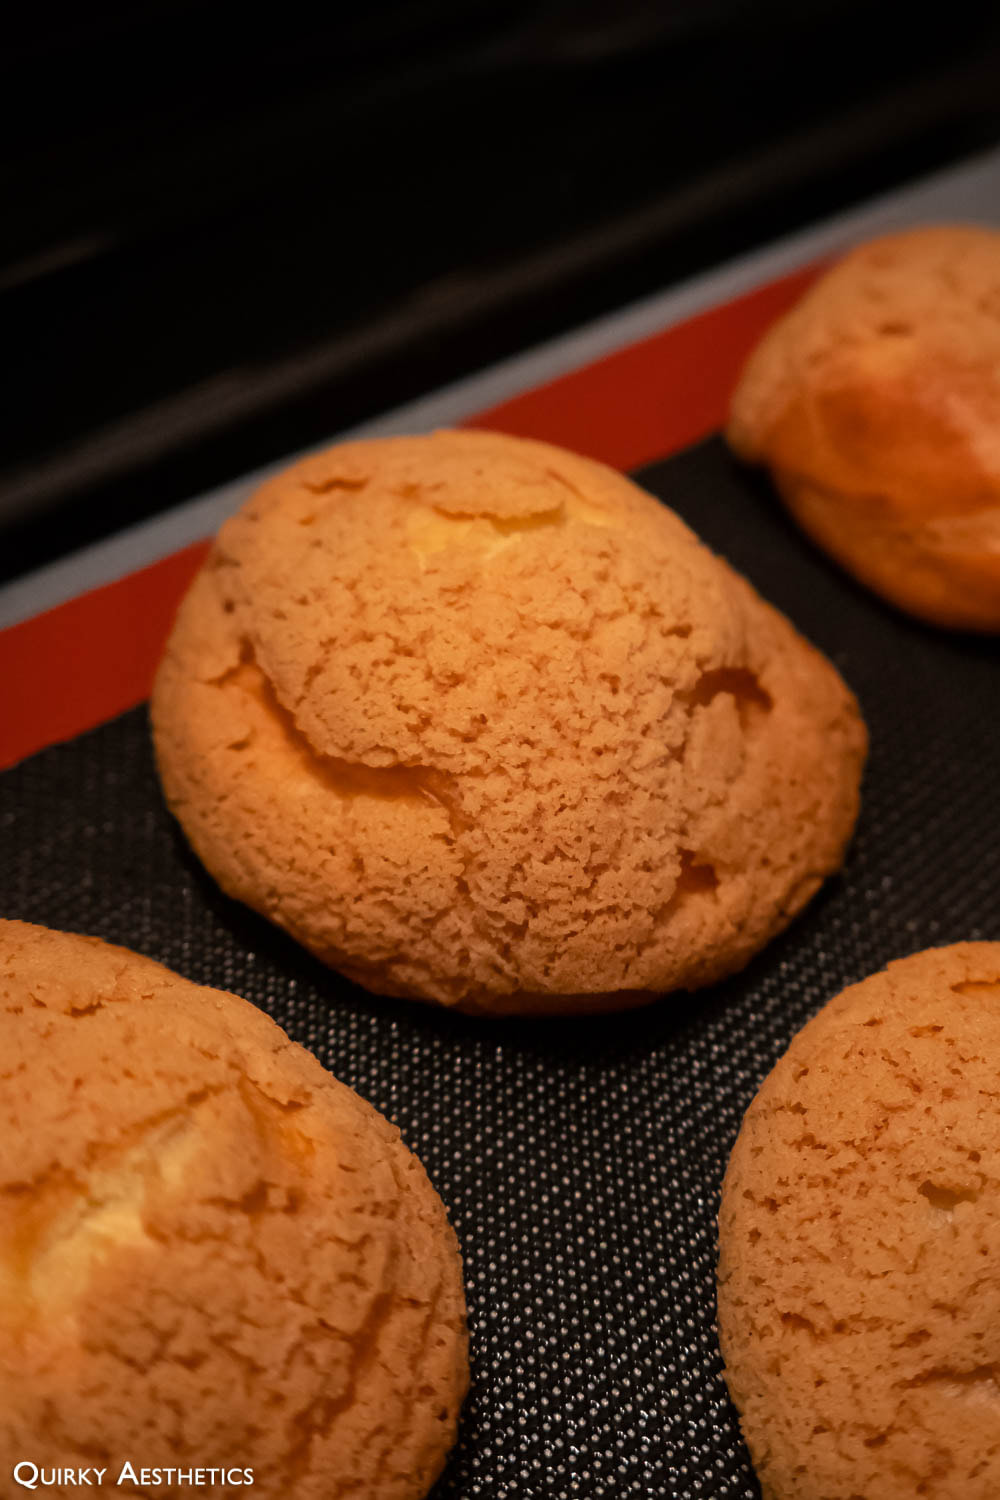
Gazing warily from the other side of the glass panel, I braced myself for the results. Unlike cakes and cookies, the rise wasn't immediate. The expansion occurred gradually, eventually reaching a point where I regretted not providing greater spacing between the guidelines to promote air flow.
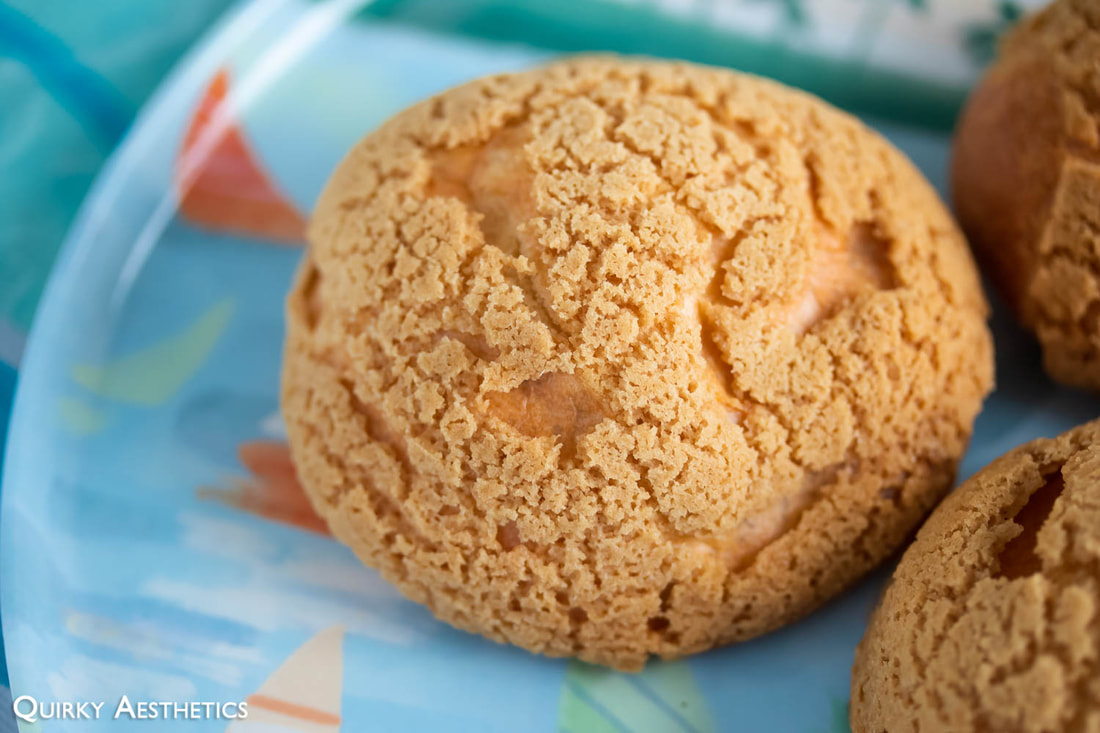
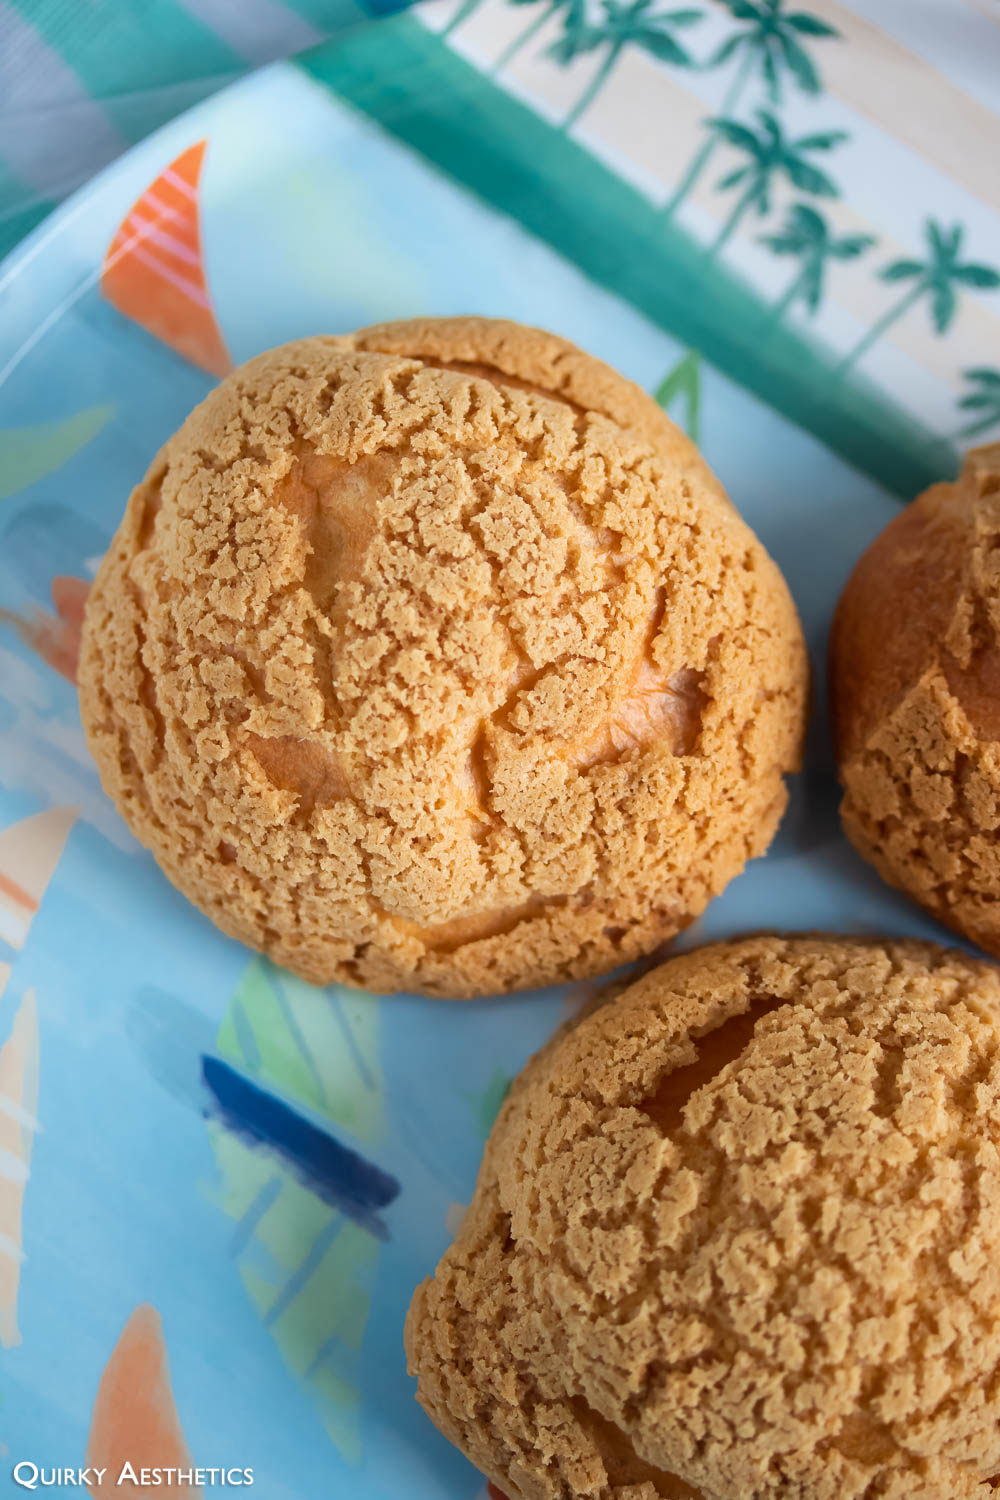
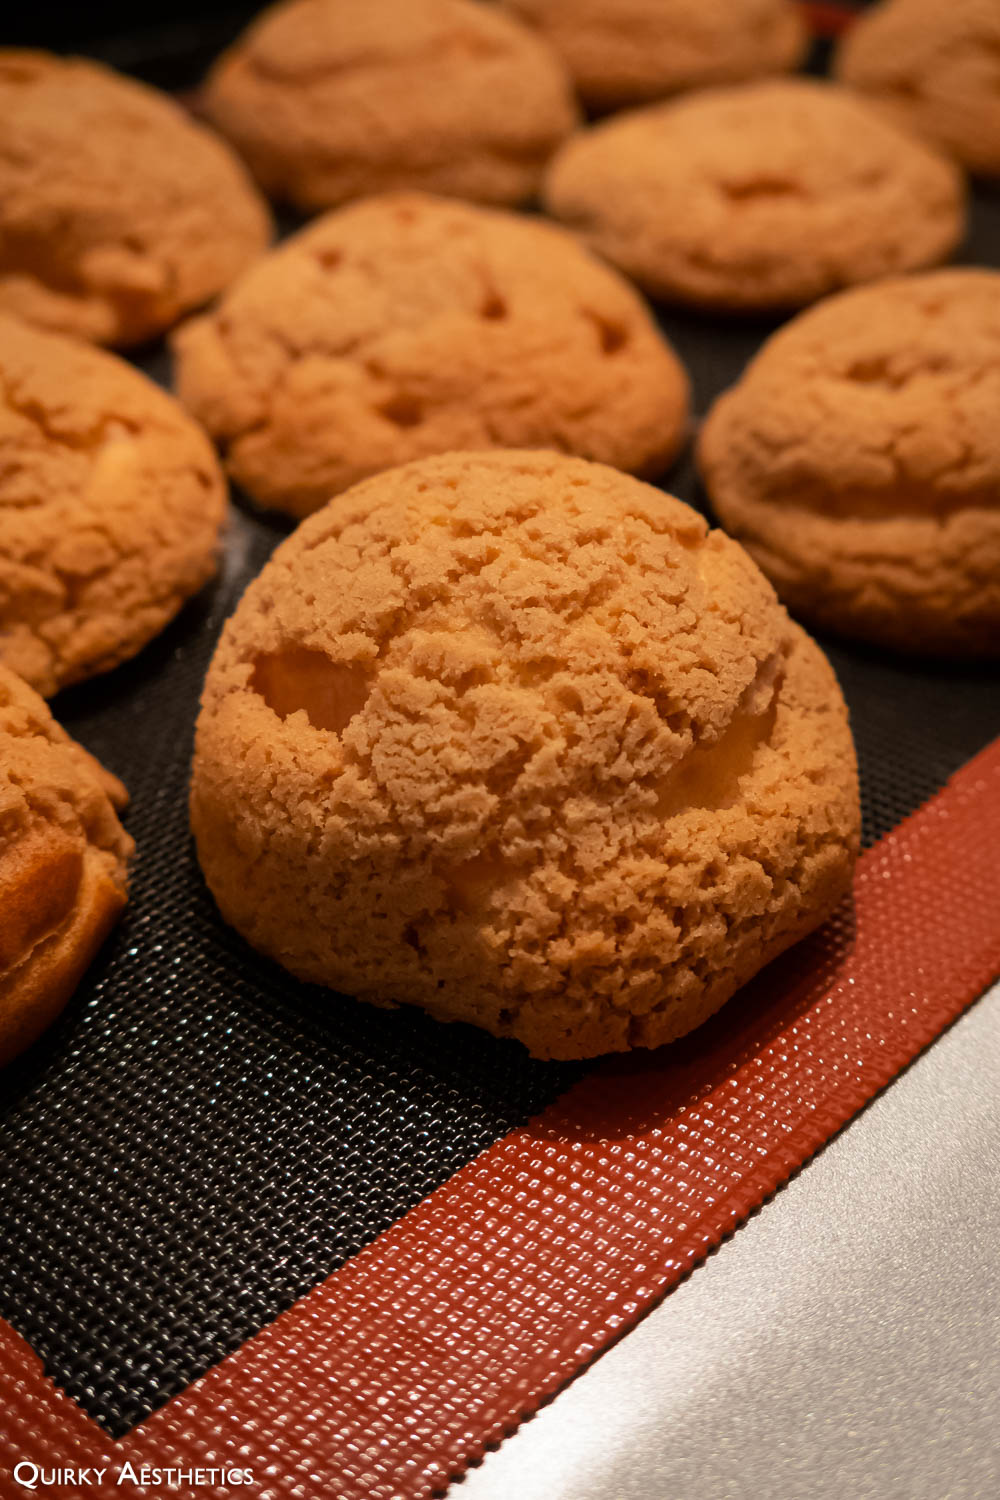
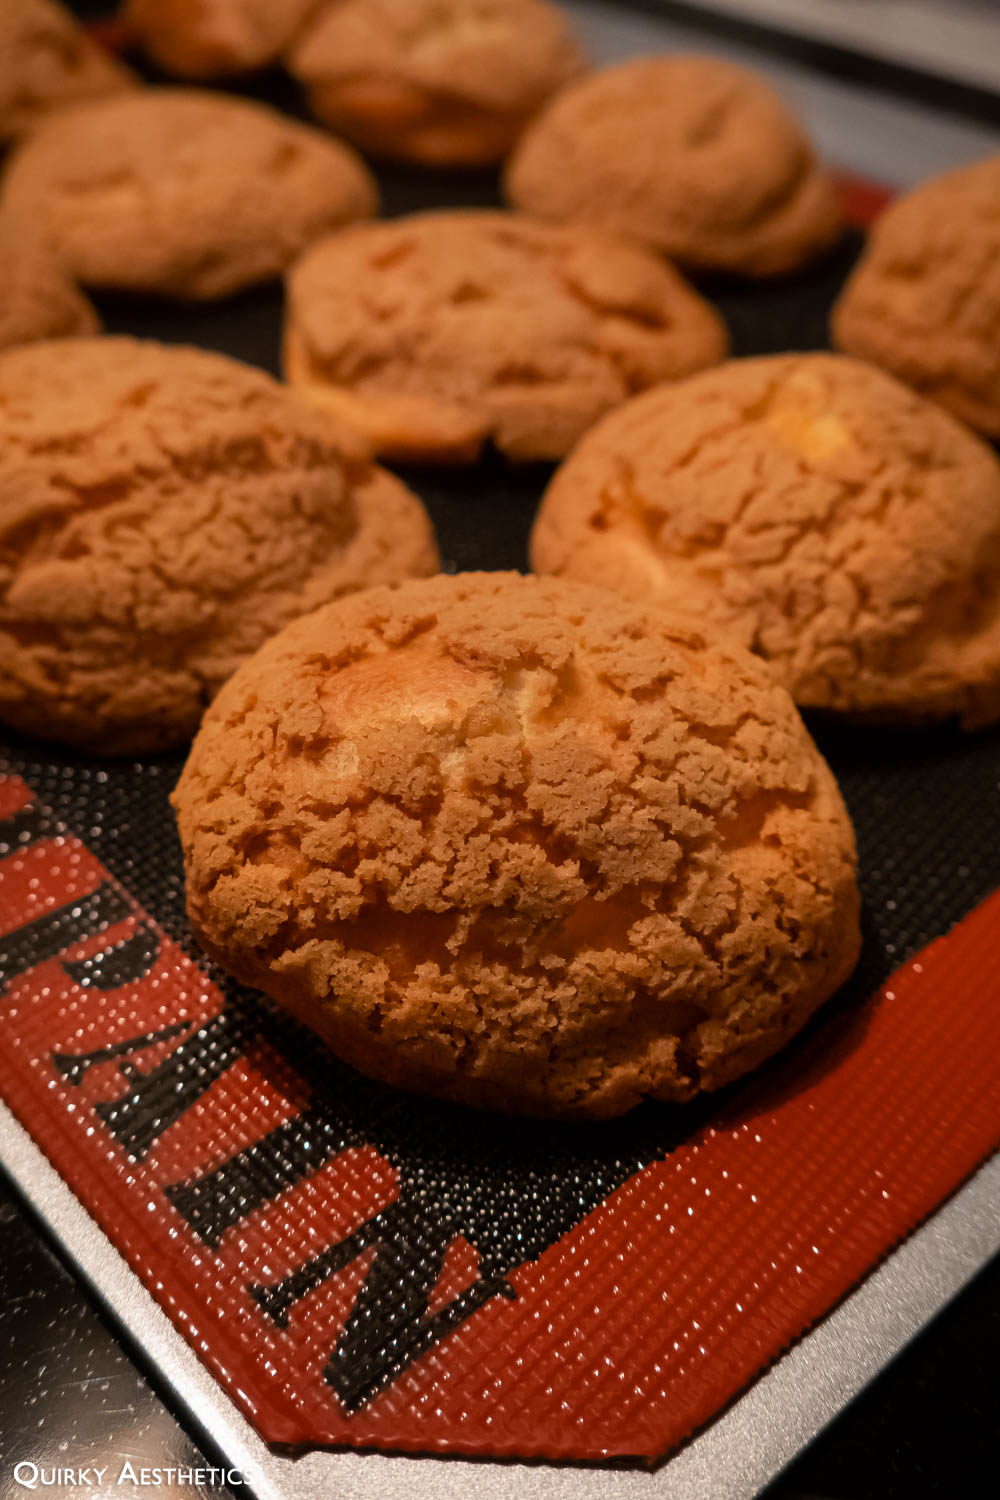
I removed the tray from the oven with glee, glad to have obtained promising visuals. Then, I turned away briefly, only to revisit the scene moments later to find my beautifully puffed rounds plummeting. All had managed a glorious, golden appearance, yet a good portion had deflated underneath the cracqueline topping, eliminating its support and causing the cookie to crack.
I removed the tray from the oven with glee, glad to have obtained promising visuals. Then, I turned away briefly, only to revisit the scene moments later to find my beautifully puffed rounds plummeting. All had managed a glorious, golden appearance, yet a good portion had deflated underneath the cracqueline topping, eliminating its support and causing the cookie to crack.
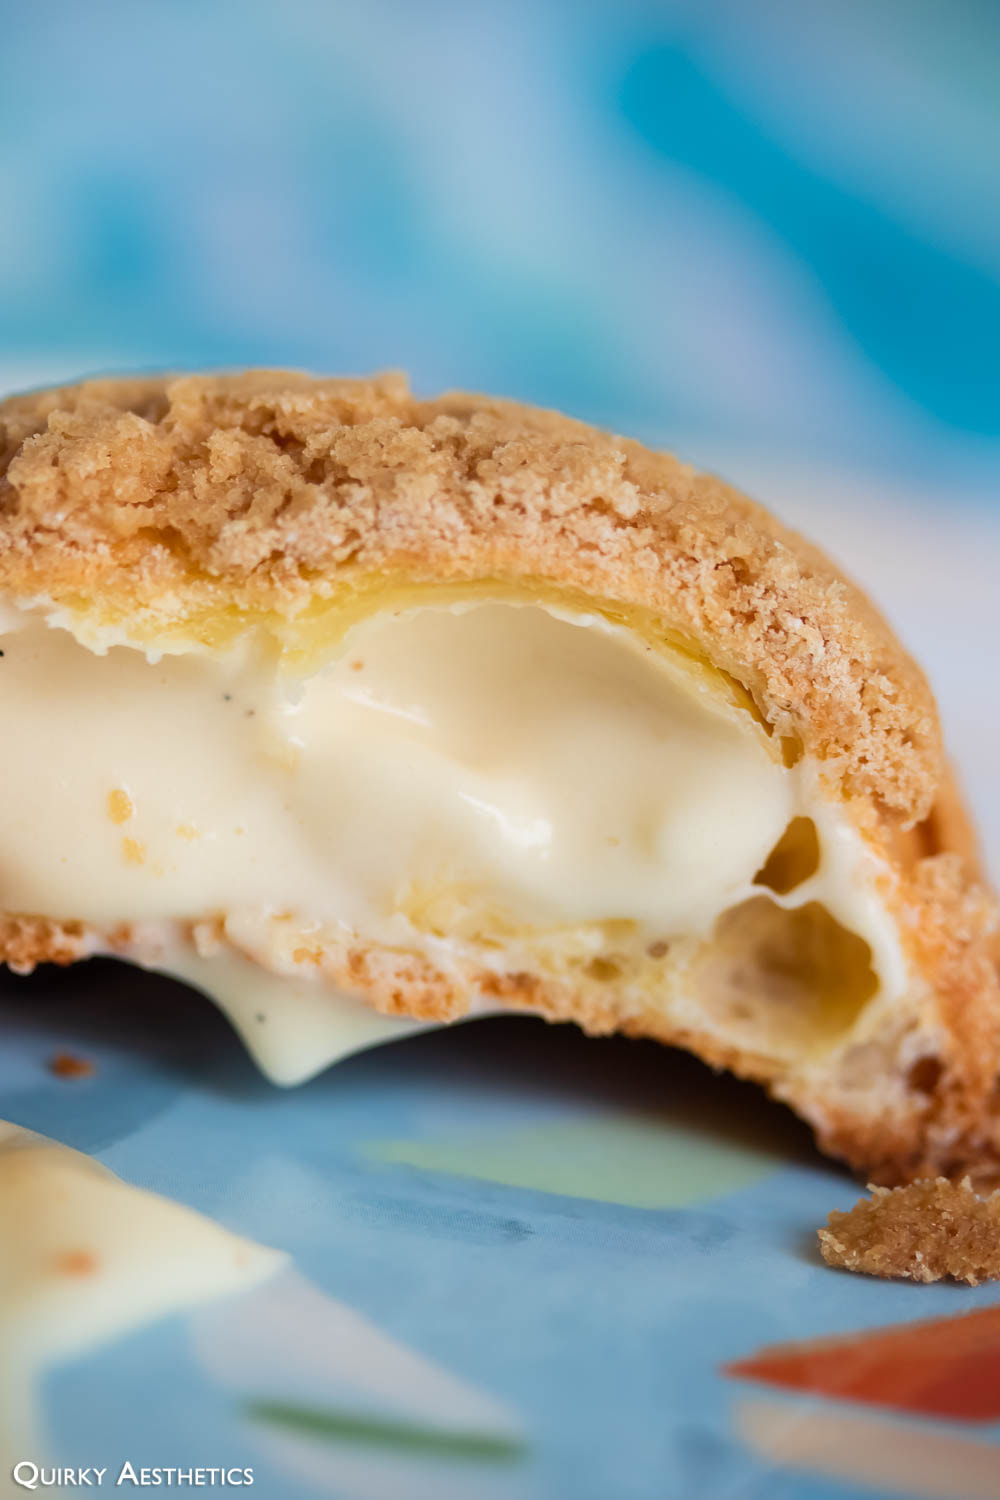
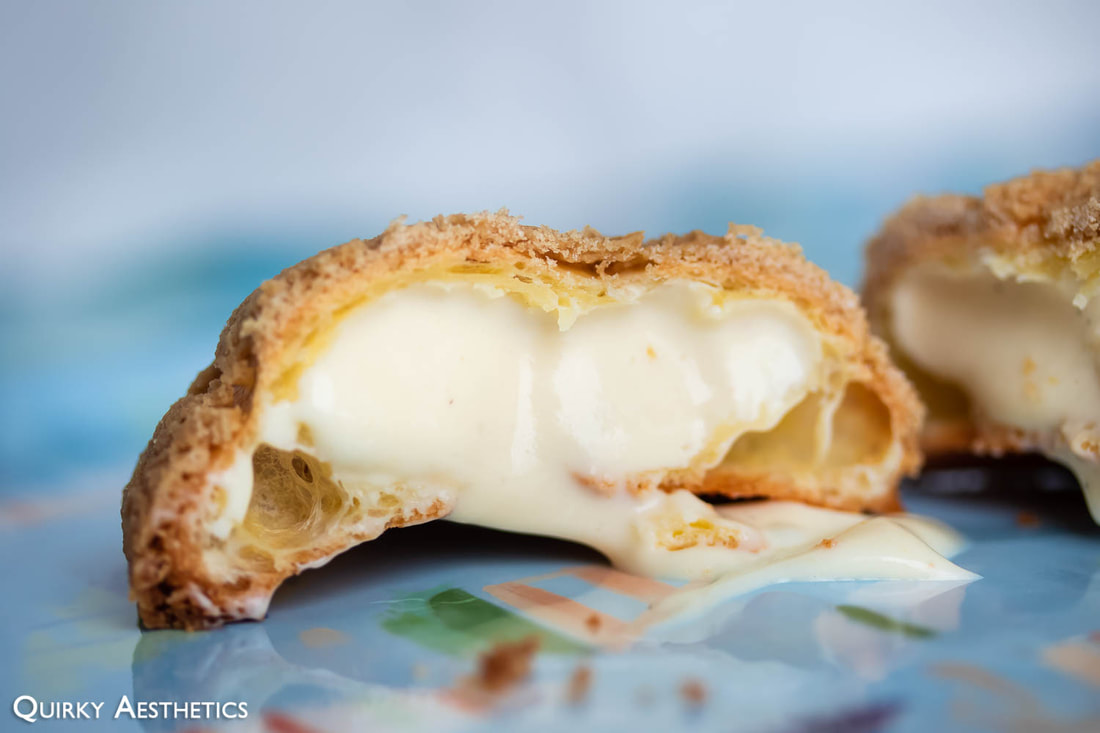
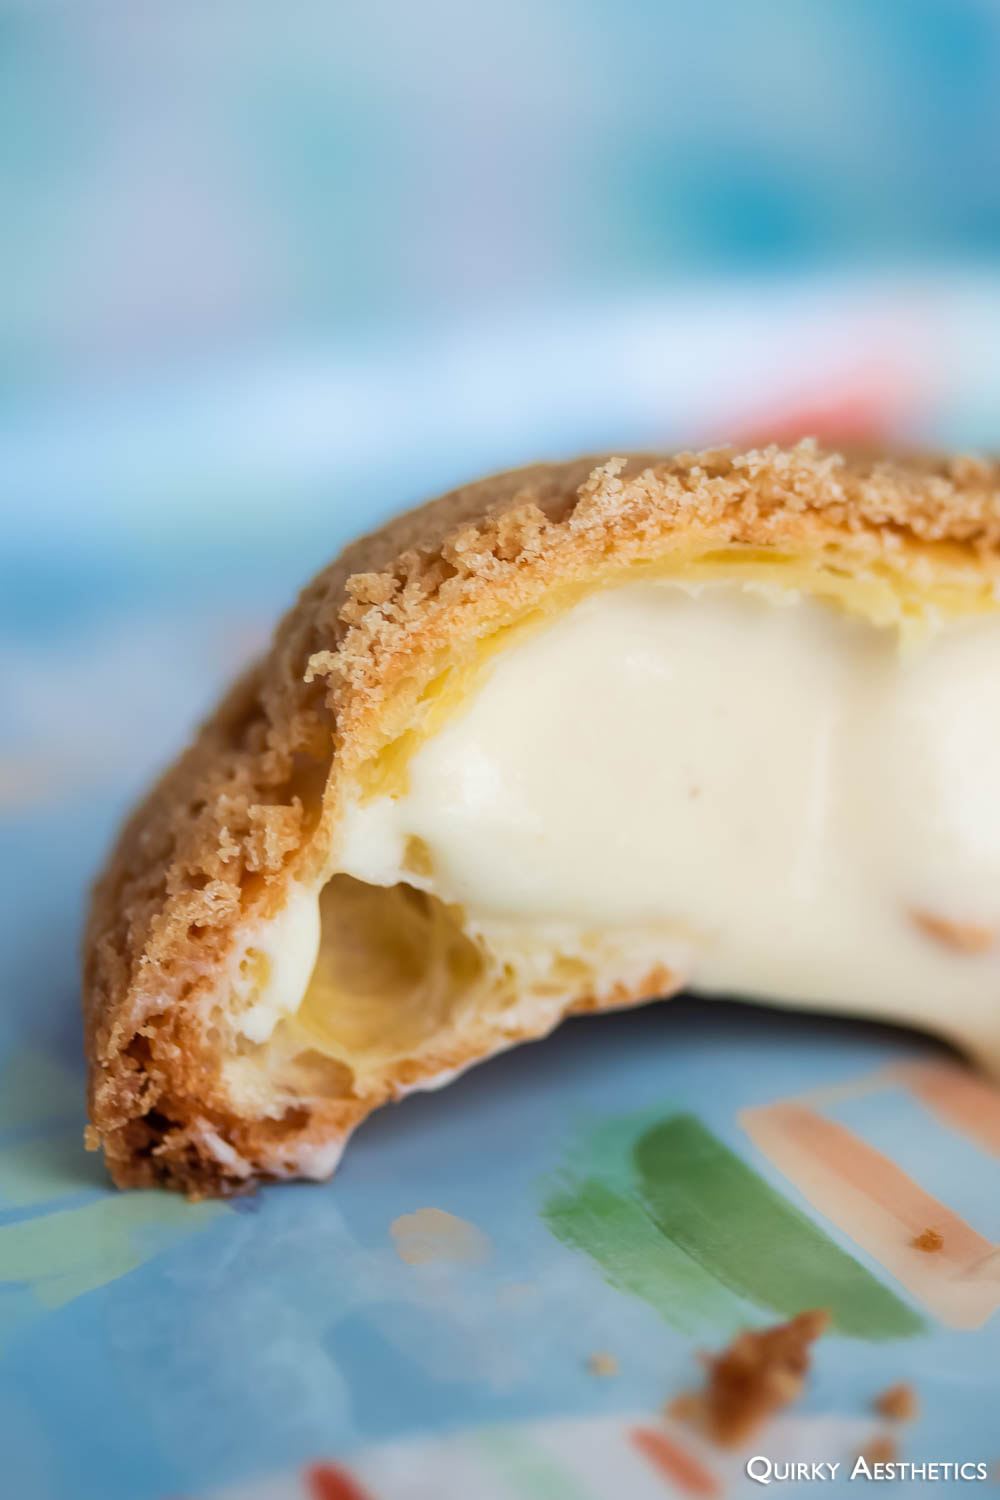
While the bottoms were as breathtakingly brilliant as their surfaces, they had appeared to curve inward in a peculiar convex fashion. Needless to say, not all would accept the embodiment of filling.
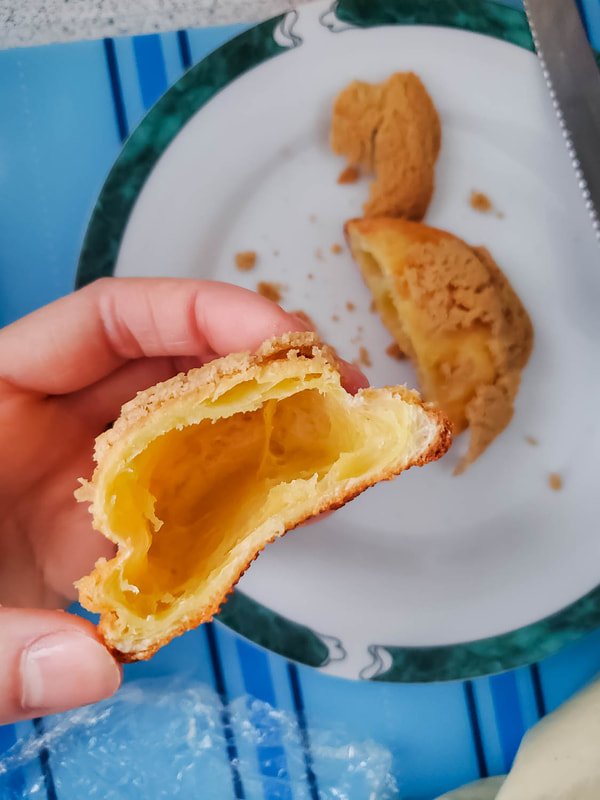 | 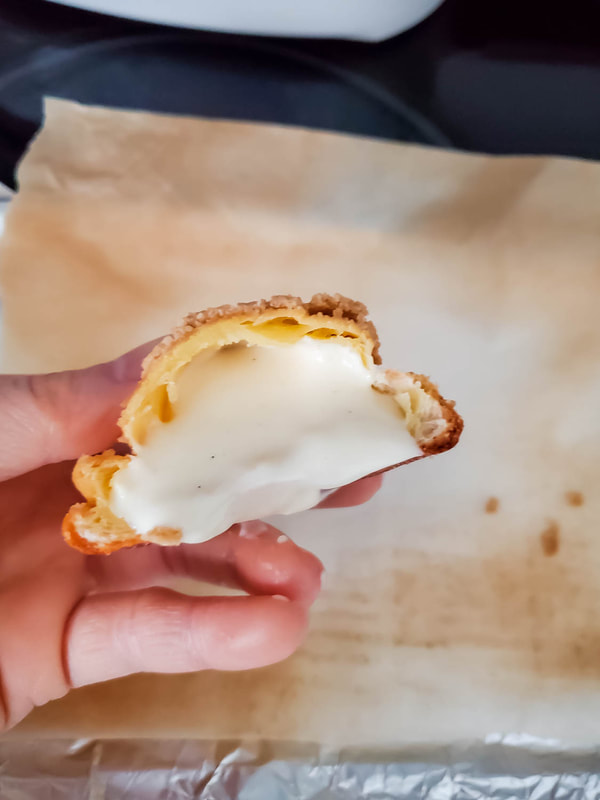 |
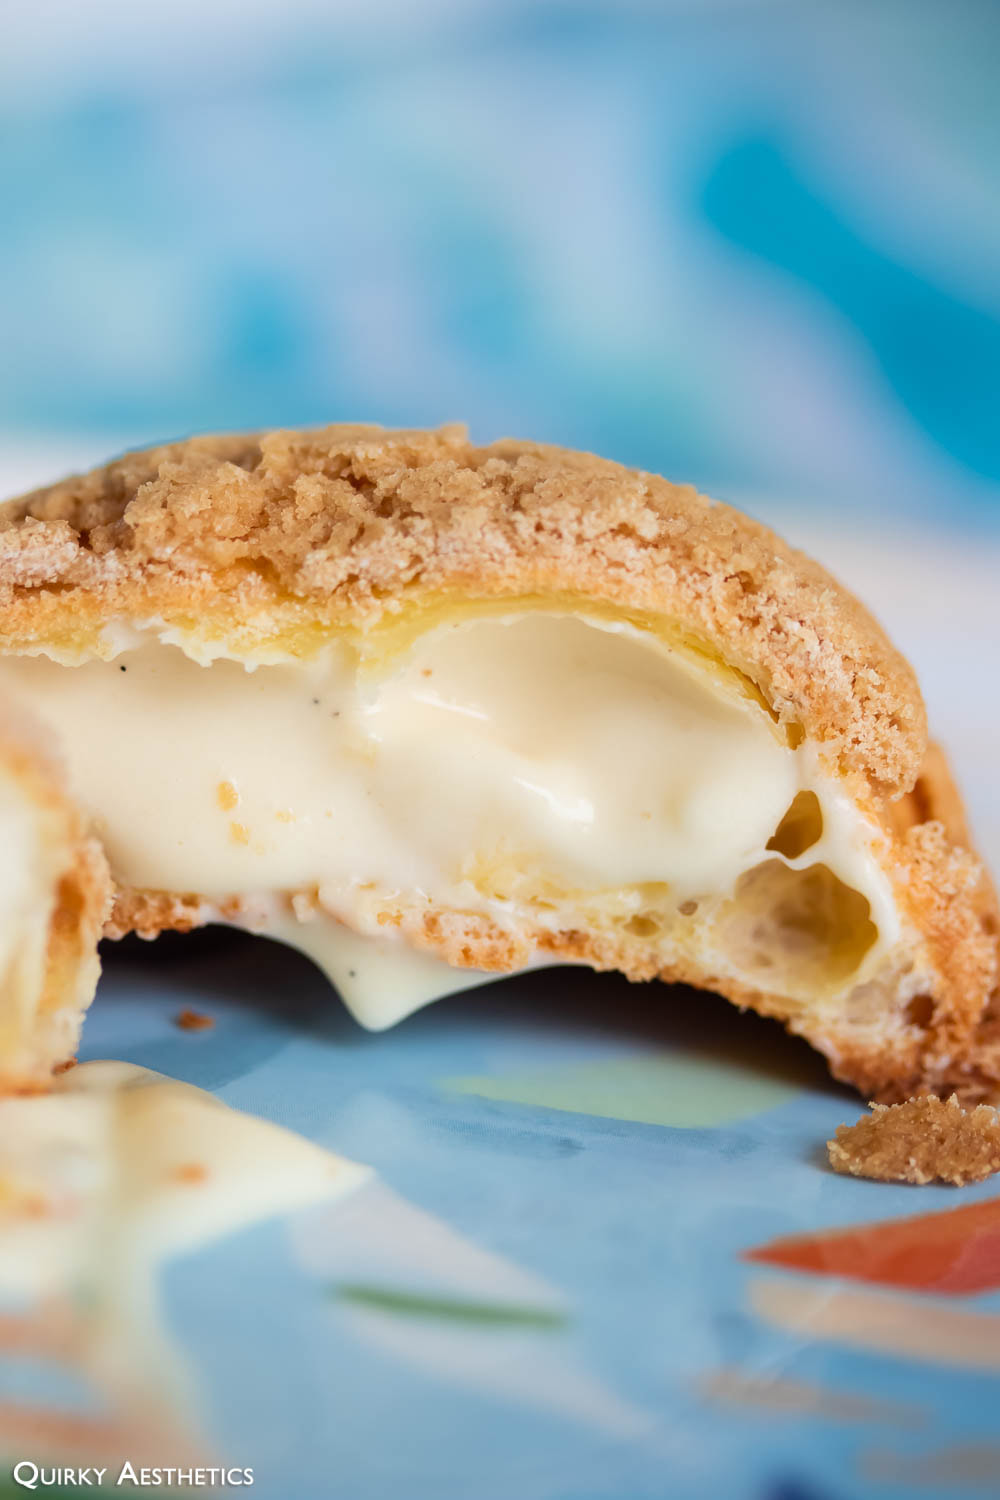
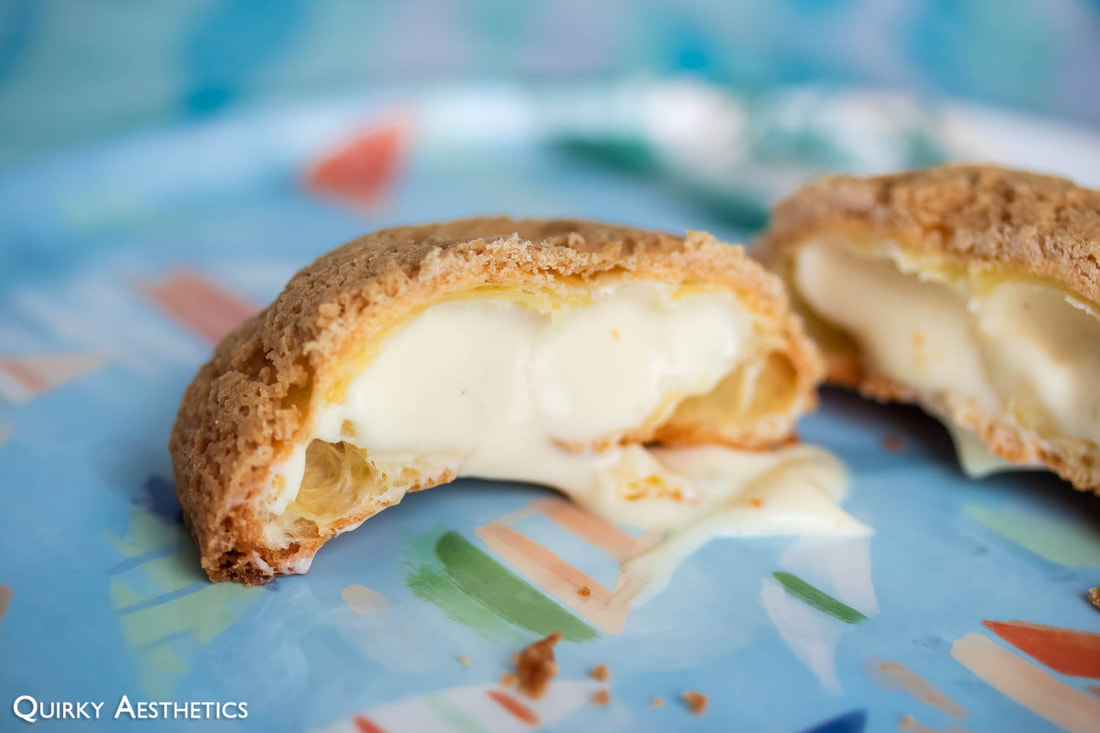
Straining the pastry cream had left me with 359 g, as opposed to Sunday's 400 g. The portion, adequately cooled after hours upon hours of labour and dishwashing, would be folded with 100 g of unsweetened heavy cream. In fear of soggy shells, the diplomat cream would only be filled before presentation and consumption. It should also be noted that the choux remained crisp when stored at room temperature for two days, but faltered on the third. Toasting slightly would reinstate buttery aromas and craquelin's signature crunch, though makes for trickier piping due to the temperature difference of the shell and cream.
Interestingly, even after hours of chilling, the cream was still quite loose. The runny consistency, in conjunction with imperfect pâte à choux, made for quite the challenging eating process.
Interestingly, even after hours of chilling, the cream was still quite loose. The runny consistency, in conjunction with imperfect pâte à choux, made for quite the challenging eating process.
Post-production consultation with Sunday Baking discussed several elements of the process:
Her gracious - not to mention speedy! - troubleshooting assistance allowed us to narrow down potential causes for subsequent trials. Lumpiness in the batter was learned to be a consequence of not mixing the flour vigorously enough in the dough-forming stagings. This was evident in the non-uniform caved bottoms across the batch.
Moreover, the collapse could also have been alluded to an excess of egg and insufficient flour for support. Doneness and temperature preservation appeared to be handled decently, for the choux was golden and cooked through.
- Uniform mixing of flour to ensure gluten development for structure
- Quantity of beaten egg
- Preserving oven temperature while baking - absolutely no opening of oven door
- Doneness - Was the choux cooked inside?
Her gracious - not to mention speedy! - troubleshooting assistance allowed us to narrow down potential causes for subsequent trials. Lumpiness in the batter was learned to be a consequence of not mixing the flour vigorously enough in the dough-forming stagings. This was evident in the non-uniform caved bottoms across the batch.
Moreover, the collapse could also have been alluded to an excess of egg and insufficient flour for support. Doneness and temperature preservation appeared to be handled decently, for the choux was golden and cooked through.
 |  |
She assured me that construction of choux pastry was not a simple skill to conquer, and that the next attempt would be better. Drawing from personal experience, the process may even prove more challenging that laminated pastry for it demands more than just time and temperature control.
It dawned on me that developing a robust foundation of pastry-making basics as a hobbyist home baker would constitute no easy feat. Yet, I was particularly privileged to be have crossed paths with Sunday, both virtually and physically. A disciple in my own right, this space documents the efforts undertaken, data documented, and guidance received to progress my self-led journey to baking excellence.
It dawned on me that developing a robust foundation of pastry-making basics as a hobbyist home baker would constitute no easy feat. Yet, I was particularly privileged to be have crossed paths with Sunday, both virtually and physically. A disciple in my own right, this space documents the efforts undertaken, data documented, and guidance received to progress my self-led journey to baking excellence.
2) Chocolate Olive Oil Cake + Swiss Buttercream
Beyond Cookie Choux, a second project had been constructed in parallel.
Beyond Cookie Choux, a second project had been constructed in parallel.
 |  |
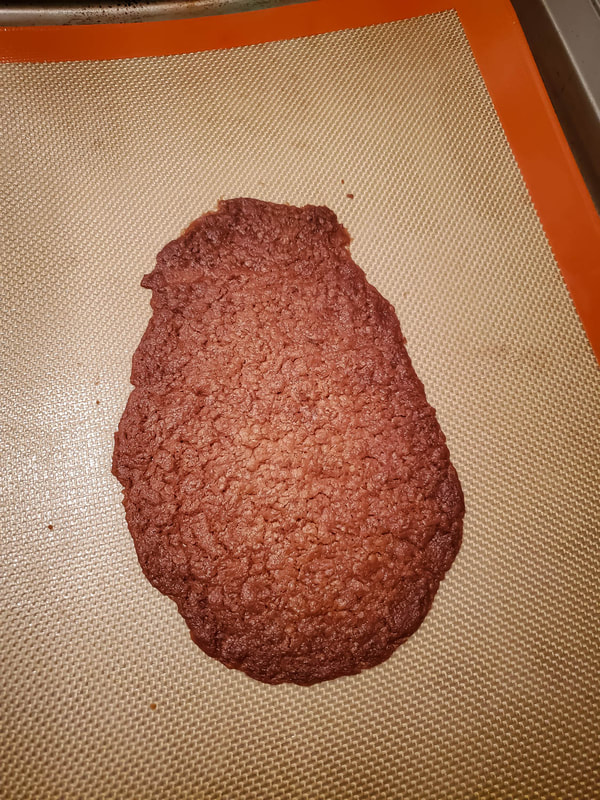
SK's chocolate olive oil cake had entered my radar recently through perusal of her newsletter. The entirely vegan composition seemed easy enough: olive oil, cocoa power, water, and three teaspoons of apple cider vinegar, plus a lot of mixing. Though I've never been keen on vegan recipes - can you blame me after the vegan Pumpkin Snacking Cake? - the product, in principle, had been claimed as "an excellent layer cake". The description echoed in my mind as a suitable counterpart for buttercream, my solution to a sudden excess of egg whites.
Construction of the cake base was as straightforward as anticipated. The batter was runny, as to be expected of its high liquid content, but frothed sufficiently given its inclusion of baking soda, apple cider vinegar, and brown sugar. For the record, the sugars had been swapped in favour of less white, no brown, and more golden yellow, with the comparison as follows:
Unlikely were these swaps to have impacted the structure of the cake tremendously, however, the results were utterly dissimilar to the images featured on the website. Baked in two 6-inch aluminum pans instead of one shallow 9-in aluminum pan, the sides began to peel away after twenty-five minutes, though the centre remained damp and jiggly. Additional bursts of ten, then fifteen, then another ten would allow the cake to solidify. While the surface began to shrivel, the centre began to collapse. It was still damp.
- 120 g of granulated sugar, instead of 150 g
- 180 g of golden yellow sugar, instead of 145 dark brown sugar
Unlikely were these swaps to have impacted the structure of the cake tremendously, however, the results were utterly dissimilar to the images featured on the website. Baked in two 6-inch aluminum pans instead of one shallow 9-in aluminum pan, the sides began to peel away after twenty-five minutes, though the centre remained damp and jiggly. Additional bursts of ten, then fifteen, then another ten would allow the cake to solidify. While the surface began to shrivel, the centre began to collapse. It was still damp.
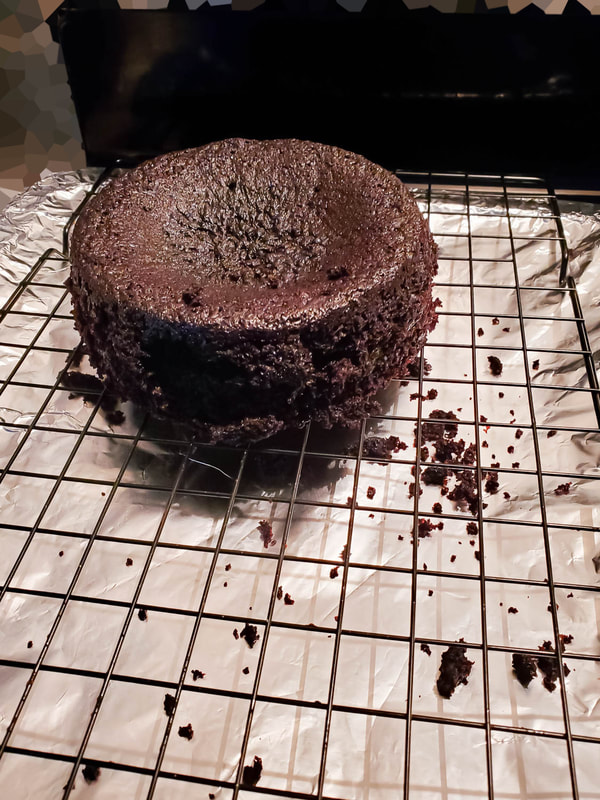 | 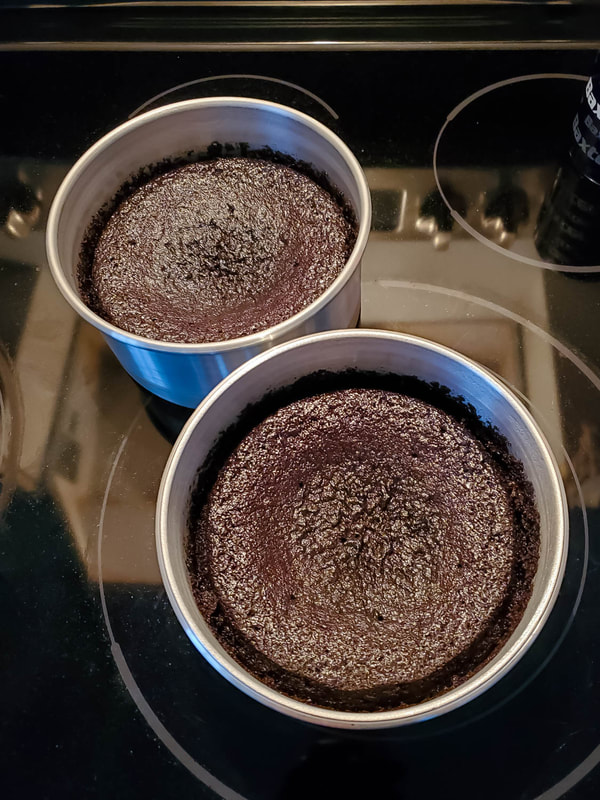 |
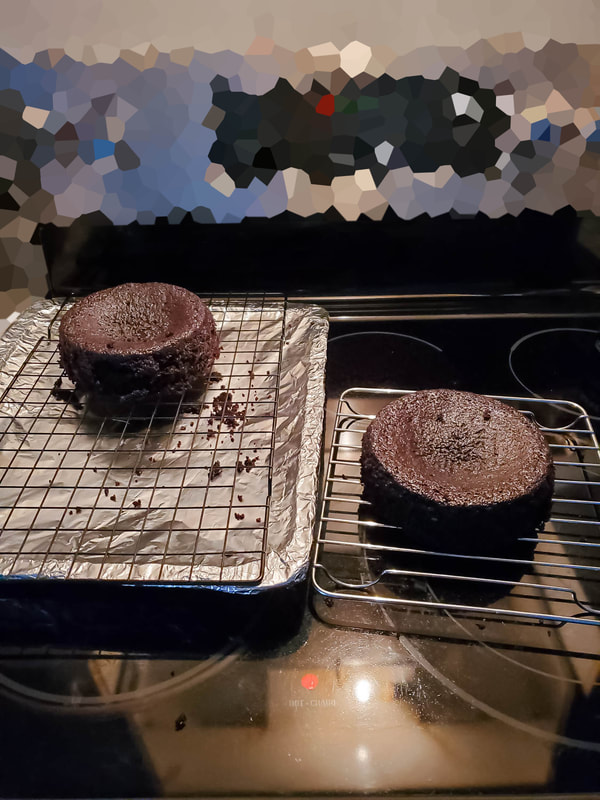
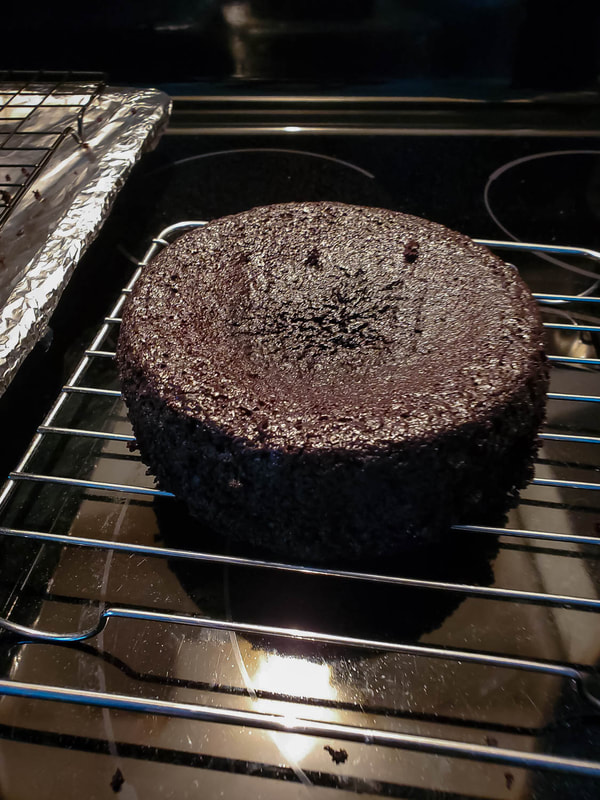
Truthfully, the chocolate olive oil cake had merely been an oven primer for the Cookie Choux - to ensure thorough circulation of heat prior to my prized production. The cake rounds were removed from the oven once deemed somewhat sturdy and allowed to cool completely before unmoulding.
The tops were removed, for the obvious reason of attaining uniform surfaces. Scraps sampled by yours truly radiated an astringency about them: not unreacted baking soda, but the signature savouriness of olive oil paired with copious amounts of cocoa powder.
I wasn't a fan. Neither had I been fond of my olive oil and cocoa powder inventory being depleted so soon!
 |  |
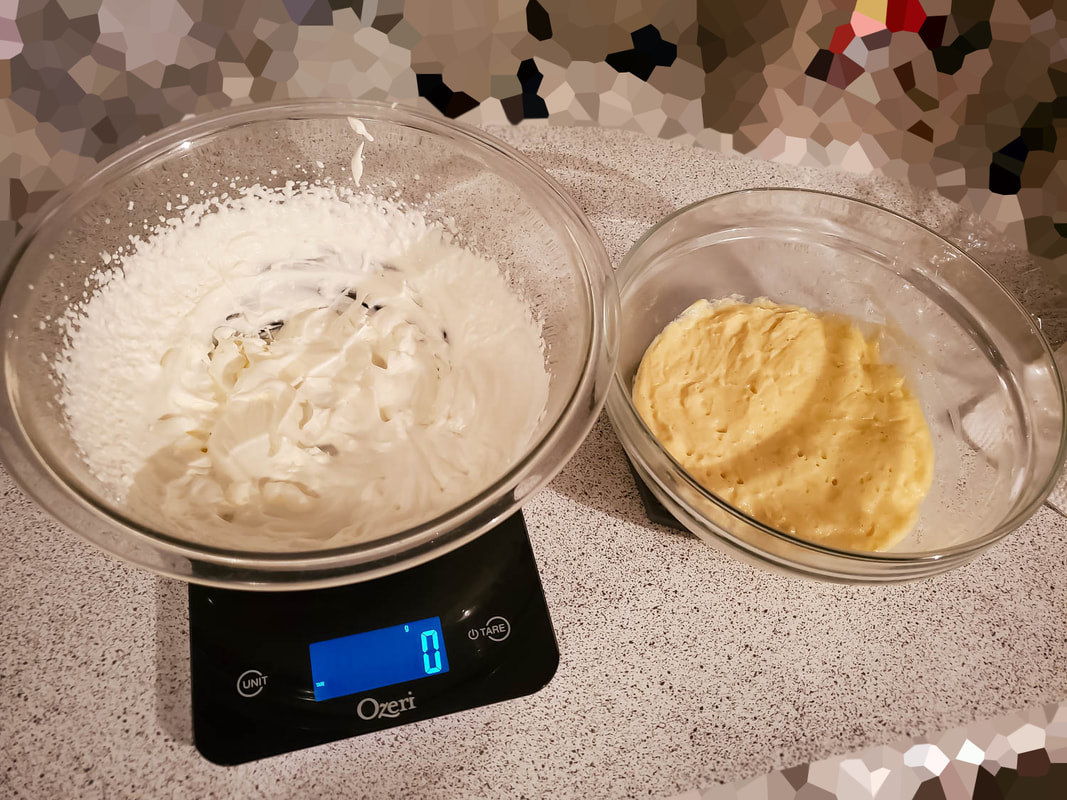
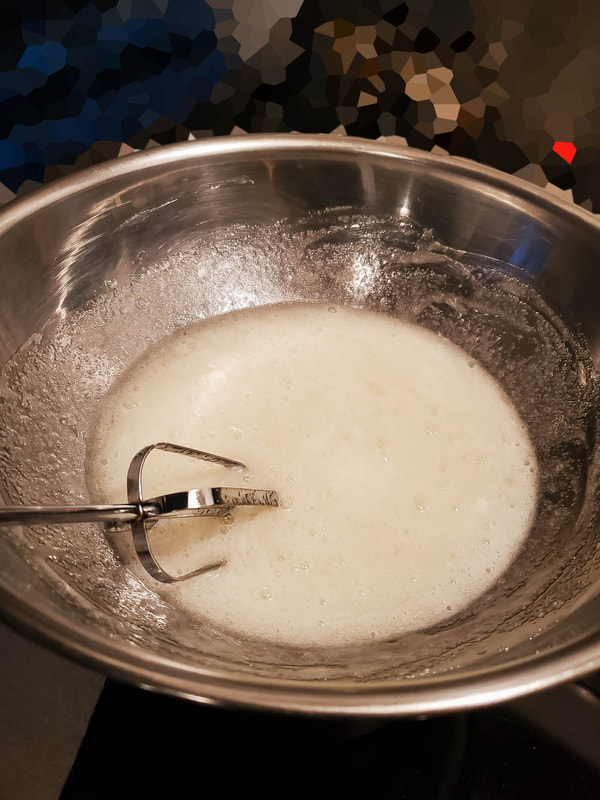
Growing more fatigued by the minute, Italian Buttercream was dismissed for Swiss Buttercream instead. 160 g of egg whites remained. The ratio, according to King Arthur Baking, would adopt the below:
1) Sugar
Egg whites x 2.2 = 160 x 2.2 = 352 g
2) Butter
Egg whites x 3 = 160 x 3 = 480 g
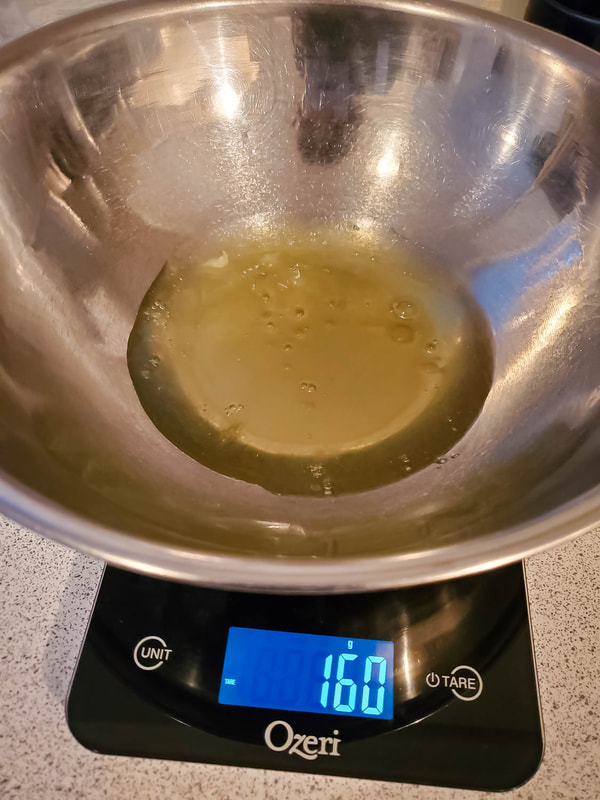
But I was running low on butter. The remaining stick weighed in at 327 g. I proceeded with this 47% reduction of fat, willing the meringue to provide stability and compensating any excess sweetness with additives of espresso and melted chocolate.
Swiss buttercream prevailed as the safer, forgiving alternative to Italian buttercream, as my egg white-sugar mixture had surpassed its required 162 F (reaching 180 F!!) when I came to the realization. Persistent whipping enabled formation of the meringue still, but the mixture was hardly spreadable after incorporation of partially melted butter chunks. It goes without saying that a stand mixer is the optimal weapon of choice for this venture, though I have none and resorted to my trusty hand mixer.
1) Sugar
Egg whites x 2.2 = 160 x 2.2 = 352 g
2) Butter
Egg whites x 3 = 160 x 3 = 480 g
But I was running low on butter. The remaining stick weighed in at 327 g. I proceeded with this 47% reduction of fat, willing the meringue to provide stability and compensating any excess sweetness with additives of espresso and melted chocolate.
Swiss buttercream prevailed as the safer, forgiving alternative to Italian buttercream, as my egg white-sugar mixture had surpassed its required 162 F (reaching 180 F!!) when I came to the realization. Persistent whipping enabled formation of the meringue still, but the mixture was hardly spreadable after incorporation of partially melted butter chunks. It goes without saying that a stand mixer is the optimal weapon of choice for this venture, though I have none and resorted to my trusty hand mixer.
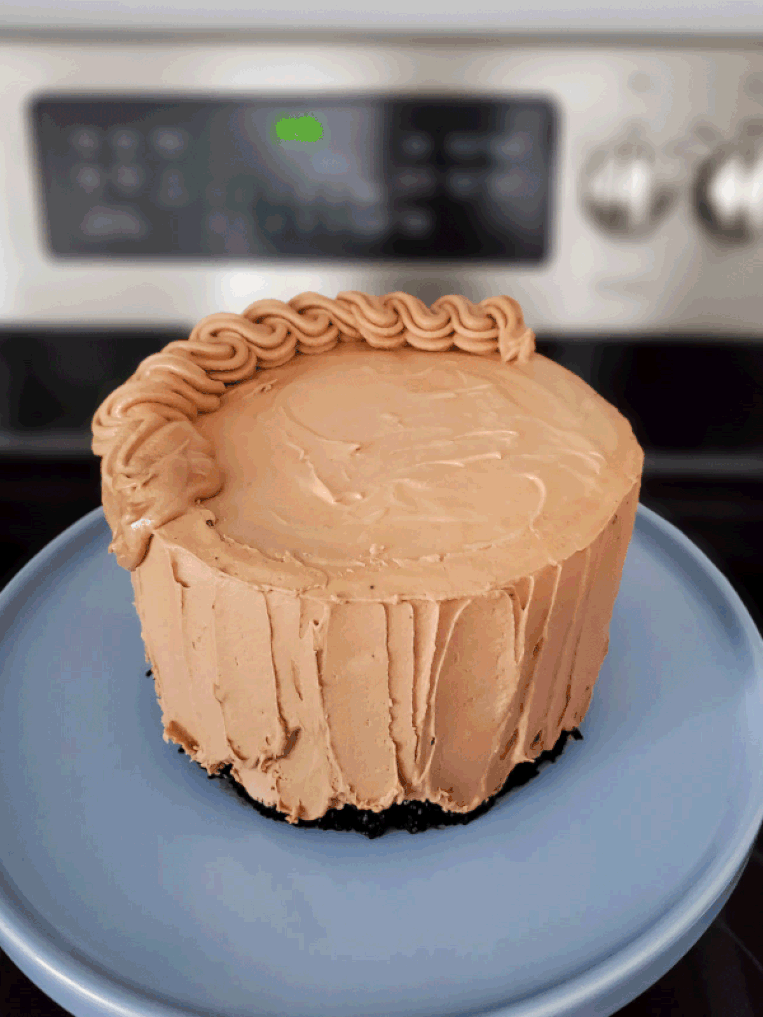
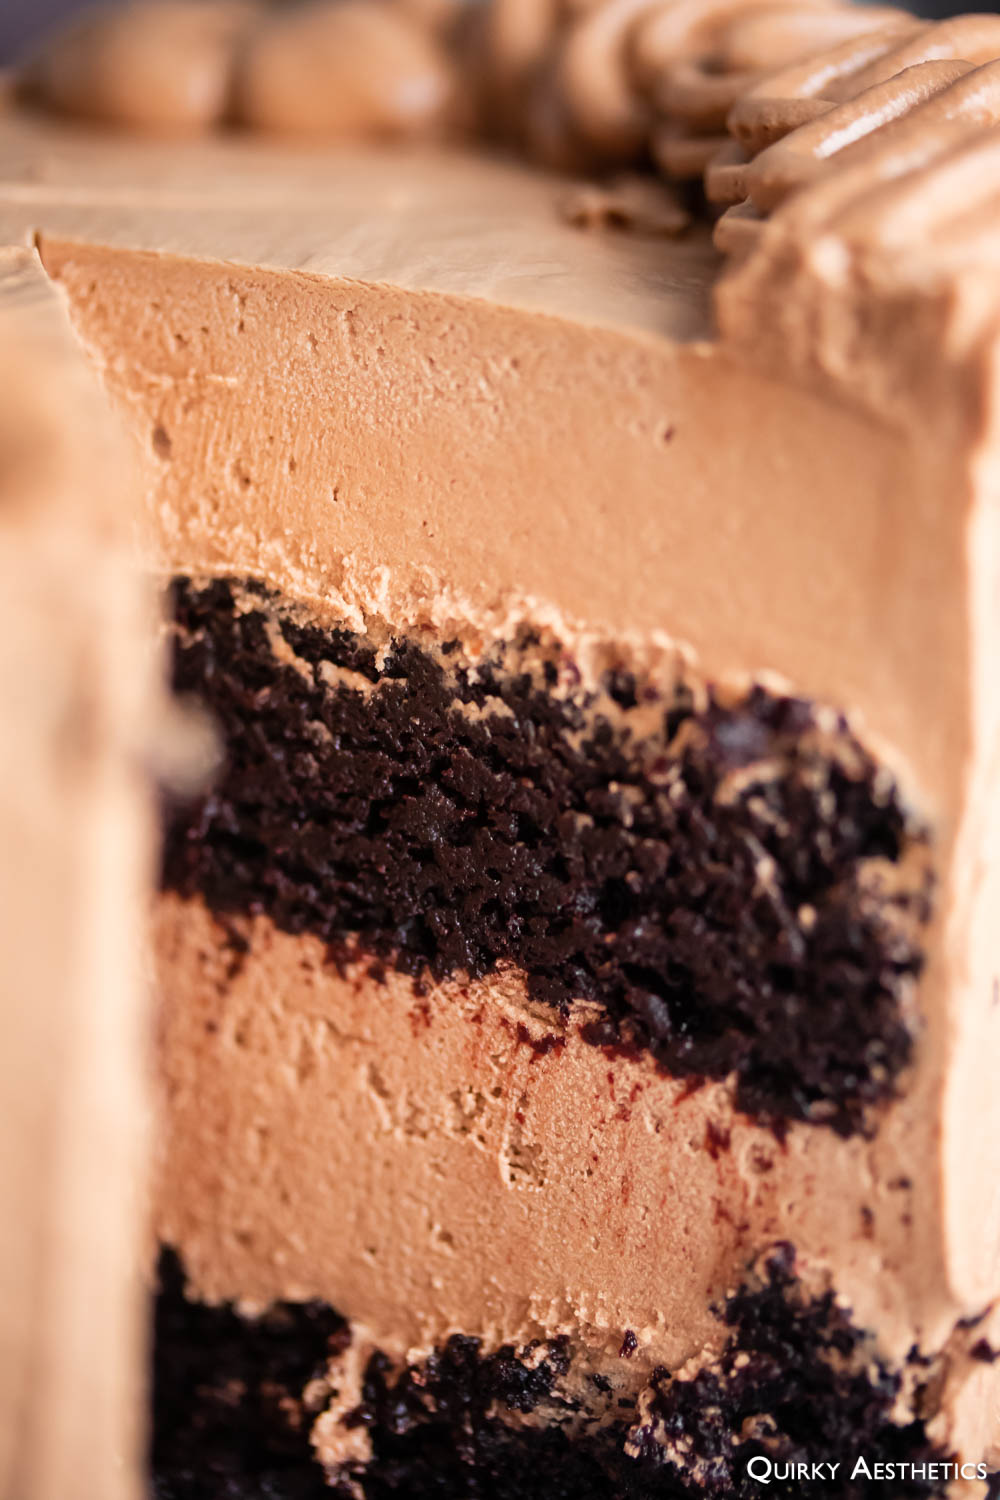
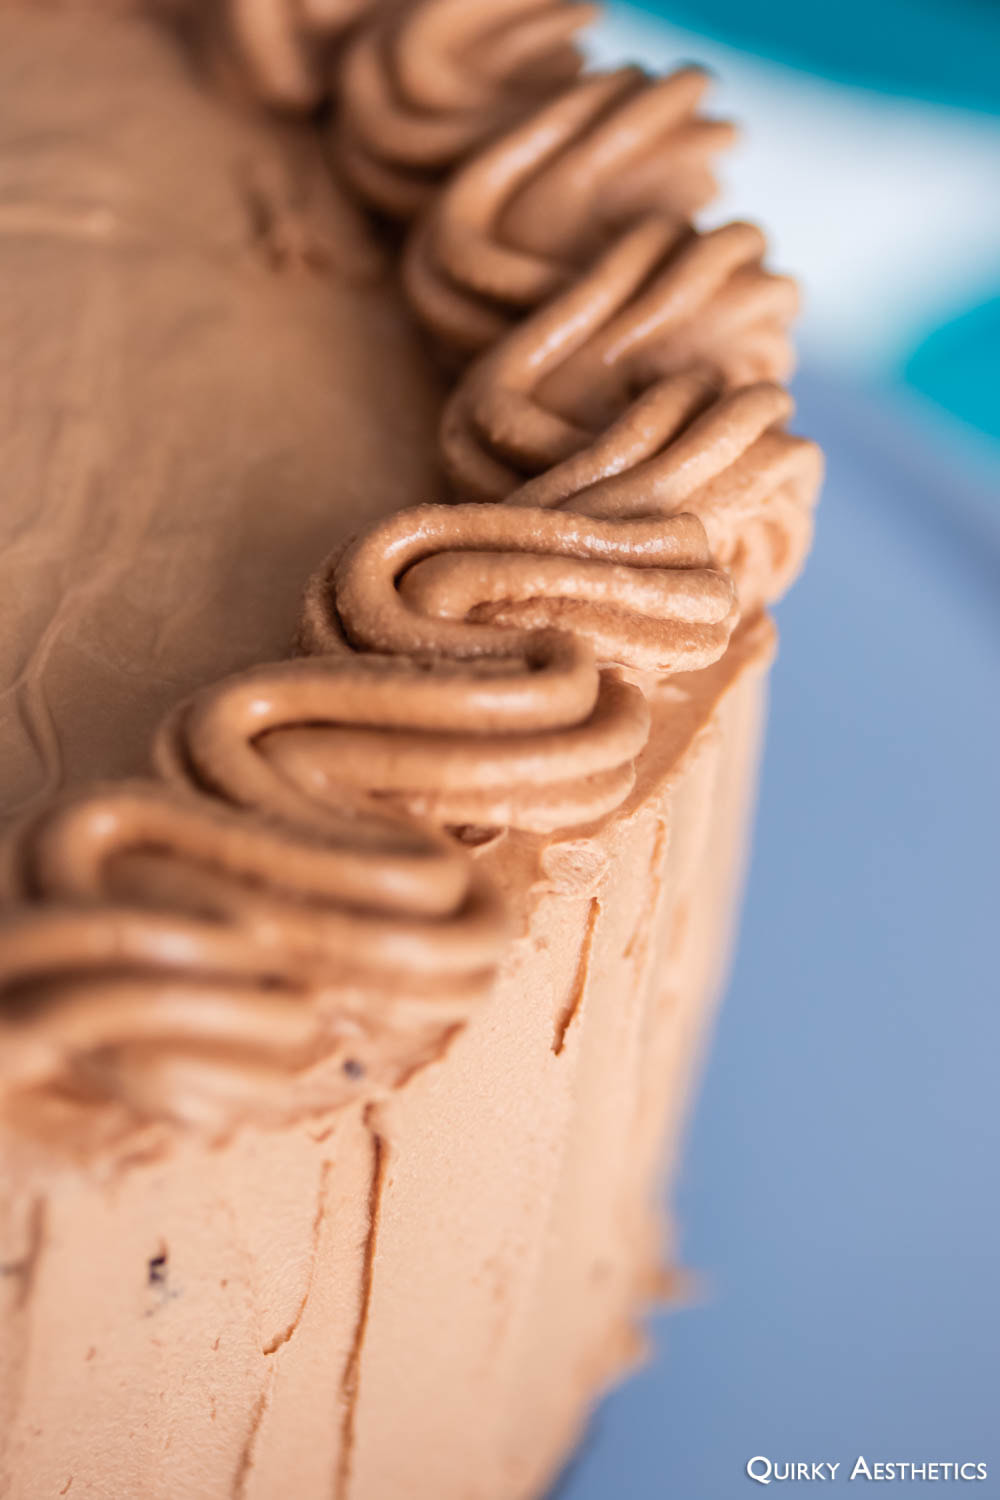
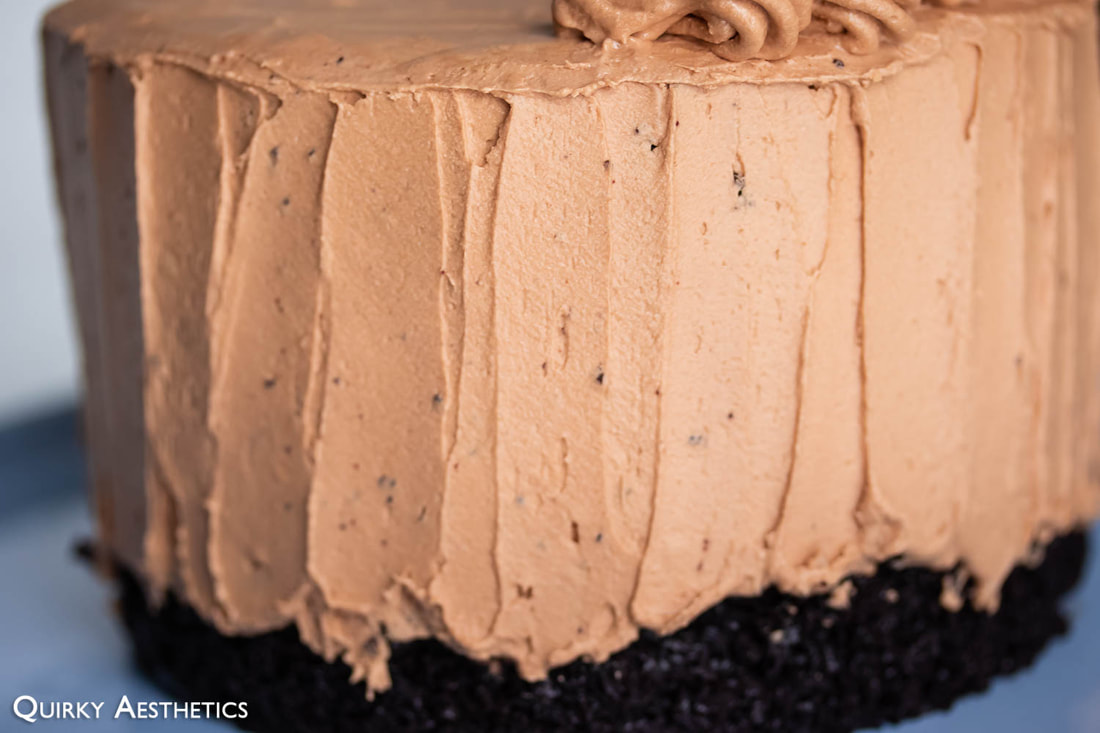
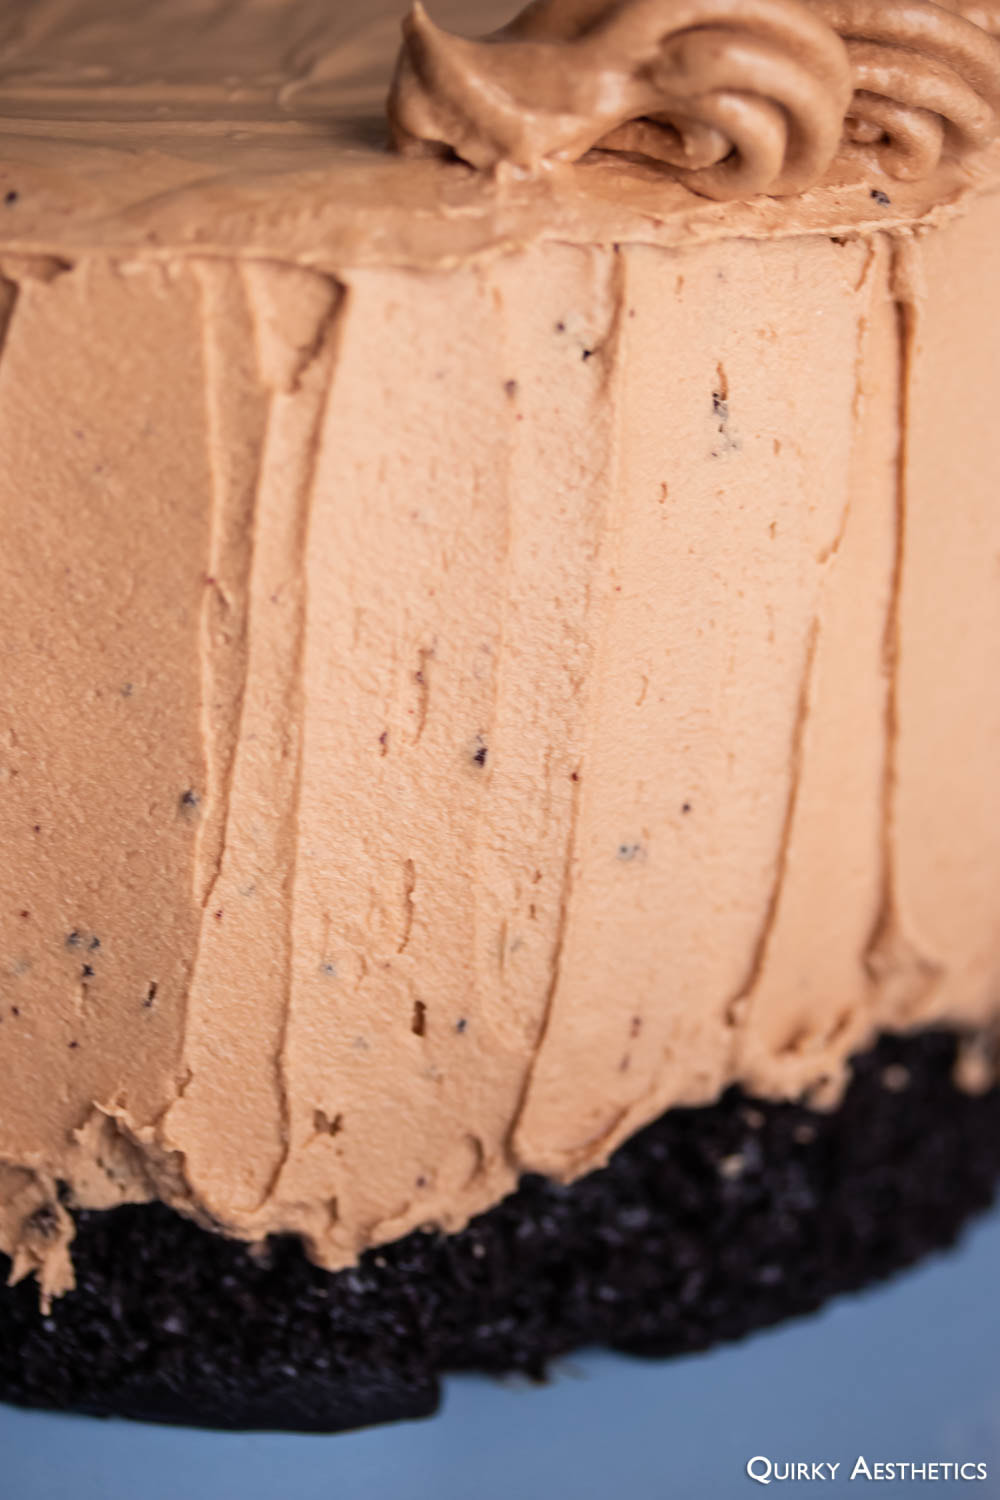
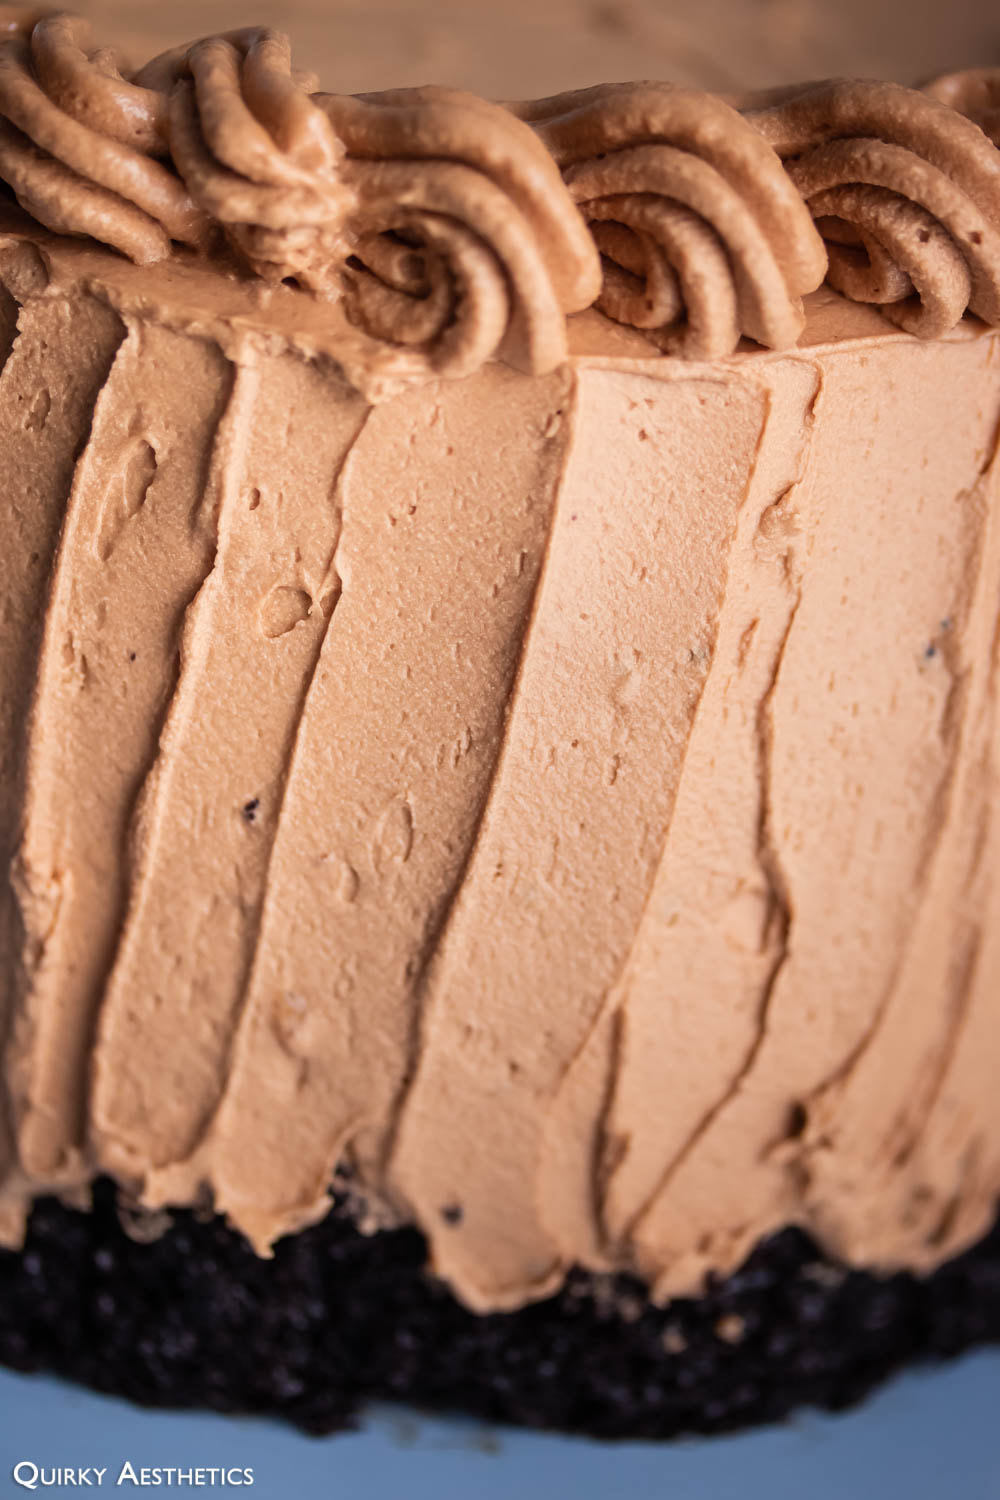
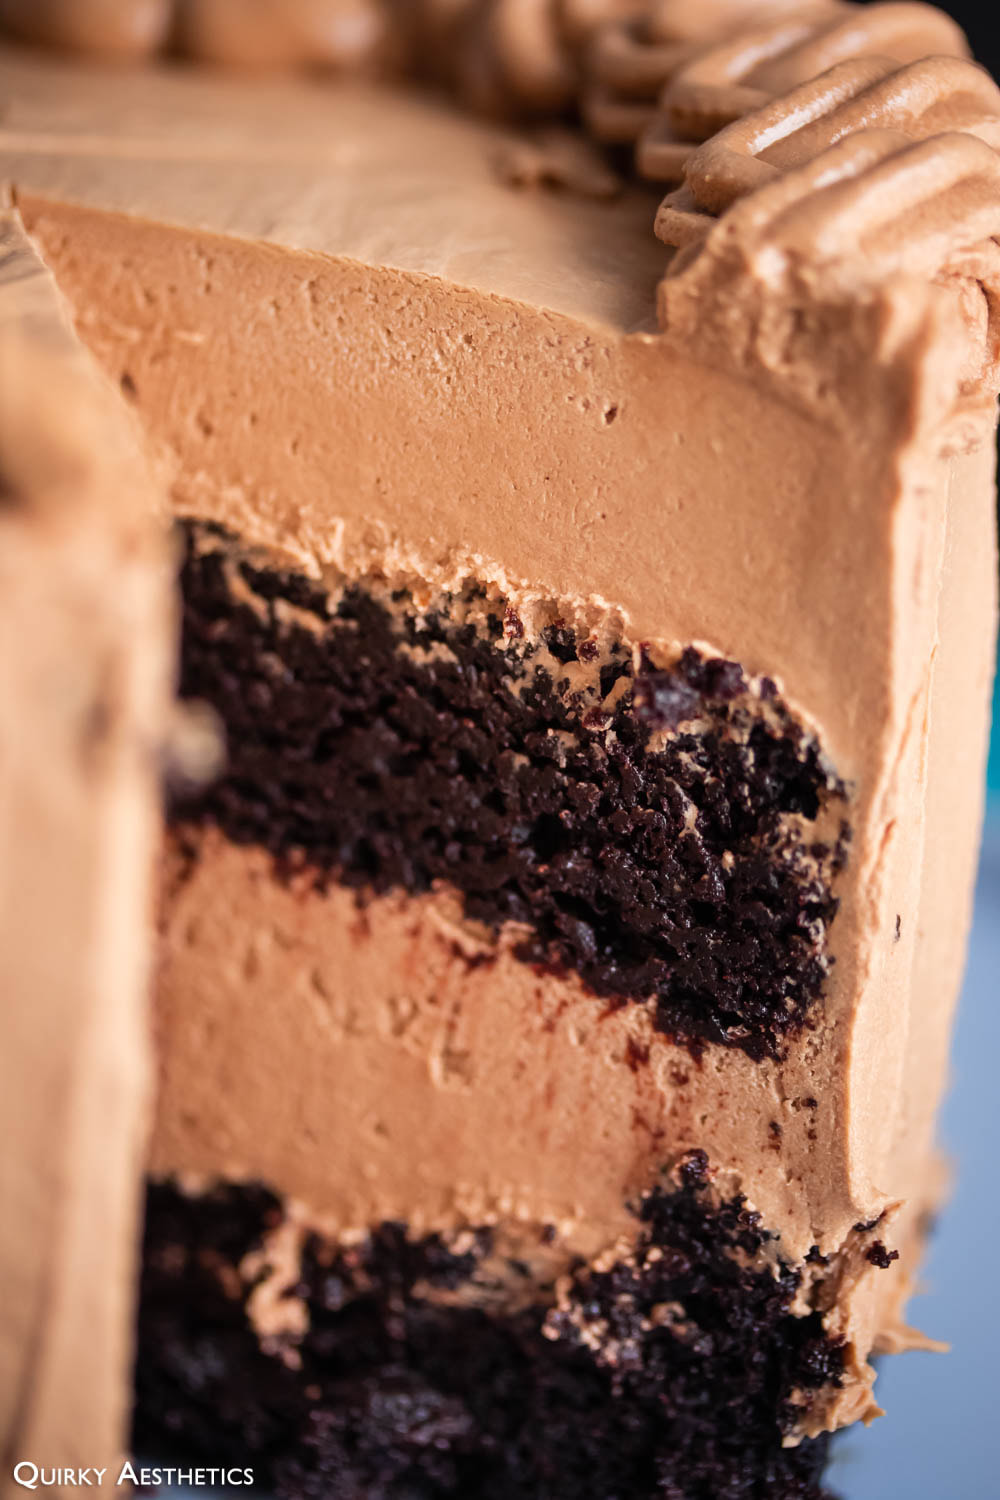
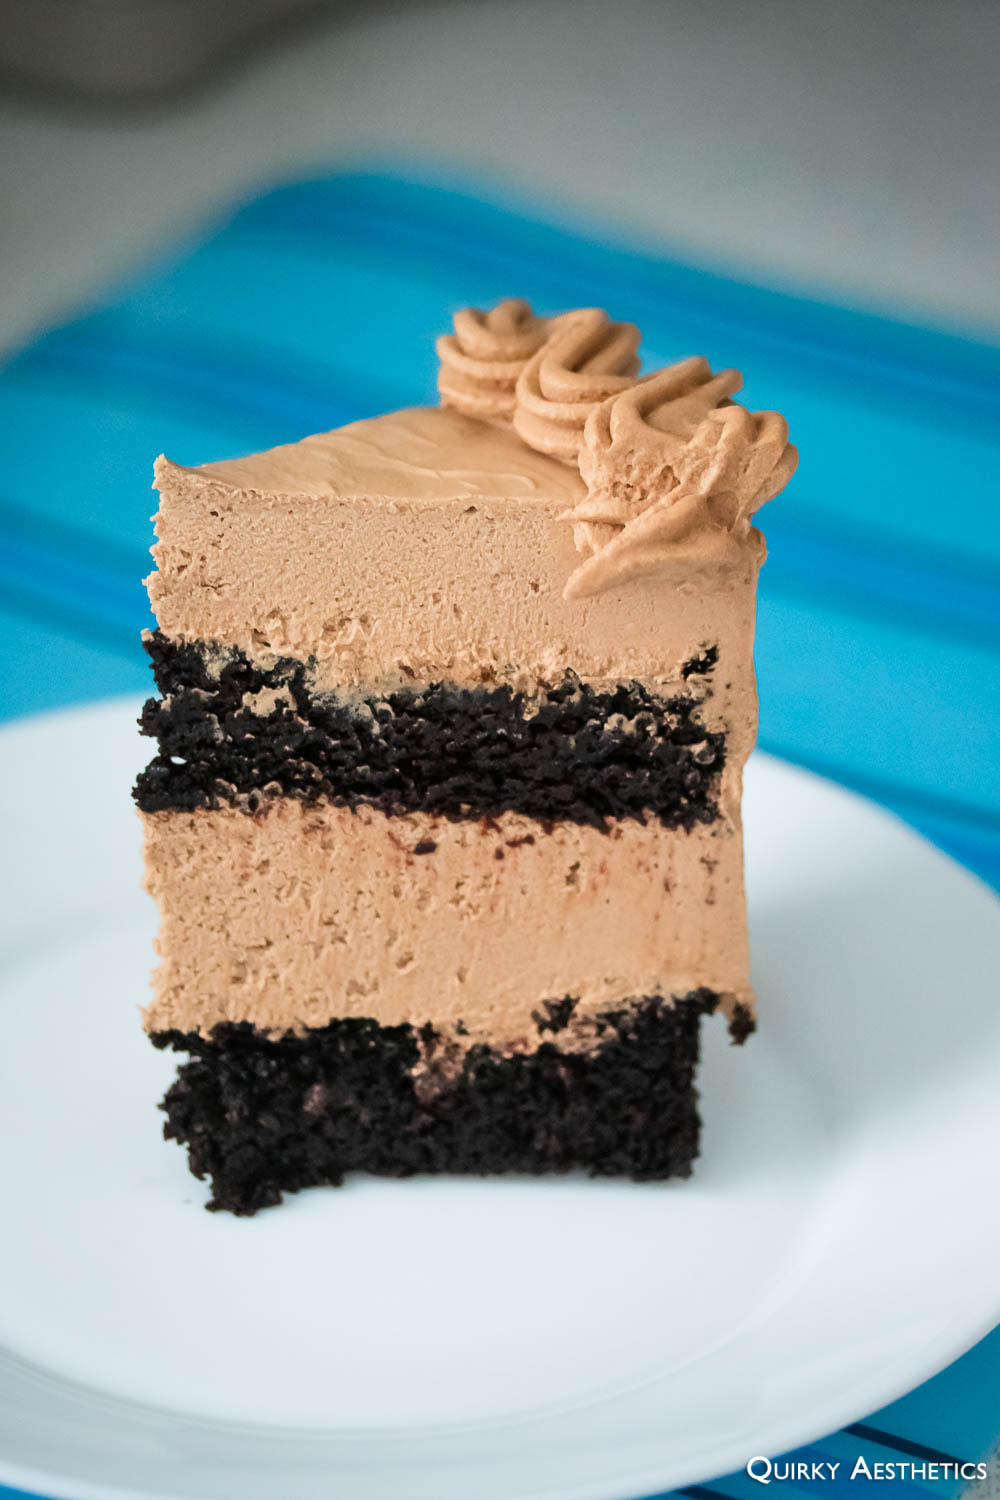
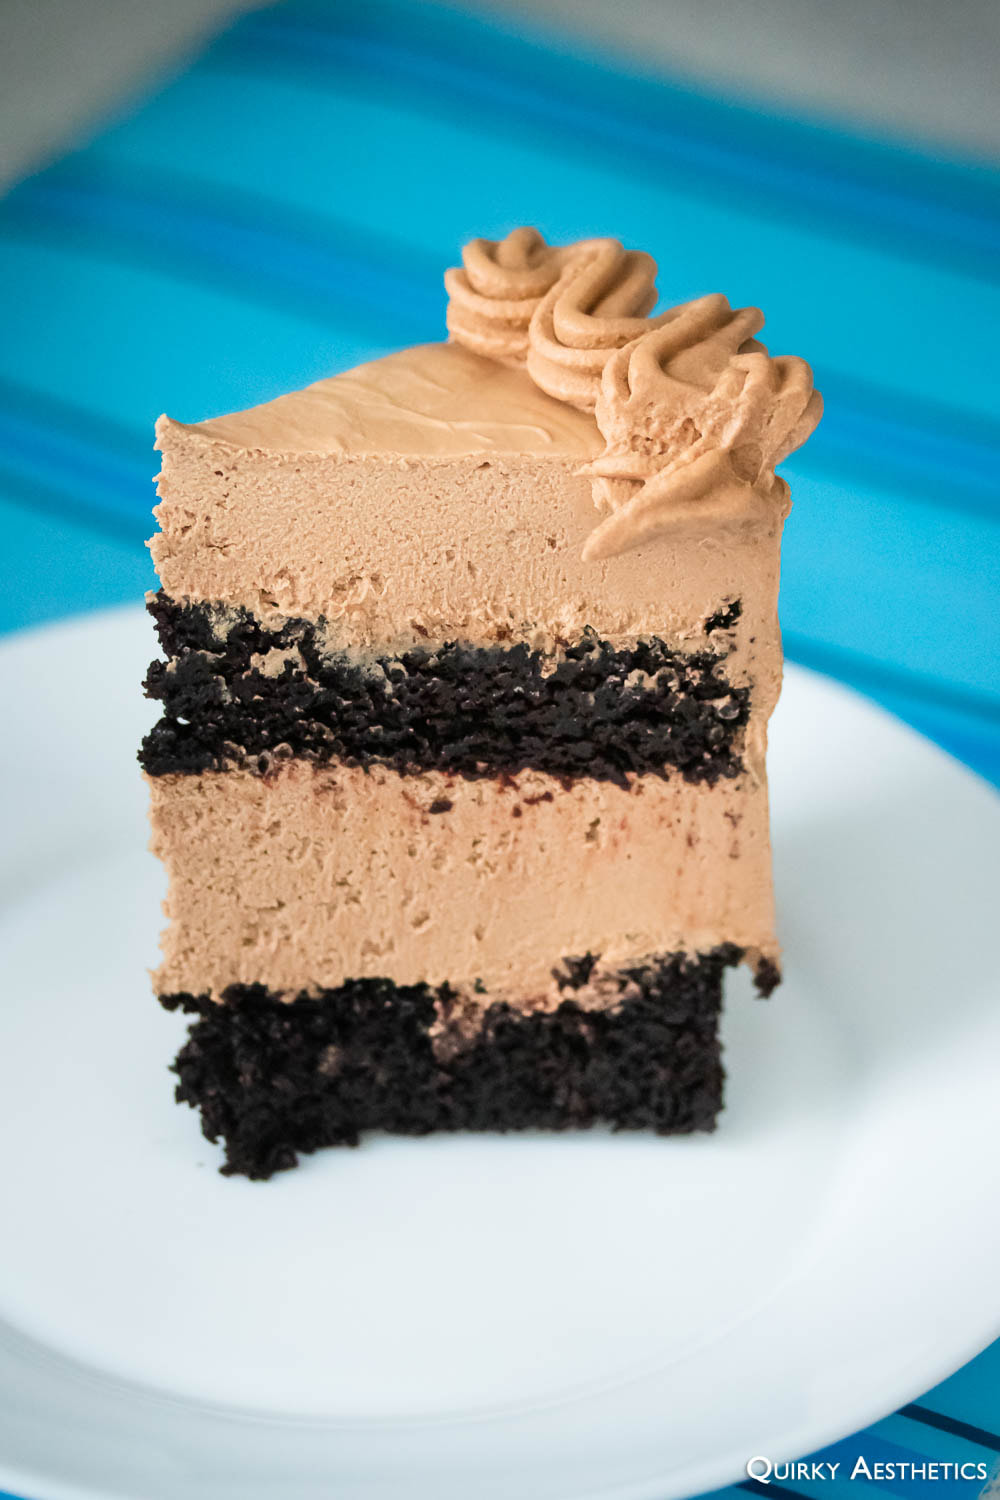
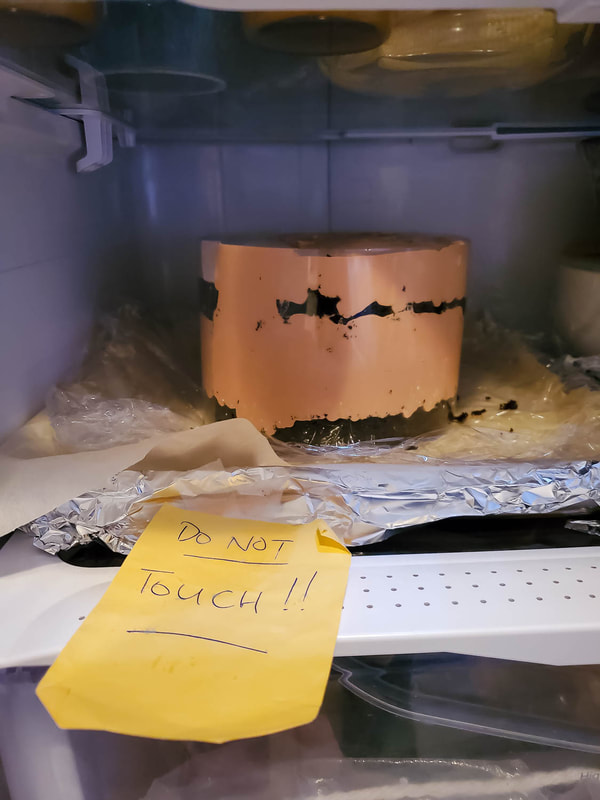
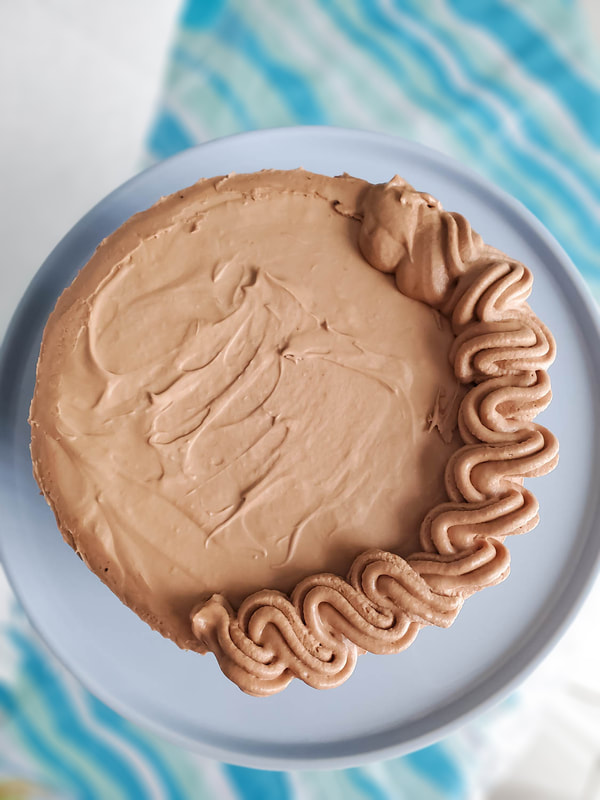
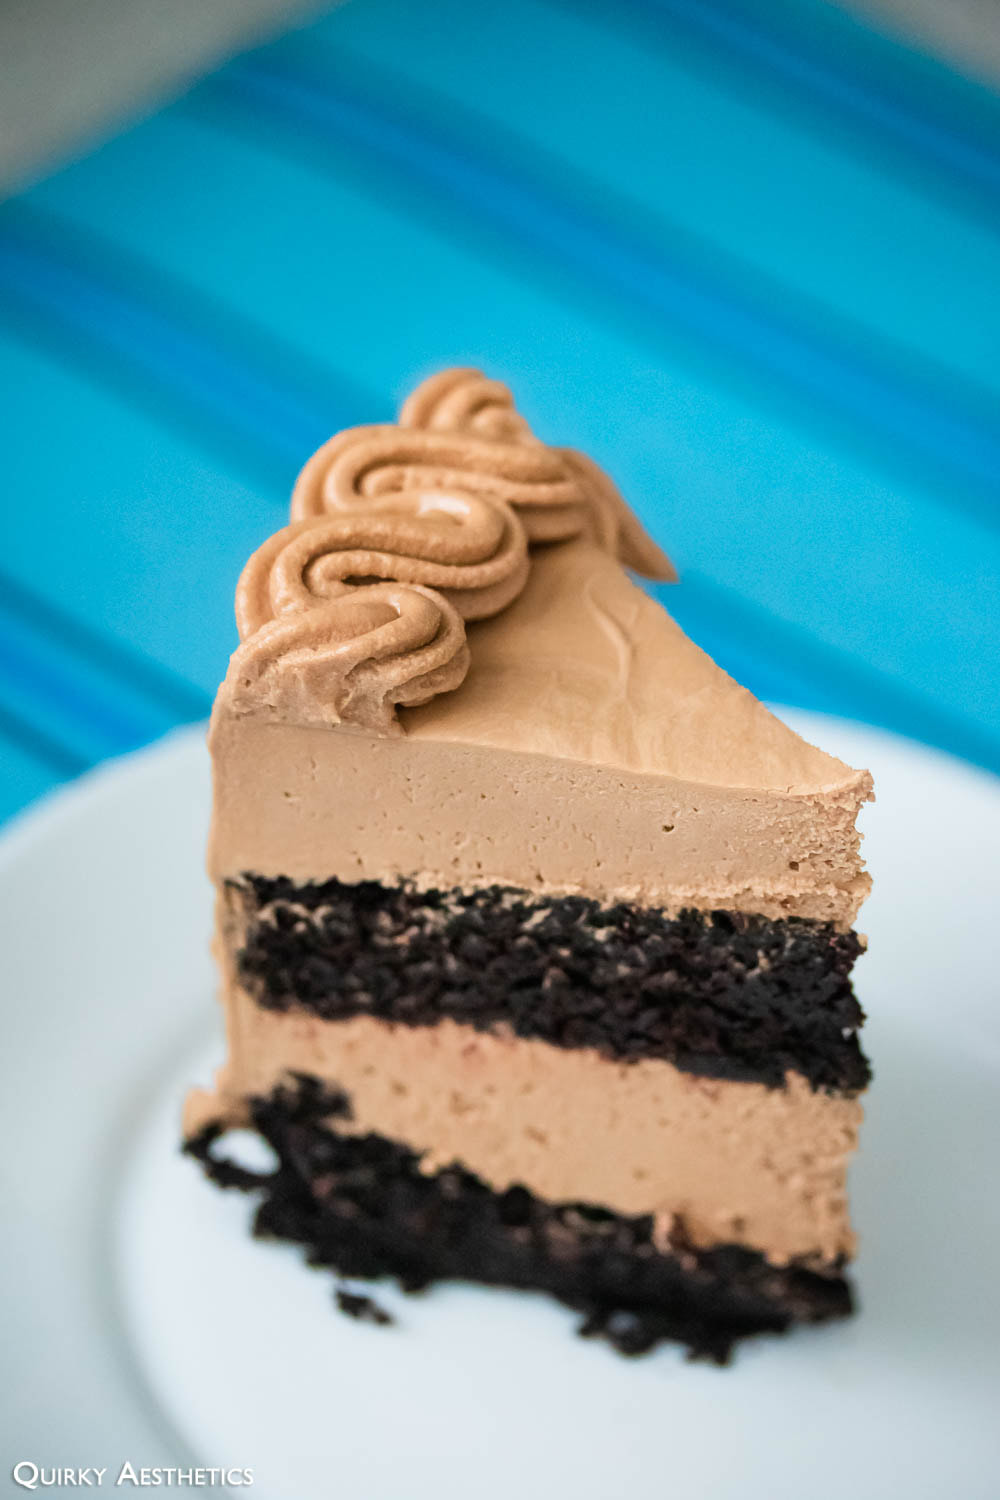
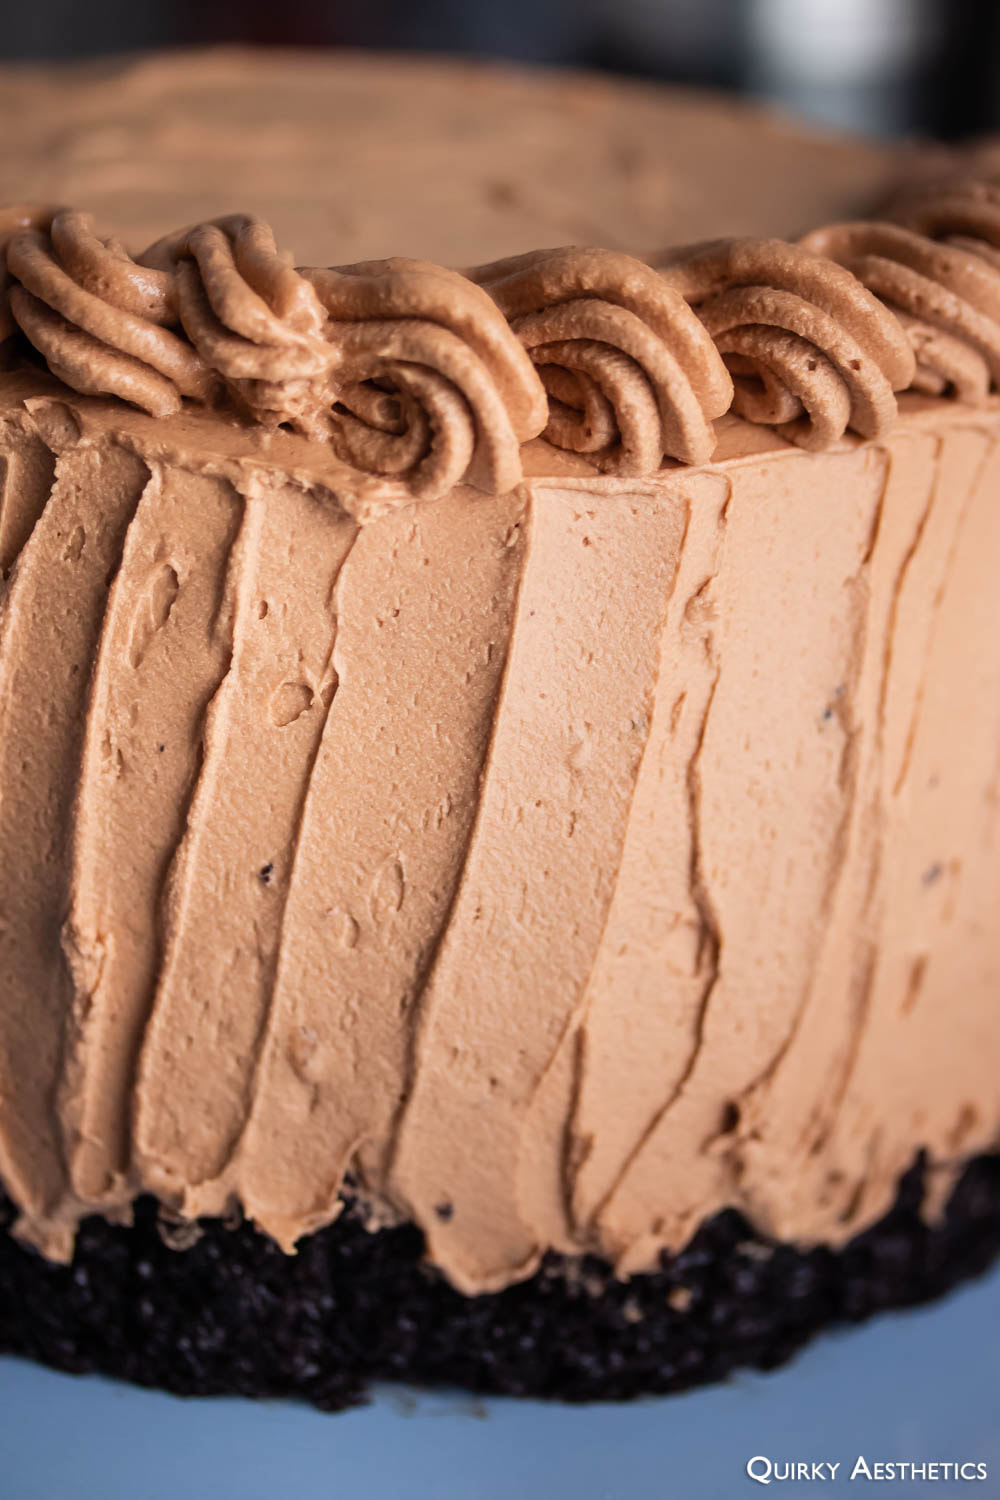
At long last, the horrifically crumbly cake was assembled. Lining a medium-sized toaster tray with plastic wrap, the first layer of cake was carefully removed and placed at the centre. An acetate sheet was then wrapped tightly about its circumference and secured at two points with tape. An exceptionally loose An exceptionally loose - but smooth - Swiss buttercream would then be poured into the flexible mould, for application with an offset spatula was unthinkable in the face of disintegrating crumb. Naturally, the cake could not be sliced into thinner sections, so buttercream was alternated at an equally substantial thickness. The second cake round was placed into the mould inverted, such that the base would reside on top. The layered specimen would then chill overnight before being finished with trunk-like vertical strokes of buttercream and coils that ultimately saw dissolution with prolonged exposure to palm warmth.
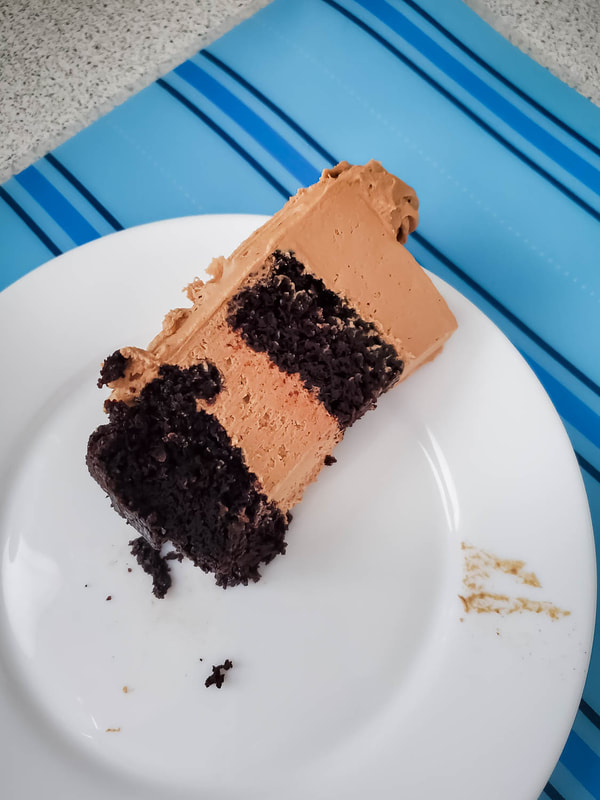
The finished slice was as satiating as I envisioned, though, thankfully not as sugary. The buttercream had set up nicely, compensating the cake with much-needed structural integrity and balance of non-vegan decadence. One-inch wide cuts are advised for sanity's sake.
The finished slice was as satiating as I envisioned, though, thankfully not as sugary. The buttercream had set up nicely, compensating the cake with much-needed structural integrity and balance of non-vegan decadence. One-inch wide cuts are advised for sanity's sake.
 |  |
The entire ordeal spanned five hours in total, from the initial stages of pastry cream to setting the last baking tool on the drying rack. I'd declare the cookie choux experiment to be highly beneficial for growth in my baking journey, although the chocolate olive oil cake will not be a creation warranting revisit.


 RSS Feed