Random Thoughts of a Quirky Blogger
  • ~ Home ~
  • ~ What I Think ~
  • ~ What I See ~
    • Events
    • Food
    • People
    • Places
  • ~ What I Make ~
  • Blog Series
  • Terms and Conditions
  • Disclaimer

Matcha Cheese Tarts

12/9/2016

4 Comments

 
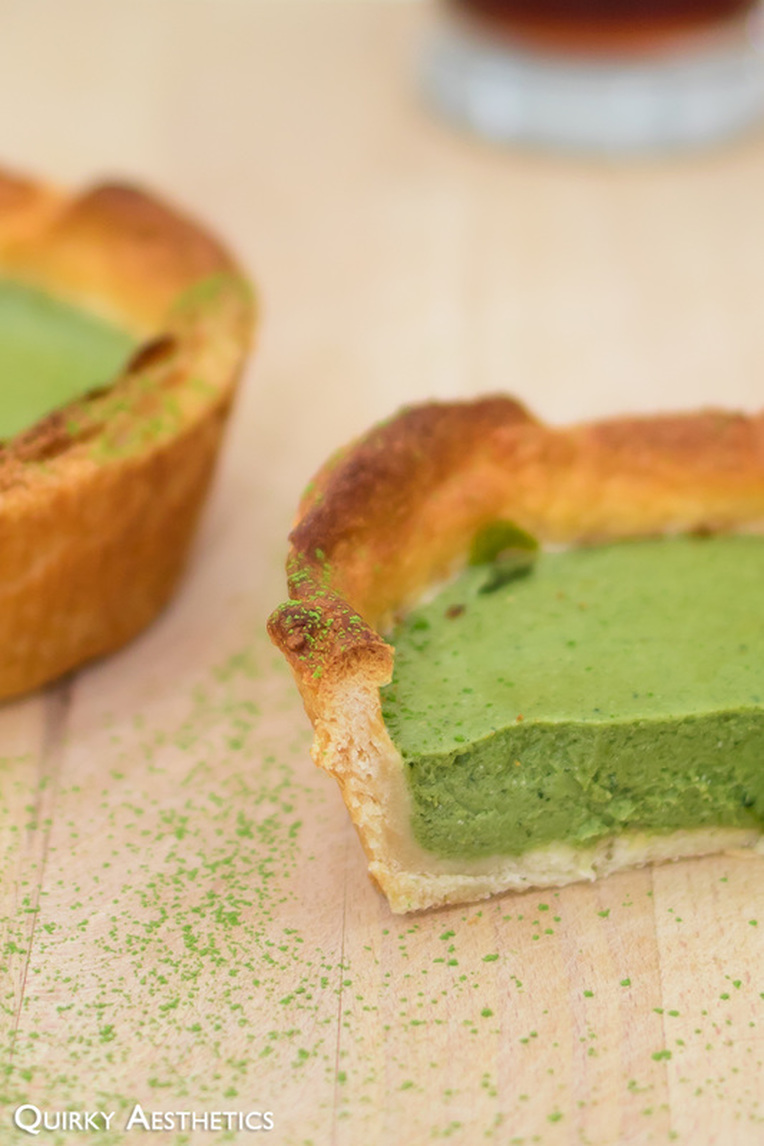
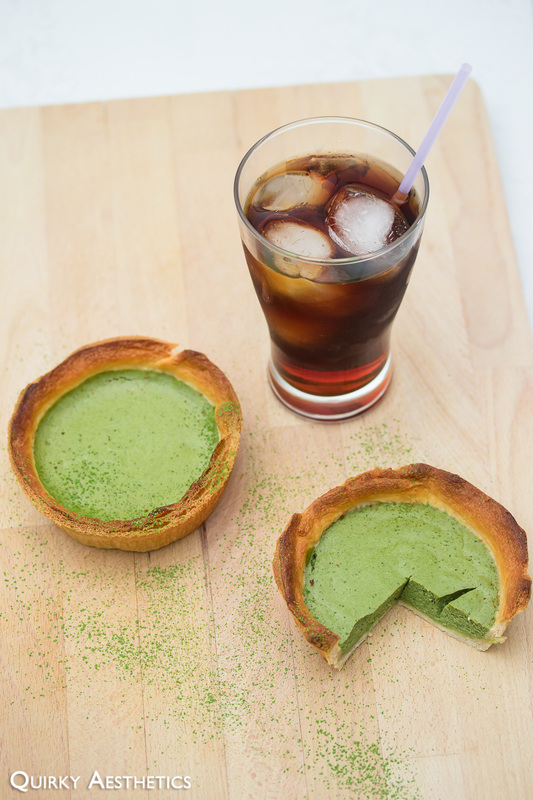
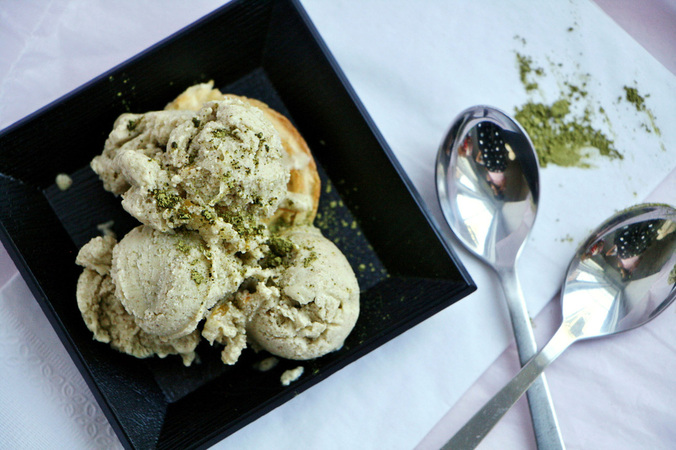
Not to be mistaken with molten cheese tarts, these indulgent pastries are more representative of a cheesecake baked in a crispy croissant shell and omit the small dosage of Parmesan typically used in Japanese-style lava tarts.

Honestly speaking, I have a fear of leaking batter, which is why it's always difficult to picture something of high viscocity turning solid once slow-baked. As a consequence of this phobia, I allowed the mixture to congeal over a hot water bath - reminiscent of forming a custard - before pouring the filling into the shell for baking.
Picture
Picture
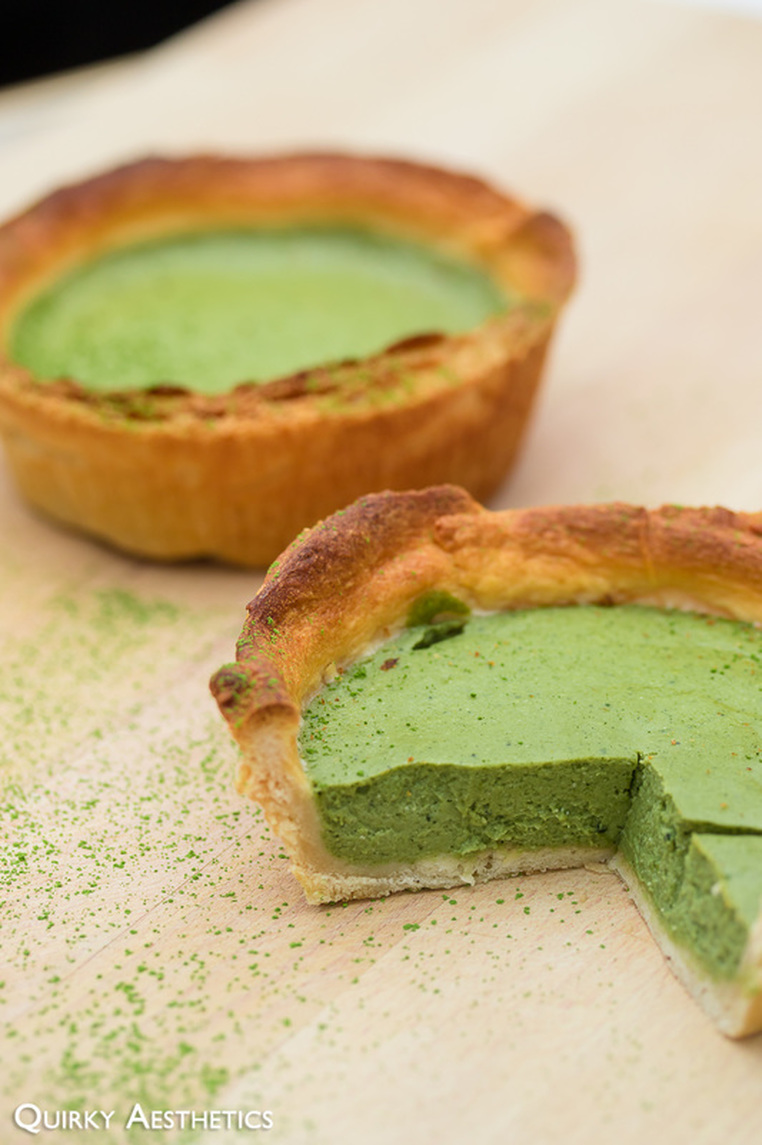
Peachy Bunny's video served as a great guide. Those knowing me, though, will know that I have a hard time adhering to a recipe in its entirety. Eventually, my mind trailed off and found this cheese tart recipe. Combined, the methods (miraculously) yielded this successful product.
Picture
Picture
Picture
Picture
Picture
Ingredients
(Recipe inspired by and adapted from Peachy Bunny)

- 1 pkg original Philadelphia Cream Cheese (8 oz. / 226 g), softened
- 2 tbsp granulated sugar
- 3 eggs
- pinch of salt
- 1/4 cup half & half cream*
- 1/4 milk*
- 1 tbsp corn starch
- 2 tbsp matcha/green tea powder *
- 1/2 tsp vanilla extract
- 1 pkg Pillsbury original Crescent Roll (225 g)


Directions:

1) Preheat oven to 375 F. 
2) Line aluminum trays with puff pastry dough as desired. (I opted to line some in their entirety and others solely on the bottom.)
3) Beat softened cream cheese until smooth. Add in sugar and mix again.
4) Add in the pinch of salt, vanilla extract, cream, and milk. Beat lightly to combine.
5) Sift in cornstarch and matcha powder, then gently mix.
6) Add in eggs and beat until well combined.
7) Bring a small pan of water to a roaring boil, then reduce to medium heat.
8) Place matcha cheese filling over the pot of simmering water, stirring constantly as the mixture thickens.
9) Remove from heat once the mixture achieves a runny custard consistency. When lifted with a spatula, the mixture should drip back into the bowl very slowly.
10) Allow the mixture to rest for 1-2 minutes before carefully filling each puff pastry-lined tin. Gently drop on a sturdy surface to remove any air bubbles.
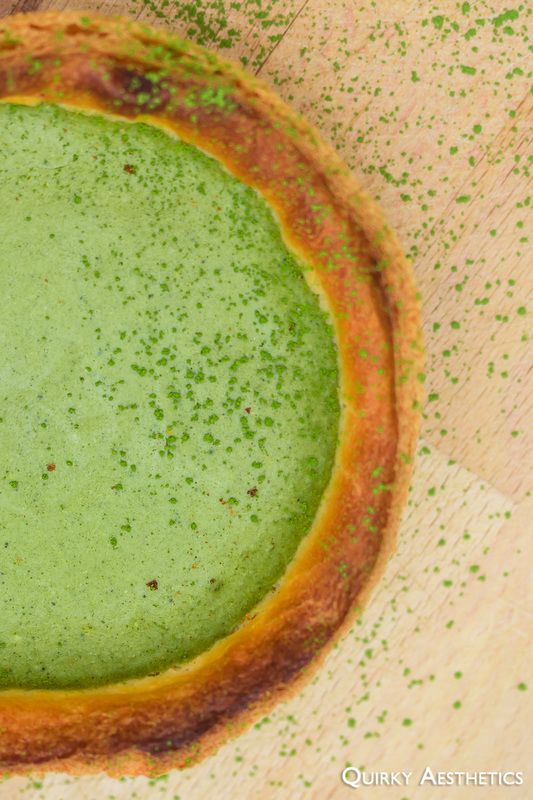
11) Bake for 10 minutes, or until the edges of the puff pastry become a rich copper shade. Let cool on a wire rack, then refrigerate. Allow the tarts to chill for at least 4 hours.
12) Serve and enjoy!


Notes
- I commited the dreaded mistake of baking my puff pastry tart shells once before pouring in the filling. As a result, the shell drastically puffed up and was required to be flattened before the second baking process. When using storebought puff pastry, I would recommend baking at the same time as the filling to prevent burning.
- Both cream and milk were utilized in this recipe, however it should be noted that either form of dairy is fine. The type of milk (1%, 2%, or whole) can be varied to your preference. If substituting with skim milk though, please add a splash of cream to maintain the required fat content.
- As opposed to Peachy Bunny's rendition, I opted to use a much smaller amount of matcha powder. Personally, I found that two tablespoons' worth was sufficient in obtaining the desired flavour and colour intensity, but feel free to adjust this amount to suit your preferences.

4 Comments

Homemade Poke Bowl

12/3/2016

0 Comments

 
Poke bowls are to me as what Chipotle burrito bowls are to our neighbours in the south: an incurable addiction. I'd like to revel in the fact that protein-topped rice and veggie combinations are far more nutritious and provide supreme post-consumption satisfaction though.

Several poke restaurants throughout the GTA (1, 2) , as well as Vancouver, already allow meals to be fully personalized to customers' preferences, but attempting to compile one's own rendition at home literally hands over the baton of customization.
The concept is simple, really, but the resouce allocation and preparation processes themselves are quite time-consuming.
Picture
Picture
Picture
Picture
Picture
Ingredients

Marinade:
- 1 tbsp sesame oil
- 1 tsp wasabi
- 1 tsp rice wine vinegar
- juice of half of a lime
- 2 tbsp light soy sauce
- 2 tbsp maple syrup
- 1 tsp white sesame seeds
- 1 tsp black sesame seeds
- pinch of sea salt
- pinch of granulated sugar

Poke Bowl*:
- 1/2 fillet salmon sashimi
- 2 tbsp corn kernels
- 1 cup romaine lettuce, roughly chopped
- 1 tbsp potato salad
- 1 stalk green onion, finely chopped
- Jeju mandarin wedges
- dried seaweed strips (to taste)
- black and white sesame seeds (to taste)
- 1/3 cup cooked white rice

- 1-2 tbsp rice wine vinegar
- pinch of sea salt
- pinch of granulated sugar
- Kewpie mayonnaise


Directions:

Part i:  Salmon Poke
1) Using a sharp knife, carefully slice sashimi-grade salmon fillet into small cubes of approximately 2 cm each.
2) Mix marinade ingredients in a medium bowl and coat cubed salmon well.
3) Let sit covered while the other components of the poke bowl are prepared.


Part ii: Poke Bowl
1) Combine white rice with rice wine vinegar, sea salt, and sugar. Mix well.
2) Place sushi rice and/or romaine lettuce at the bottom of a shallow, wide bowl. Top with potato salad, corn kernels, and Jeju mandarin wedges. Spoon marinated salmon poke to the centre of the bowl.
3) Garnish with green onion, sesame seeds, nori strips, and mayonnaise.
4)
Serve and enjoy!

Notes
- Poke bowls allow for complete customization; this being stated, it should be noted that the items utilized in this recipe should be viewed as a mere guideline for variance in nutritional properties. White sushi rice can easily be substituted for quinoa, brown rice, or soba noodles; sunomono (crab meat salad) and pineapple chunks can be used in place of potato salad and mandarin wedges respectively. Feel free to let your creativity guide you!
- It is crucial that sashimi-grade fish is obtained for this recipe, as raw salmon and tuna fillets cannot be handled in the same manner and may induce disease if not treated properly.
- For a vegetarian or vegan option, tofu (or any other plant-based protein of choice) can be utilized in place of salmon.

0 Comments

Baked Tofu Fries with Sriracha Mayo Sauce

3/20/2016

0 Comments

 
I have a sad addiction to carb-heavy foods when I'm feeling haggard, so I tend to prevent myself from indulging in bread, rice, and other starchy foods once I'm back to regular sleeping patterns.
But there are days when one hankers for fries and tangy dipping sauce, so I've proposed a guilt-free solution: Baked Panko-Crusted Tofu Fries with a tangy Sriracha Mayo sauce.

Combining the satisfying crunchiness of McD's, fusion flavours of bar appetizers, and unique blend of izakaya-like spicy mayo, here's a great alternative to the greasy, fast-food classic. It's a relatively simple dish to prepare, albeit a bit time-consuming and procedure-intensive.
Picture
Picture
Picture
Ingredients

Tofu Fries
- 2 packs firm tofu *
- 2-3 cups panko
- 3 eggs
- 1/4 to 1/3 cup olive oil
- sea salt
- black pepper
- herbs/seasonings of choice *
- 1/8 cup nori strips (optional)


Sriracha Mayo Sauce
- 1 tbsp Sriracha sauce
- 3 heaping tbsp mayonnaise *
- 1 tbsp honey *
- 1 tbsp wasabi
- 1 tbsp rice wine vinegar
- 2 tbsp light soy sauce
- 2 tbsp chives, finely chopped


Directions:

Part i:  Tofu Fries
1) Drain and thoroughly dry tofu blocks. Wrap individually in paper towels and allow to drain in the refrigerator overnight (or for at least 5 hours) while placing a light weight on top.
2) Remove paper towels from tofu and pat dry. Slice into 3- to 4-inch strips roughly 1 cm in thickness. Set aside.
3) Place eggs in a medium bowl and beat well. Spoon panko into a large bowl and add in salt, pepper, and seasonings of choice (I used garlic powder and seasoned salt).
4) Preheat oven to 400 F. Line baking tray with aluminum foil and grease well with olive oil.
5) Carefully dip tofu strips into the beaten egg before coating with the panko mixture. Place strips onto the baking tray, spacing each at roughly 1.5 cm apart.
6) Bake for 10-12 minutes, or until the surface turns a golden, coppery brown hue. Remove from oven, flip over, and continue baking for another 10 minutes at the same temperature. For additional crispiness, toast for 1-2 minutes after baking.
7) Repeat 5) and 6) until all the tofu strips have been used up.
8) Let cool and prepare the dipping sauce.


Part ii: Sriracha Mayo Sauce
1) Combine all ingredients and mix well.
2) Top with chopped chives and serve with tofu fries.


Notes
- Firm tofu was used in this recipe, though it is highly recommended to obtain Very Firm tofu if possible to decrease chances of crumbling during cooking.
- In addition, or in substitution of, seasoned salt and garlic powder, other dried herbs such as thyme or basil can also be used for enhanced aroma.
- I have used a tabletop convection oven for this recipe; cooking times may differ on a full-scale oven so it is suggested to check frequently and adjust baking times accordingly.
- Feel free to modify the sriracha-mayo ratio to your preferred liking and degree of spiciness.
- An egg-free mayonnaise or specialty vegan mayonnaise can be used in place of regular mayonnaise to render this recipe vegan.

- If honey is not available, feel free to substitute with 1-2 tbsp of granulated sugar.
0 Comments

Hot Chocolate Yuan Yang

10/25/2015

0 Comments

 
It's that time of year again - winter. (Do I hear groans from my fellow Canadians?)

While Apple Cider and PSLs are the common choices for fall, I tend to lean more towards extra-caffeinated, milky drinks when having to wake up earlier to accommodate harsh weather/precarious driving conditions. We're out of Nutella for now, but there's never a shortage of tea nor sweetened condensed milk in the cupboards.

I looked toward my favourite food blogs to derive inspiration for an innovative toasty beverages, and was more than thrilled to try out Lady and Pups' creative rendition of hot chocolate inspired by Cantonese flavours.
Picture
Picture
Picture
Picture
Picture
Picture
(Recipe adapted from Lady and Pups' 'THE HOT TRIPLETS')

Ingredients

- 1/2 cup 1% milk*
- 1/4 cup evaporated milk
- 3 tbsp sweetened condensed milk*
- 1/3 to 1/2 cup espresso*
- 3 tsp loose leaf black tea*
- 1 heaping tbsp cocoa powder
- 1 handful of mini marshmallows*

Directions:

1) Spoon tea leaves into a filter bag, then place into a small saucepan with the milk.
2) Steep the tea over low heat while stirring constantly. Spoon in sweetened condensed milk, stirring after the addition of each tablespoon.
3) Once the mixture becomes a pale copper hue, remove the tea bag and add in the espresso and evaporated milk. Stir to combine.
4) Over low-medium heat, add in cocoa powder and stir until fully dissolved.
5) Remove from heat and strain the mixture to remove any clumps.
6) At this stage, one can opt for a chilled version of the drink by allowing it to cool to room temperature and placing in the refrigerator at this stage for approximately one hour. Serve over ice.
7) To restore a slight amount of heat into the drink, microwave for 20 to 25 seconds before using a milk frother to add texture.
8) Pour into a serving mug and top with marshmallows. If desired, char the surface of the marshmallow layer with a kitchen blowtorch.
9) Serve and enjoy!

Notes
- Feel free to substitute 1% milk with skim milk, or even 2% milk for a richer taste. I have not attempted to use non-dairy milks though, and thus cannot vouch for the taste or texture if substituted.
- Feel free to adjust the amount of tea leaves or espresso to fit your tastes. I generally prefer milder coffee and stronger tea flavours, but happened to be running low on Nepal Black. (Oops!)
- Evaporated milk is an essential element of yuan yang and would advise against substituting coconut milk/almond milk/cashew milk/etc. in its place.
- Sweetened condensed milk provides the hot chocolate with a dose of unique sweetness unlike any other, therefore it is the recommended sweetener in this case. However, if you must, other potential alternatives include granulated sugar or agave.
- The size of marshmallows used in the recipe is entirely based on preference; mini marshmallow were utilized for this recipe simply since I find that charring large marshmallows uniformly to be slightly more challenging.
- For best results, allow the marshmallows to melt halfway before consuming.
0 Comments

Gluten-Free Almond Strawberry Cake

1/27/2015

0 Comments

 
Almond meal can be pretty pricey when purchased as is, which is usually why I've never attempted cake recipes involving the ingredient previously. But when I had a substantial amount of already ground sweet almonds left over from making almond milk, I decided to give a low-carb cake recipe a try.

Well, technically, it wasn't a recipe. I simply followed the general guideline of a recipe off Pinterest and improvised as the project progressed, finally topping the cake with some fresh strawberries we had in the fridge.

The attempt turned out to be satisfactorily successful in the end, and resulted in a easy, great-tasting afternoon snack!
Picture
Picture
Picture
Picture
Picture
Picture
Picture
Picture
Ingredients

- 2 eggs*
- 1/2 cup skim evaporated milk*
- 3 tbsp sweetened condensed milk*
- 1 tsp baking powder
- 2 cups of ground sweet almonds*
- 1/2 cup melted butter
- 1 tsp vanilla extract
- 3/4 cup large strawberries, thinly sliced (opt.)

Directions:

1) Preheat oven to 375 F.
2) Melt the butter in a large bowl. Then crack in the eggs and whisk quickly to prevent them from scrambling. Add in sweetened condensed milk once eggs and butter are fully incorporated.
3) Sift in baking powder and add in vanilla extract.
4) Whisk in ground sweet almonds in three to four additions before pouring in evaporated milk.
5) Grease a large round pan and pour in the batter. Top with sliced strawberries as desired.
6) Bake for 35-40 minutes. Once the surface becomes golden brown, remove from the oven and let cool for at least 10 minutes.
7) Using a plastic knife, carefully remove the cake from the pan and allow it to completely cool on a cooling rack.
8) Serve and enjoy!

Notes
- The ground almonds used in this recipe are smaller in size and sweeter in nature, and are a common ingredient in Chinese almond milk desserts. As opposed to the elongated oval-shaped almonds, these are rounder and plumper. An image of the almonds can be viewed HERE.
- Feel free to use regular skim milk (or even almond milk!) in place of skim evaporated milk. 1% or 2% could also be used for a richer taste if so desired.
- For a vegan option, feel free to use maple syrup or cane syrup in place of sweetened condensed milk. Please be aware that both of these have a stronger taste than sweetened condensed milk and have the potential to overpower the almond taste in the cake.
Butter could also be switched out for a vegan alternative if so desired, though I cannot vouch for the results as I have not attempted this.
- As my cake came out slightly crumblier than I would have preferred, I would recommend adding one more egg to the batter to allow the cake to have a stronger cohesive property.
0 Comments

Festive Cheese & Cranberry Scones

12/18/2013

0 Comments

 
I love Christmas, and I also love food.

Recently, I've been craving some biscuits for munching on while continuing on my long trek to my final (mechanics) exam.
And since my mom refilled the cheese inventory, I could finally try a hand at baking scones!

But wait, these aren't just any old scones!  They're Christmas tree-shaped scones! Honestly, just how awesome is that?! (≧∇≦)

Plus, they also pack in a punch of protein and a healthy dose of calcium. And like many of my recent creations, they're also gluten-free! ^ ^
Picture
Picture
Picture
Picture

Ingredients
- 1 cup oat flour
- 1 cup shredded part-skim mozzarella cheese
- 1 cup sweetened dried cranberries
- 2 tbsp calorie-wise mayonnaise
- 1 tbsp dijon mustard
- 2 tbsp Blue Menu sundried tomato and herb seasoning blend
- 2 tsp coarse sea salt
- 1 tsp baking powder
- 1/4 cup water (or as needed)

Directions:
1) Preheat oven to 425 F.
2) Place all dry ingredients, shredded cheese, and cranberries in a large bowl.
3) Add in mayonnaise and mustard. Mix until fully combined. The texture should resemble a coarse meal.
4) Add in water little by little until a dough forms.
5) Optional: Flatten the dough on a sheet of wax paper or floured surface. Cut out shapes of choice using cookie cutters.
6) Place scones onto greased baking tray, or one lined with parchment paper. Bake for 11-13 minutes or until the edges start to brown slightly.
7) Let cool and enjoy!

Makes 20 servings.

Notes
- In this recipe, I used part-skim mozzarella cheese and calorie-wise mayonnaise to keep the fat content to a minimum. However, if you prefer a richer taste, feel free to choose the regular (non-reduced fat) option.
- If you do not have sea salt, feel free to use normal salt instead.
- The number of servings depends the size and shape of cookie cutters used, so exact nutrition information will vary. I used large Christmas tree cookie cutters and had a small amount of dough left over, therefore the data below was calculated based on 5.5 servings.

Nutrition:
(Based on 5.5 servings)

Calories: 165.9
Fat:  5.8 g
     Saturated: 2.7 g
Cholestrol: 12.7 mg
Sodium: 552.3 mg
Potassium: 0.2 mg
Carbohydrates: 21.4 g
     Fibre:  2.4 g
     Sugars:  8.3 g
Protein:  7.3 g
---
Vitamin A: 3.2%
Calcium: 19.7%
Iron: 4.7%
0 Comments

Matcha Yuzu Cheesecake Ice Cream

9/11/2013

0 Comments

 
Matcha Yuzu Cheesecake Ice Cream. Well, that was a mouthful wasn't it?

But a mouthful worth saying, and a mouthful worth making in my opinion. It's low carb and high protein and well worth the effort. Oh, and for the record, these photos don't nearly it enough justice =P

Let's start! =)
Picture
Picture
Picture
Picture
Picture
Ingredients
- 250g light cream cheese, softened
- 5-6 tbsp yuzu jam
- 100 cc water (Feel free to add less/more than this amount)
- 3 tsp granulated sugar
- 1 tsp matcha powder (opt.)
- about 1 tbsp chocolate shavings (opt.)
- 1 packet of Knox unflavoured gelatin powder
- 1 tsp of cornstarch

Total Cooking Time: about 8 hours
Active Cooking Time: 25 minutes
Difficulty: Easy

Makes about 2.5 cups.

Directions:
1) Beat softened cream cheese with sugar and yuzu jam until fully combined. Gradually add water in small amounts to ease combining of the mixture. (I added enough just enough water to reach the consistency of pancake batter.)
2) Whisk in matcha powder and chocolate shavings if using. Beat to combine once again.
3) Mix cornstarch with 1 tbsp of water and add to the mixture. Beat to combine. Place over a bain-marie, stirring constantly until the mixture has thickened.
4) Remove from heat and let cool to room temperature.
5) Mix gelatin powder with 2 tbsp of water. Stir until completely dissolved and add to the mixture. Combine well.
6) Refrigerate mixture for about 4 hours.
7) Pour mixture into ice cream maker and process according to manufacturer's directions.
8) Serve and enjoy!

Notes:
- To describe the flavours present in this concoction of an ice cream mixture, I'd have to say it's quite an acquired taste. I rather loved the tanginess of the yuzu combined with the creaminess of the cream cheese, mixed with a slight hint of bitterness from the matcha. My mom was also fond of the flavour. My dad on the other hand, however, wasn't. So keep in mind that this is mix is definitely not your run-of-the-mill ice cream flavour.
- Some medications cannot be taken in conjunction with citrus fruits such as yuzu and grapefruit. Please be aware of this before serving to an individual that may be taking such medications.

Nutrition:
(Based on the the ENTIRE recipe)

Total Calories: 737.8 cal
Fat:  41.7 g
Cholestrol: 125 mg
Sodium:  875 mg
Carbohydrates: 46.6 g
Fibre:  0 g
Sugar:  39.8 g
Protein:  29 g

0 Comments
    The Sweet
    The Savoury

    Archives

    July 2020
    March 2020
    January 2020
    April 2019
    August 2018
    June 2018
    April 2018
    February 2018
    December 2017
    November 2017
    August 2017
    July 2017
    May 2017
    April 2017
    February 2017
    January 2017
    December 2016
    April 2016
    March 2016
    October 2015
    September 2015
    July 2015
    January 2015
    December 2014
    June 2014
    March 2014
    February 2014
    January 2014
    December 2013
    November 2013
    October 2013
    September 2013
    August 2013


    Categories

    All
    Brownie
    Chocolate
    Christmas Recipes
    Easy Recipes
    Gluten Free
    High Fibre
    High Potassium
    High Protein
    Ice Cream
    Japanese Style
    Low Carb
    Low Cholestrol
    Low Fat
    Low Sodium
    Matcha
    Microwave Recipe
    Quick Recipes
    Savoury Recipes
    Sweet Recipes
    Vegan
    Vegetarian
    Yuzu


    RSS Feed

WHAT DOES "QUIRKY AESTHETICS" MEAN?

Quirky =  a term that commonly refers to something/someone distinctly different and unique
Aesthetics = the visual aspect of things


Together, Quirky Aesthetics refers to the things, events, and happenings seen and perceived by this blog's creator - quirky perspectives in a visual form.

Contact ME

​Subscribe

Join our mailing list today!
Join Now
© Quirky Aesthetics. All rights reserved. Last modified: August 10, 2015.