Random Thoughts of a Quirky Blogger
  • ~ Home ~
  • ~ What I Think ~
  • ~ What I See ~
    • Events
    • Food
    • People
    • Places
  • ~ What I Make ~
  • Blog Series
  • Terms and Conditions
  • Disclaimer

Vegetable Borscht Soup + Spinach Roll-Ups

5/14/2017

0 Comments

 
Having a unmistakable affection for sleeping in is synonymous with an adoration for brunch. Though as much as I enjoy brunch in a cozy, bustling setting with thirty plus other diners, I passionately despise lineups and traffic congestion.

I prefer to take brunch in my own hands, even if it involves an incredibly lengthy clean-up process. The results are always well worth my planning and culinary efforts - just be sure to set aside enough time to enjoy the meal!

Happy Mother's Day to all the intrepid, loving mothers around the world!
Picture
Picture
Picture
Picture
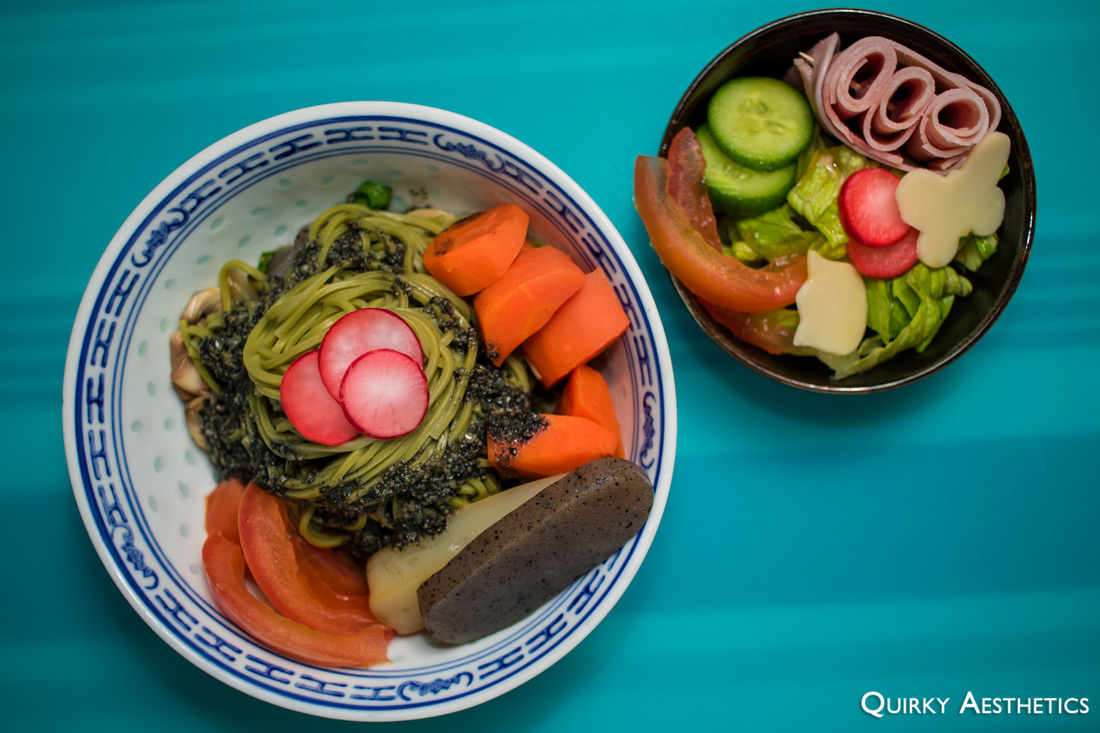
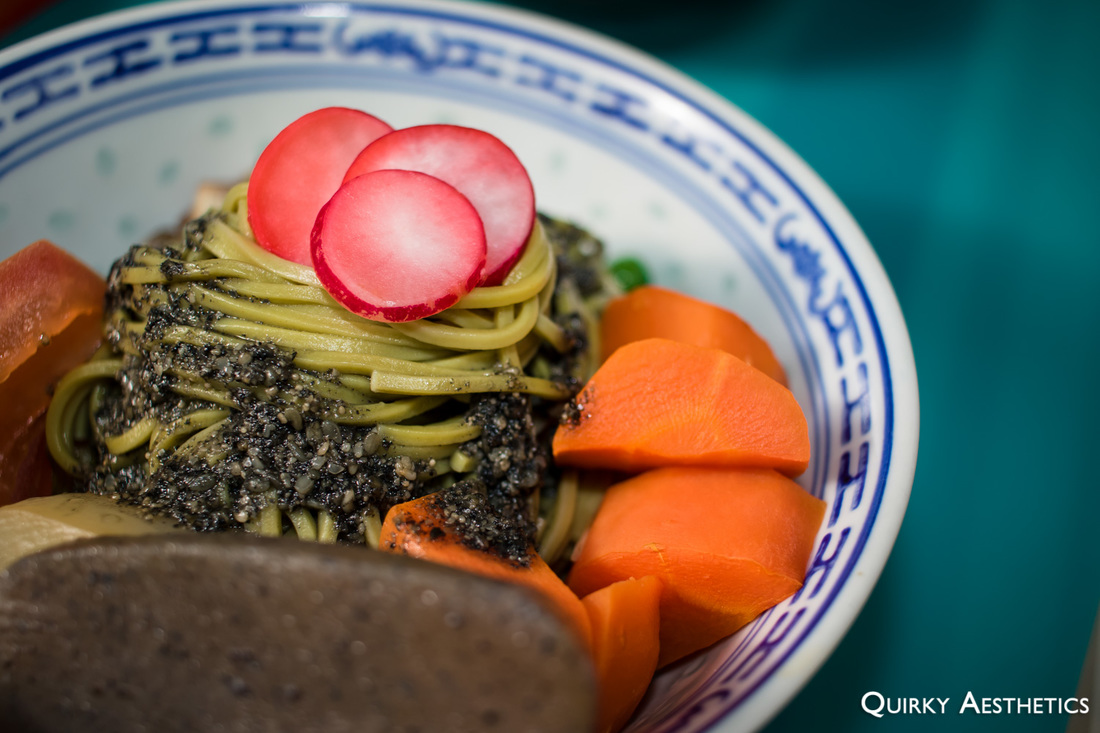
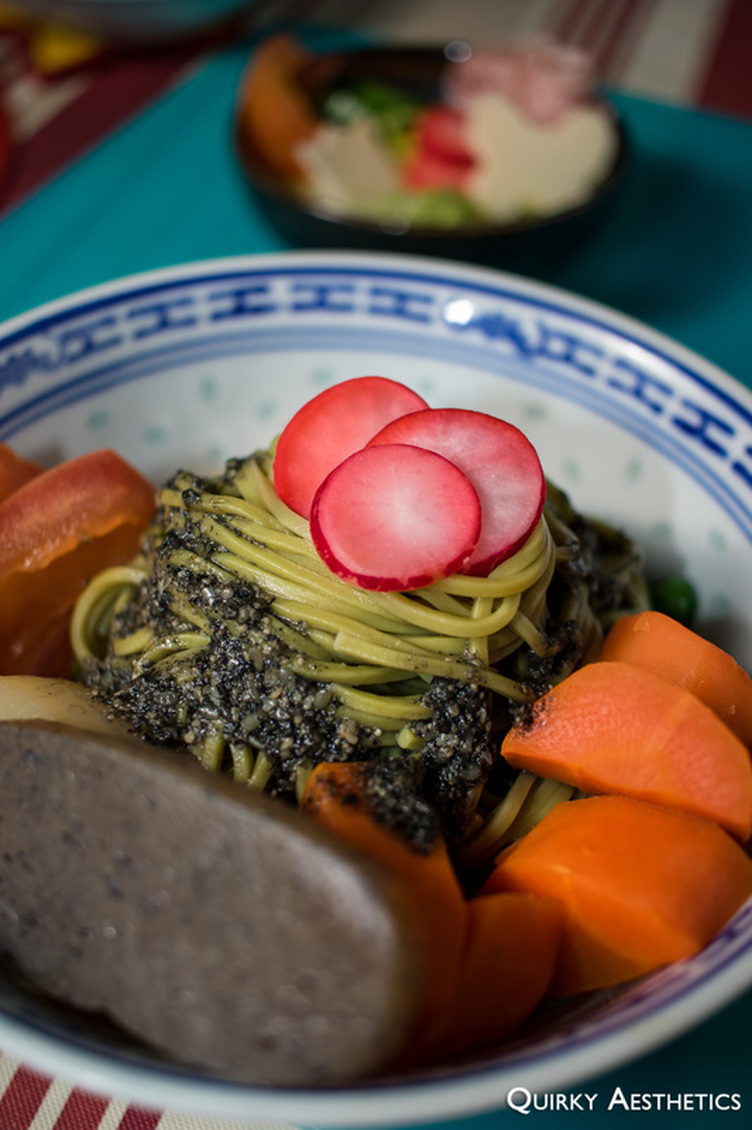
Ingredients

Vegetable Borscht Soup
- 3 medium tomatoes
- 2 bell peppers, chopped
- 1 can sliced beets (or 1 whole beet, sliced)
- 2 zucchini, sliced
- 1 sweet potato, diced
- 1 red onion, diced
- 1 carrot, diced
- 1 can Swanson chicken stock (approx. 412 mL)
- 2 tbsp Worcestershire sauce
- vegetable oil
- dollop of sour cream (optional)


​Spinach Roll-Ups

Crepes
- 1 bunch spinach
- 5 eggs
- 3/4 cup milk
- 1 cup all-purpose flour
- 1 tsp cornstarch
- 5 - 6 turkey breast deli slices
- 1 mushroom, sliced *

Mushroom Mayo
(
Recipe inspired by and adapted from SORTED Food)
- 11 cremini mushrooms, roughly chopped
- 1 tbsp butter
- 1 tbsp syrup
- 3 - 4 tbsp mayonnaise
- 1-2 tbsp bulgogi sauce
- sea salt
- 1 tsp wasabi *
- garlic powder *
Directions:

i) Vegetable Borscht Soup

1) Preheat oven to 375 F.
2) Cut tomatoes in small chunks, leaving one halve unsliced for topping (if desired). Slice the half into wedges and set aside.
3) Lightly coat half of the diced tomatoes with oil and sea salt. Roast for 12 minutes at 375 F.
4) Roast diced bell peppers for 9 minutes at 375 F.
5) Heat vegetable oil in a pot over medium-high heat. Sautée onions until soft and fragrant.
6) Add in beets, sweet potato, peppers, zucchini, and unroasted tomatoes.
7) Pour in one can of chicken stock (approximately 412 mL). Reduce the heat to medium and allow to simmer for 6 minutes, covered.
8) Once the vegetables have softened, partially pulverize the mixture using an emulsion blender. Continue blending until half of the vegetables remain intact.
9) Add in roasted tomatoes and worchestershire sauce. Mix well.
10) Add a small amount of water such that all components are submerged. Continue to simmer covered for several minutes.
11) Turn off heat and set aside covered.
12) In a shallow pan over high heat, roast tomato wedges until evenly charred on each side. Set aside for topping. (Optional)
13) Ladle soup in a bowl and top with charred tomato wedges, a dollop of sour cream, and thinly sliced scallions (if desired).
14) Serve and enjoy!

ii) Spinach Roll-Ups - Crepes

1) Allow spinach to wilt over a large pot over medium heat. Stir the bottom-most pieces every so often to prevent burning.
2) Transfer the wilted spinach to a bowl to cool. Pulverize in a food processor until smooth and free from lumps. Set aside and prepare crepe/pancake batter.
3) In a large bowl, whisk eggs and add in milk.
4) Fold in spinach paste and combine well.
5) Sift in flour and cornstarch, then mix well to incorporate.
6) Heat vegetable oil in a large, shallow pan over medium-high heat. Use a paper towel square to remove excess oil and grease the inside of the pan. Do not discard this paper towel; place on a small dish for re-use.
7) Using a ladle, spoon the batter into the pan and reduce to medium heat. Cover and allow to cook slowly.
8) Flip the pancake when bubbles appear on the surface. Allow to cook covered for 3 to 5 minutes before removing from heat.
9) Grease the pan again and repeat until no more batter remains. Let crepes cool to room temperature.

iii) Spinach Roll-Ups - Mushroom Mayo

10) In a small pot over medium, melt butter until foamy.
11) Add in chopped mushroom, sea salt, and sugar syrup.
12) Cover and allow to cook, keeping the pot moving every thirty seconds.
13) Stir to ensure that all sides are cooked evenly.
14) Once browned and softened, transfer mushrooms to a small bowl to cool.
15) Blend in a food processor until smooth.
16) Combine mushroom paste, mayonnaise, bulgogi sauce, and seasonings of choice in a medium bowl. Cover and place in the refrigerator to chill.
​
iv) Spinach Roll-Ups - Assembly

17) In a shallow pan over high heat, roast mushroom slices until evenly charred on each side. Set aside for topping. (Optional)
18) Place two slices of turkey breast at the outer edges of the pancake and roll laterally.
19) Remove mushroom mayo from fridge and spread a thin layer onto a serving plate. Arrange Spinach Roll-Ups on top and serve with charred mushrooms.
20) Serve and enjoy!
​
Notes
- Tomato wedges and sliced mushrooms were set aside for charring and topping the above dishes, though this step can be eliminated if toppings are not desired.
- Mushroom Mayo seasonings can be adjusted to one's preferences. I have added wasabi and garlic powder, however feel free to add/remove seasonings as necessary.
- For the Spinach Roll-Ups, I utilized a ratio of 1 bunch of spinach to 5 eggs. This yielded a rather thick pancake as opposed to the thin crepe that I had been aiming for. It is recommended to reduce the amount of spinach paste for a thinner crepe.
- This recipe can be made vegetarian by swapping deli turkey breast slices for animal-free alternatives (such as tofu pockets or enoki mushrooms).
0 Comments

Curry Japchae

4/1/2017

0 Comments

 
The box of curry on our countertop has been beckoning for my attention for some time now. With some unattractive leftovers in the fridge and an enormous bag of unopened japchae noodes peeking out from behind, I set to work combining the two to create a predominantly Korean-inspired dish with an injection of Japanese-style yellow curry.
Picture
Picture
Picture
Ingredients

Japchae
- 1 bunch japchae (sweet potato) noodles
- 2 bell peppers, roughly diced
- 1 onion, chopped
- 1 shallot, chopped
- 1 small knob ginger
- 4 perilla leaves, thinly sliced
- 1/3 cup vegetable oil
- 2 tbsp sesame oil
- sesame seeds (opt.)

Sauce
- 1 quarter block Golden Curry mild curry roux *
- 2 tbsp bulgogi sauce
- 1-2 tbsp kimchi base sauce
- 1 tbsp cane syrup *
- 1 tbsp light soy sauce
- 1 tbsp whipped peanut butter
- 1 tsp rice wine vinegar
- 1 tsp cornstarch (opt.)
​
Directions:

1) Bring a pot of water to a roaring boil. Add in japchae noodles and mix quickly. Remove and rinse with cold water before it softens. (See note.) Set aside.
2) Blanch the diced peppers until partially cooked. The colours will become a tad more vibrant, but shouldn't be able to be easily pierced by a fork. Rise with cold water and set aside.
3) In a medium bowl, dissolve the curry block with a small amount of hot water. Add in all sauce ingredients and mix well. Set aside.
4) Heat vegetable oil in a large pot. Over high heat, stir fry chopped onion, shallot, and ginger until fragrant and slightly golden.
5) Add in japchae and peppers, stirring to make sure that nothing adheres to the bottom of the pot.
6) Quickly add in the sauce mixture and toss to coat the japchae evenly. Feel free to add water at this stage to make the mixing process easier.
7) Add in sesame oil and any other sauce modifications if desired. Add perilla leaves.
8) Reduce heat to medium and continue stirring until sauce thickens. If too much water was added during the previous steps, mix cornstarch with a small amount of water and add it into the pot.
9) Remove from heat once sauce has thickened.
10) Let cool and top with sesame seeds (if desired).
11) Serve and enjoy!

Notes
- Admittedly, I overcooked the japchae noodles, causing the strands to disintegrate and adopt a mushy texture once the sauce was mixed in. As such, I would advise cooking the noodles only briefly, or simply rinsing them once before stir-frying.
- Rice wine vinegar is an optional ingredient, however I find that the tartness helps to balance the creamness of the peanut butter and curry roux. If available, fresh lime juice would be an even better alternative.
- Feel free to substitute cane syrup with sugar or honey.
- This recipe is versatile and can be altered based on one's dining preferences. Bits of ham or sausage can be added to the pot for a source of protein. It can also be made vegan with curry roux that is free of animal byproucts - Golden Curry contains "edible oil and fat" (derived from unspecified sources).
- While japchae noodles themselves are gluten-free, please be aware that the curry roux used in this recipe contains wheat.
- I used a mild curry block for this recipe, however feel free to adjust the spiciness to your liking.

0 Comments

Homemade Poke Bowl

12/3/2016

0 Comments

 
Poke bowls are to me as what Chipotle burrito bowls are to our neighbours in the south: an incurable addiction. I'd like to revel in the fact that protein-topped rice and veggie combinations are far more nutritious and provide supreme post-consumption satisfaction though.

Several poke restaurants throughout the GTA (1, 2) , as well as Vancouver, already allow meals to be fully personalized to customers' preferences, but attempting to compile one's own rendition at home literally hands over the baton of customization.
The concept is simple, really, but the resouce allocation and preparation processes themselves are quite time-consuming.
Picture
Picture
Picture
Picture
Picture
Ingredients

Marinade:
- 1 tbsp sesame oil
- 1 tsp wasabi
- 1 tsp rice wine vinegar
- juice of half of a lime
- 2 tbsp light soy sauce
- 2 tbsp maple syrup
- 1 tsp white sesame seeds
- 1 tsp black sesame seeds
- pinch of sea salt
- pinch of granulated sugar

Poke Bowl*:
- 1/2 fillet salmon sashimi
- 2 tbsp corn kernels
- 1 cup romaine lettuce, roughly chopped
- 1 tbsp potato salad
- 1 stalk green onion, finely chopped
- Jeju mandarin wedges
- dried seaweed strips (to taste)
- black and white sesame seeds (to taste)
- 1/3 cup cooked white rice

- 1-2 tbsp rice wine vinegar
- pinch of sea salt
- pinch of granulated sugar
- Kewpie mayonnaise


Directions:

Part i:  Salmon Poke
1) Using a sharp knife, carefully slice sashimi-grade salmon fillet into small cubes of approximately 2 cm each.
2) Mix marinade ingredients in a medium bowl and coat cubed salmon well.
3) Let sit covered while the other components of the poke bowl are prepared.


Part ii: Poke Bowl
1) Combine white rice with rice wine vinegar, sea salt, and sugar. Mix well.
2) Place sushi rice and/or romaine lettuce at the bottom of a shallow, wide bowl. Top with potato salad, corn kernels, and Jeju mandarin wedges. Spoon marinated salmon poke to the centre of the bowl.
3) Garnish with green onion, sesame seeds, nori strips, and mayonnaise.
4)
Serve and enjoy!

Notes
- Poke bowls allow for complete customization; this being stated, it should be noted that the items utilized in this recipe should be viewed as a mere guideline for variance in nutritional properties. White sushi rice can easily be substituted for quinoa, brown rice, or soba noodles; sunomono (crab meat salad) and pineapple chunks can be used in place of potato salad and mandarin wedges respectively. Feel free to let your creativity guide you!
- It is crucial that sashimi-grade fish is obtained for this recipe, as raw salmon and tuna fillets cannot be handled in the same manner and may induce disease if not treated properly.
- For a vegetarian or vegan option, tofu (or any other plant-based protein of choice) can be utilized in place of salmon.

0 Comments

Wafu-Style Salad & Green Tea Soba with Black Sesame Paste Sauce

4/2/2016

0 Comments

 
Creating combinations with uncommon flavour pairings is always an enticing mission. Fusion cuisine, when executed successfully, exude the same unique appeal.

The original mission was to create a creamy carbonara with the remaining ingredients in the fridge; but after the ingredients had been prepped, I came to the conclusion that they suited wafu-style dishes much more. A side salad with tangy vinaigrette dressing and a multi-toned bowl of Green Tea Soba with Black Sesame Paste Sauce resulted from this decision.
Picture
Picture
Picture
The dishes comprises of a significant number of components, through which preparation actually requires a lengthier prep time than the cooking process. It would wise to allow two hours for this project, with 30 minutes worth of slack should you find yourself unsure of the next steps. 
Picture
Picture
Ingredients

Pickled Radishes (for topping)
- 1 cup red radishes
- 3/4 lime
- 2 tbsp honey
- pinch of salt
- 2 tbsp granulated sugar

Wafu-Style Salad
- 1 head romaine lettuce
- 2 tomatoes
- 2 mini cucumbers, sliced
- 1-2 slices of deli ham (optional)
- 1-2 slices Swiss cheese (optional)
- 2 tbsp rice wine vinegar
- 2 tbsp corn syrup
- 1/4 cup soy sauce
- 1/4 cup water
- 2 tsp wasabi

Green Tea Soba with Black Sesame Paste Sauce
- 3 bunches green tea soba
- 3 carrots, diced
- 2 packages shirataki (optional)
- 10 cremini mushrooms, thinly sliced
- 1 head romaine lettuce
- 4 shallots, thinly sliced
- 1/2 cup black sesame seeds
- 2 tbsp white sesame seeds
- 2 tbsp sesame oil
- 1 tbsp rice wine vinegar
- 2-3 tbsp maple syrup
- 2 tbsp light soy sauce

Directions:

Part i:  Pickled Radishes
1) Thinly slice the red radishes and place into a medium-sized bowl.
2) Add in the juice of 3/4 of a lime, honey, salt, and sugar to taste.
3) Mix thoroughly and set aside for at least 1 hour to pickle.
4) Chill before serving.

Part ii: Wafu-Style Salad
1) Wash and thoroughly drain the romaine lettuce, discarding any wilted sections in the process. Chop into strips and allow to drain well as the other ingredients are prepared.
2) Slice tomatoes into wedges and discard the seeds. Set aside.
3) Use cookie cutters to form small decorative pieces of cheese for topping. (Optional)
4) Slice deli ham into 1-inch sections. Roll three sections and secure with a toothpick. Use the remaining two strips to cover the edges of the toothpick. (Optional)
5) Make the the vinaigrette dressing by combining the rice wine vinegar, corn syrup, soy sauce, water, and wasabi in a small bowl. Whisk to combine and chill before serving. (Alternatively, ponzu sauce could be used in place of soy sauce and rice wine vinegar.)
6) Arrange tomatoes, cucumbers, cheese cutouts, and deli ham on top of lettuce strips just before serving. Drizzle with wafu-style dressing and top with pickled radishes if desired.
7) Serve and enjoy!

Part iii: Black Sesame Paste Sauce
1) Soak black sesame seeds in water for approximately one hour. In a separate bowl, soak the white sesame seeds for an equal duration of time.
2) Drain well and spoon into a shallow pan. Over medium-high tea, toast until the white sesame seeds change colour. Be sure to keep the seeds in constant motion such that they do not burn.
3) Remove from heat and place into a food processor. Grind until the seeds are largely pulverized, adding in small amounts of water to ease the process if necessary.
4) Place mixture into a large bowl and add in sesame oil, rice wine vinegar, maple syrup, and soy sauce. Whisk well to combine.
5) Serve with Green Tea Soba.


Part iv: Green Tea Soba 
1) Cook green tea soba according to package directions. Strain and rinse with cold water once cooked. Set aside.
2) Rinse shirataki and slice into 1 cm-thick pieces.
3) Wash and thoroughly drain the romaine lettuce, discarding any wilted sections in the process. Chop into strips.
4) Arrange peeled and diced carrots onto a baking tray. Using a Bake/Steam function, cook for 12-15 minutes at 375 F. If your oven does not have this setting, steam until the carrot pieces have a gleaming orange surface. Ideally, the carrots should be 80% cooked. Set aside.
5) Over medium-high heat, sautee shallots in sesame oil until fragrant. Add in shirataki and approximately 1 tbsp soy sauce to taste. 6) Reduce heat slightly and add in lettuce strips and mushrooms. Continue sauteeing until the mushrooms become a light grey-brown hue.
7) Place at the vegetable sautee at the bottom of a shallow serving bowl and top with green tea soba. Arrange carrots, shirataki, and pickled radishes (if desired) on top. Drizzle black sesame paste sauce.
8) Serve and enjoy!


Notes
- The ingredient ratios in the serving and dipping sauces were adjusted to my preferred degree of tartness. Feel free to modify these proportions according to your preferences.
- These dishes can be rendered vegetarian by omitting the ham slices, and also vegan by substituting tofu cheese for Swiss cheese.
- The method for preparing the black sesame paste sauce was partially derived from Mama Cheung's Kitchen.
0 Comments

Baked Tofu Fries with Sriracha Mayo Sauce

3/20/2016

0 Comments

 
I have a sad addiction to carb-heavy foods when I'm feeling haggard, so I tend to prevent myself from indulging in bread, rice, and other starchy foods once I'm back to regular sleeping patterns.
But there are days when one hankers for fries and tangy dipping sauce, so I've proposed a guilt-free solution: Baked Panko-Crusted Tofu Fries with a tangy Sriracha Mayo sauce.

Combining the satisfying crunchiness of McD's, fusion flavours of bar appetizers, and unique blend of izakaya-like spicy mayo, here's a great alternative to the greasy, fast-food classic. It's a relatively simple dish to prepare, albeit a bit time-consuming and procedure-intensive.
Picture
Picture
Picture
Ingredients

Tofu Fries
- 2 packs firm tofu *
- 2-3 cups panko
- 3 eggs
- 1/4 to 1/3 cup olive oil
- sea salt
- black pepper
- herbs/seasonings of choice *
- 1/8 cup nori strips (optional)


Sriracha Mayo Sauce
- 1 tbsp Sriracha sauce
- 3 heaping tbsp mayonnaise *
- 1 tbsp honey *
- 1 tbsp wasabi
- 1 tbsp rice wine vinegar
- 2 tbsp light soy sauce
- 2 tbsp chives, finely chopped


Directions:

Part i:  Tofu Fries
1) Drain and thoroughly dry tofu blocks. Wrap individually in paper towels and allow to drain in the refrigerator overnight (or for at least 5 hours) while placing a light weight on top.
2) Remove paper towels from tofu and pat dry. Slice into 3- to 4-inch strips roughly 1 cm in thickness. Set aside.
3) Place eggs in a medium bowl and beat well. Spoon panko into a large bowl and add in salt, pepper, and seasonings of choice (I used garlic powder and seasoned salt).
4) Preheat oven to 400 F. Line baking tray with aluminum foil and grease well with olive oil.
5) Carefully dip tofu strips into the beaten egg before coating with the panko mixture. Place strips onto the baking tray, spacing each at roughly 1.5 cm apart.
6) Bake for 10-12 minutes, or until the surface turns a golden, coppery brown hue. Remove from oven, flip over, and continue baking for another 10 minutes at the same temperature. For additional crispiness, toast for 1-2 minutes after baking.
7) Repeat 5) and 6) until all the tofu strips have been used up.
8) Let cool and prepare the dipping sauce.


Part ii: Sriracha Mayo Sauce
1) Combine all ingredients and mix well.
2) Top with chopped chives and serve with tofu fries.


Notes
- Firm tofu was used in this recipe, though it is highly recommended to obtain Very Firm tofu if possible to decrease chances of crumbling during cooking.
- In addition, or in substitution of, seasoned salt and garlic powder, other dried herbs such as thyme or basil can also be used for enhanced aroma.
- I have used a tabletop convection oven for this recipe; cooking times may differ on a full-scale oven so it is suggested to check frequently and adjust baking times accordingly.
- Feel free to modify the sriracha-mayo ratio to your preferred liking and degree of spiciness.
- An egg-free mayonnaise or specialty vegan mayonnaise can be used in place of regular mayonnaise to render this recipe vegan.

- If honey is not available, feel free to substitute with 1-2 tbsp of granulated sugar.
0 Comments

Somen in Lemongrass Coconut Broth

3/8/2016

0 Comments

 
What's better than ramen? DIY somen!

Pricey bowls of cold ramen salad have never been my thing (I mean, $12 for canned corn and tacky noodles?!?), and neither have greasy, slick portions of pork bone soup. In celebration of the weather finally making a turn for the positive (literally so), I present to you  a tangy, refreshing noodle dish that can be served either hot or cold.
Picture
Picture
Picture
Ingredients

Broth (Recipe inspired by and adapted from La Fuji Mama)
- 2 cans coconut milk
- 2-3 cups water
- 3 tbsp olive oil
- 2 tbsp lemongrass powder
- 1 stalk leek, chopped
- 1 bunch cilantro*
- 5 cloves garlic, minced
- 1.5 tbsp thyme
- 3 limes, juiced*
- 1/4 cup soy sauce
- 1 tbsp granulated sugar
- 3 tbsp sea salt (or as required)

Somen Noodles
- 4 bunches uncooked somen noodles
- 3-4 mini cucumbers
- 1/2 can corn kernels
- 2 nori sheets
- 1/3 cup sesame seeds
- 2 eggs
- other toppings of choice*

Pickled veggies (optional) (Recipe adapted from White on Rice Couple)
- 1 medium daikon
- 3 large carrots
- 1 cup white vinegar
- 1/3 granulated sugar*
- 1 cups water

Directions:

Part i:  Broth
1) Clean cilantro thoroughly and remove any wilted stalks. Pat dry and set aside.
2) In a large pot, sautee leek and garlic in olive oil over medium-high heat for several minutes or until fragrant.
2) Add in lemongrass powder, thyme, granulated sugar, and approximately one cup of water. Allow to simmer gently.
3) Combine coconut milk, water, and lime juice. Add into the pot.
4) Allow the mixture to simmer for a few minutes before stirring. Mix and reduce the heat immediately if the mixture begins to boil vigorously.
5) Add in soy sauce and salt. If necessary, adjust the amount of salt to your preference.
6) Remove from heat and set aside.
7) Add in cilantro several minutes before serving to prevent excessive wilting. (Please note: I added in the cilantro while preparing the broth, but would recommend performing this step later on instead.)

Part ii: Somen Noodles
1) In a shallow pot, bring water to a boil and add in somen noodles. Cook for 5-8 minutes, or as directed on the packaging, and remove from heat. Drain and rinse with cold water before floating over an ice water bath until ready to serve.
2) Thoroughly wash and skin mini cucumbers, leaving thin trails of skin on each strip. Discard the centres (or reserve for smoothie-making). Transfer cucumber strips into a serving bowl.
3) Cut nori into thin rectangular strips, roughly 1 in in length and 1 cm in width. Transfer to a serving bowl.
4) Place sesame seeds in a shallow pan and toast over low heat, mixing every so often. Once lightly browned, remove from heat and transfer to a serving bowl.
5) In a shallow pan (or medium-sized skillet), bring water a roaring boil. Immediately reduce the heat until only a few bubbles float to the surface.
6) Crack one egg into a shallow dish and slowly lower into the water. Allow the egg to poach for 3-4 minutes. Remove and cool in a bowl of water. Repeat with the remaining egg.
7) Transfer corn kernels into a serving bowl.
8) Set aside cucumber strips, nori strips, toasted sesame seeds, poached eggs, and corn kernels until ready to serve.

Part iii: Pickled veggies (optional)
1) Thinly slice daikon and carrot into strips. Place into a large bowl and cover with white vinegar and sugar. Add water and allow to pickle for about one hour.
2) Set aside until noodles are ready to serve.

Part iv: Compilation
1) Combine broth and somen noodles at the desired ratio and add toppings.
2) Enjoy!

Notes
- Try to obtain the freshest cilantro possible in order to maintain a grassy hue even after submerging in steamy broth.
- Pickled veggies should be served as an appetizer. Refrain from fully submerging them into the broth as it can cause the broth to become unnecessarily sour.
- I added 3 tbsp of granulated sugar and two cups of water to my pickled veggie mix and the outcome was lacking in flavour. The amounts in this recipe have since been adjusted to yield a more desirable finish.
- The resulting broth was found to be a bit bland, therefore I would highly suggest adding in a greater amount of salt than indicated above in Part i). For optimal results, taste the broth after the addition of lime juice and adjust as needed. Alternatively, feel free to reduce the amount of lime juice.
- During the egg poaching process, a shallow pot was utilized instead of a shallow pan/skillet. However, after experiencing a frenzy of egg whites roaming wild within the water, I would highly recommend using a skillet instead.
- Omit the egg for a low cholesterol variation or an entirely vegan option.
- Feel free to add whichever other toppings you desire, whether that be miso marinated eggplant, sweet potato, etc.
- I have opted to omit any spicy elements, but feel free to add chili flakes to render the dish to your liking.
0 Comments

Afternoon Tea Bites: Finger Sandwiches, Watermelon Tarts & Earl Grey Jelly

7/23/2015

0 Comments

 
I've been coveting an afternoon tea set (sometimes called a "high tea set" if it consists of three tiers) for what's seemed like years.

There's just something about the tiers and overall design of the food presentation apparatus that enhances the visual appeal of the items placed on it. Needless to say, I got to work creating a few items to photograph on the set as soon as I possibly could. (It was also incredibly hot outside, making it an unseemly decision to shoot Ribfest happenings.)

Confession: an authentic afternoon tea set should consist of a greater variety of food items, though the level of difficulty to craft delicate finger sandwiches and dainty English-style desserts wasn't apprehended until midway through the cooking process. From this, I would highly recommend planning the sequence in which the items are made and suggest to prepare desserts in advance.
Picture
Picture
Picture
Picture
Picture
Picture
Picture
Ingredients

Finger Sandwiches
- 3-4 slices of whole wheat bread*
- 1 cup baby potatoes, mashed and chilled
- 1 stalk green onion
- 1 tbsp wasabi*
- 2 tbsp half & half cream

Watermelon Tarts
- 1/2 cup unsalted butter*
- 2/3 cup all-purpose flour
- 2/3 cup of watermelon
- 2 eggs
- 1/3 cup milk
- 1/4 cup granulated sugar

Earl Grey Jelly
- 4 tbsp Earl Grey loose tea leaves
- 2 1/2 - 3 cups milk
- 1 package Knox gelatin powder
- sweetener*

Directions:

Part i:  Finger Sandwiches
1) Chop green onion into 1/4 inch to 1/2 inch pieces. Add to mashed potatoes and mix well.
2) Add cream to mashed potatoes and mix well. Add wasabi and mix again, ensuring that the contents are thoroughly combined.
3) Chill in the fridge for about half an hour.
4) Meanwhile, cut the bread into various (crust-less) shapes using cookie cutters of varying sizes. I have chosen a large star cookie cutter, as well as a small, scalloped one.
5) Spread mashed potato mixture between the bread layers. Set aside.

Part ii: Watermelon Tarts
1) To make the crusts of the tarts, mix cold, unsalted butter with the flour. Gradually incorporate the butter into the flour using your fingertips. Continue 'kneading' until a cohesive property is witnessed.
2) Preheat the oven to 350 F and thoroughly grease a mini cupcake pan. Spoon the butter-flour mix into the pan and press until the mix covers compartment uniformly. Ensure that the centre is at a lower elevation than the rest of tart crust so that the fillings will not spill.
3) Bake the tart crusts for 20-25 minutes.
4) During this time, make the custard filling by whisking two eggs with granulated sugar and milk.
5) Float the mixture over a bain marie (aka hot water bath) until it thickens, forming a custard. Chill the custard in the fridge until ready to use.
6) Using a melon baller, make about twelve small watermelon spheres, or as many as there are tart crusts.
7) Remove the tart crusts once golden brown and let sit for 2-3 minutes. Remove from the pan and let completely cool.
8) Remove the custard filling from the fridge and place into a piping bag, or a Ziploc bag with one end snipped off. Pipe the mixture onto the tart crust in a circular motion, working from the edges of the crust towards the centre. Repeat this for each tart crust.
9) Carefully pat the watermelon spheres with a paper towel to absorb excess moisture. Place on top of the custard filling.
10) Serve immediately, or chill to enjoy at a later date.

Part iii: Earl Grey Jelly
1) Add milk and tea leaves into a small saucepan. Bring the saucepan over a stove turned on medium heat.
2) Steep the Earl Grey tea leaves in milk for about 30-40 minutes, stirring constantly and making sure that the milk does not boil.
3) Gradually add in sweetener of choice. (Note: In my haste, the need to add sweetener completely skipped my mind. For your own purposes, use your preferred solid or liquid sweetener to enhance the flavour of the jelly to your desired taste.)
4) Dissolve the gelatin powder with a small amount of hot water, and add into the saucepan once the milk has reduced to half and the mixture has turned a rustic orange hue. Stir to mix completely.
5) Stir well and remove the stove and let cool completely. Remove the tea leaves using a strainer once cooled, or simply toss the tea filter bag if using one. Feel free to transfer the mixture to a bowl and float over an ice water bath to reduce cooling time.
6) Pour the mixture into jelly molds and let sit in the fridge for at least 2 hours.
7) Remove the jelly from the molds and refrigerate until ready to serve.

Notes
- Whole wheat bread was used in this recipe, though it can also be substituted with enriched white bread or multi-grain bread depending on preference.
- The amount of wasabi to be added to the mashed potato mixture can be adjusted to taste. 1 tbsp is enough to distinguish the flavour, but not so strong that it will cause nasal congestion.
- It is recommended to keep the skin on the baby potatoes for added texture and flavour; a small knob of butter can also be added to the mashed potatoes for a creamier finish.
- For the tart crusts, one can choose to add more butter for a less crumbly crust and richer flavour. The shells that were made utilizing this recipe stayed intact, though the edges did crumble slightly.
- As mentioned above, it is important that sweetener is added to the Earl Grey jelly mixture prior to refrigerating.
0 Comments

Festive Cheese & Cranberry Scones

12/18/2013

0 Comments

 
I love Christmas, and I also love food.

Recently, I've been craving some biscuits for munching on while continuing on my long trek to my final (mechanics) exam.
And since my mom refilled the cheese inventory, I could finally try a hand at baking scones!

But wait, these aren't just any old scones!  They're Christmas tree-shaped scones! Honestly, just how awesome is that?! (≧∇≦)

Plus, they also pack in a punch of protein and a healthy dose of calcium. And like many of my recent creations, they're also gluten-free! ^ ^
Picture
Picture
Picture
Picture

Ingredients
- 1 cup oat flour
- 1 cup shredded part-skim mozzarella cheese
- 1 cup sweetened dried cranberries
- 2 tbsp calorie-wise mayonnaise
- 1 tbsp dijon mustard
- 2 tbsp Blue Menu sundried tomato and herb seasoning blend
- 2 tsp coarse sea salt
- 1 tsp baking powder
- 1/4 cup water (or as needed)

Directions:
1) Preheat oven to 425 F.
2) Place all dry ingredients, shredded cheese, and cranberries in a large bowl.
3) Add in mayonnaise and mustard. Mix until fully combined. The texture should resemble a coarse meal.
4) Add in water little by little until a dough forms.
5) Optional: Flatten the dough on a sheet of wax paper or floured surface. Cut out shapes of choice using cookie cutters.
6) Place scones onto greased baking tray, or one lined with parchment paper. Bake for 11-13 minutes or until the edges start to brown slightly.
7) Let cool and enjoy!

Makes 20 servings.

Notes
- In this recipe, I used part-skim mozzarella cheese and calorie-wise mayonnaise to keep the fat content to a minimum. However, if you prefer a richer taste, feel free to choose the regular (non-reduced fat) option.
- If you do not have sea salt, feel free to use normal salt instead.
- The number of servings depends the size and shape of cookie cutters used, so exact nutrition information will vary. I used large Christmas tree cookie cutters and had a small amount of dough left over, therefore the data below was calculated based on 5.5 servings.

Nutrition:
(Based on 5.5 servings)

Calories: 165.9
Fat:  5.8 g
     Saturated: 2.7 g
Cholestrol: 12.7 mg
Sodium: 552.3 mg
Potassium: 0.2 mg
Carbohydrates: 21.4 g
     Fibre:  2.4 g
     Sugars:  8.3 g
Protein:  7.3 g
---
Vitamin A: 3.2%
Calcium: 19.7%
Iron: 4.7%
0 Comments

Jajang Tteokbokki (Korean Rice Cakes with Black Bean Sauce)

11/14/2013

0 Comments

 
My first savoury recipe: Jajang Tteokbokki! (or  자장 떡볶이 for those that can read Korean ^ ^ /)

Inspired by Aeri's Kitchen and using the remaining vegetables in the fridge, I was able to whip this up in less than an hour. =D
Picture
Picture
Picture
Picture
Picture
Ingredients
- 1.5 cups of brown rice ddeokbokki (Korean rice cakes) *
- 4 - 4.5 tbsp jajang sauce
- 1.5 tbsp minced garlic
- 1 stalk long green onion, chopped
- 1 package (200g) frozen scallops, defrosted *
- 1 cup frozen vegetables, defrosted (opt.)
- 4 medium carrots, diced
- 3 cups of broccoli, cut into florets and separated from stalk pieces
- 2 tbsp cornstarch
- 5-6 cups water

Directions:
1) Steam carrots and broccoli until slightly cooked. They should have changed colour slightly but not become so soft that they can easily be pierced.
2) Mix jajang sauce with 2 cups of water. Combine well.
3) Heat one tbsp of vegetable/canola oil in a pot on medium-high. Combine green onion and garlic, and pan fry until fragrant (about 3 mins). Be careful not to burn the garlic.
4) Add in ddeokbokki, vegetables, scallops and diluted jajang sauce. Slowly stir in 2 cups of water.
5) Mix cornstarch with remaining water and pour into jajang broth.
6) Distribute sauce evenly among vegetables and ddeokbokki.
7) Cook until vegetables are soft and ddeokbokki is still semi-firm.
8) Remove from heat immediately and cover until ready to serve.

Makes 25 servings.

Notes
- To make this recipe to be vegan/vegetarian, omit the scallops. 
- To lower the number of carbs, substitute ddeokbokki with "cauliflower rice".

Nutrition:
(Per serving)

Calories: 47.6
Fat:  0.6 g
     Saturated: 0.0 g
Cholestrol: 2.6 mg
Sodium:  64.8 mg
Potassium: 66.6 mg
Carbohydrates: 8.3 g
     Fibre:  0.7 g
     Sugars:  1.0 g
Protein:  2.4 g
-----------------------------------
Vitamin A: 46.5%
Vitamin C: 18.4 %
0 Comments
    The Sweet
    The Savoury

    Archives

    July 2020
    March 2020
    January 2020
    April 2019
    August 2018
    June 2018
    April 2018
    February 2018
    December 2017
    November 2017
    August 2017
    July 2017
    May 2017
    April 2017
    February 2017
    January 2017
    December 2016
    April 2016
    March 2016
    October 2015
    September 2015
    July 2015
    January 2015
    December 2014
    June 2014
    March 2014
    February 2014
    January 2014
    December 2013
    November 2013
    October 2013
    September 2013
    August 2013


    Categories

    All
    Brownie
    Chocolate
    Christmas Recipes
    Easy Recipes
    Gluten Free
    High Fibre
    High Potassium
    High Protein
    Ice Cream
    Japanese Style
    Low Carb
    Low Cholestrol
    Low Fat
    Low Sodium
    Matcha
    Microwave Recipe
    Quick Recipes
    Savoury Recipes
    Sweet Recipes
    Vegan
    Vegetarian
    Yuzu


    RSS Feed

WHAT DOES "QUIRKY AESTHETICS" MEAN?

Quirky =  a term that commonly refers to something/someone distinctly different and unique
Aesthetics = the visual aspect of things


Together, Quirky Aesthetics refers to the things, events, and happenings seen and perceived by this blog's creator - quirky perspectives in a visual form.

Contact ME

​Subscribe

Join our mailing list today!
Join Now
© Quirky Aesthetics. All rights reserved. Last modified: August 10, 2015.