Random Thoughts of a Quirky Blogger
  • ~ Home ~
  • ~ What I Think ~
  • ~ What I See ~
    • Events
    • Food
    • People
    • Places
  • ~ What I Make ~
  • Blog Series
  • Terms and Conditions
  • Disclaimer

Yuzu Plum Iced Tea

4/20/2017

0 Comments

 
Frigid winter temperatures mean steamy, spicy sips, but spring calls for refreshing glasses of fruity iced teas.

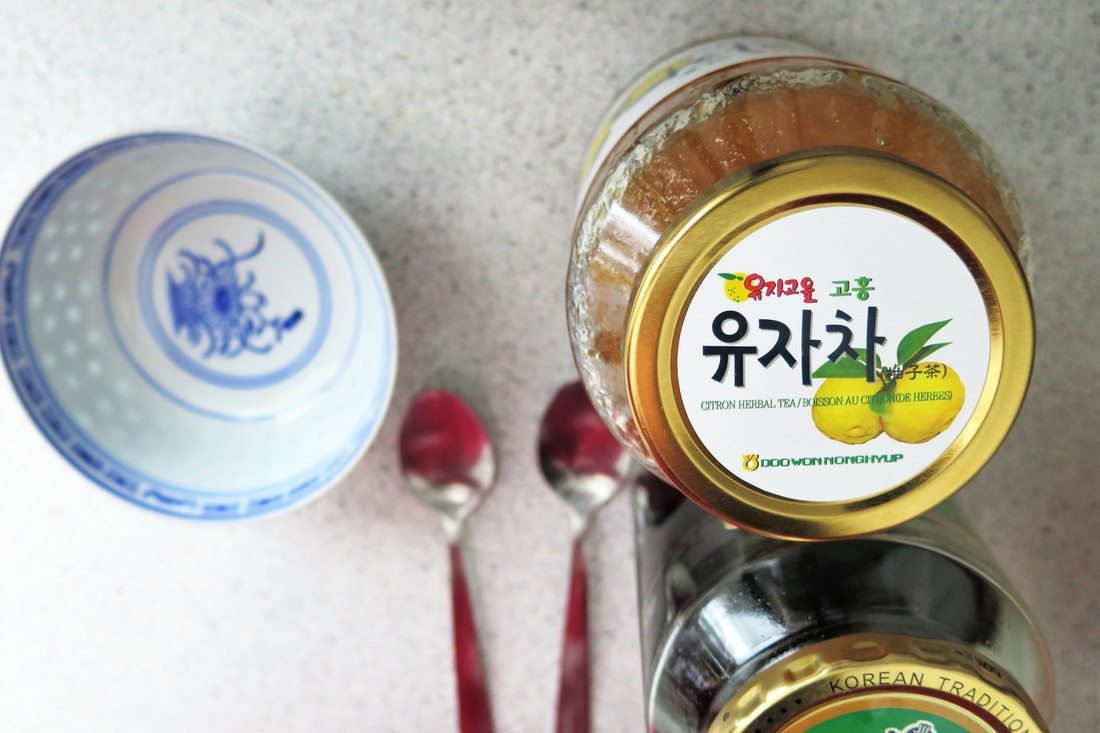
Mixing yuzu, also known as Honey Citron, and Korean sour plum (매실) with cold green tea has been a consistent favourite as of late. It transitions well from the season of showers to the summer months, and can even be transformed into a slushie for added cooling relief.

Once again, I've attempted to illustrate the steps in video format (sans music for the sake of maintaining my copyright strike profile clean). As the video recipe is text-less, please refer to the ingredient list below for approximate proportions.
Picture
Picture
Ingredients
​
- 1 lime wedge
- 1/2 cup ice
- 1-2 tsp yuzu/honey citron tea
- 2 tsp sour plum concentrate
- 1/3 cup hot water
- 2/3 cup green tea, chilled *​

Directions:

0) Brew preferred variety of green tea, then let cool and refrigerate for at least four hours.
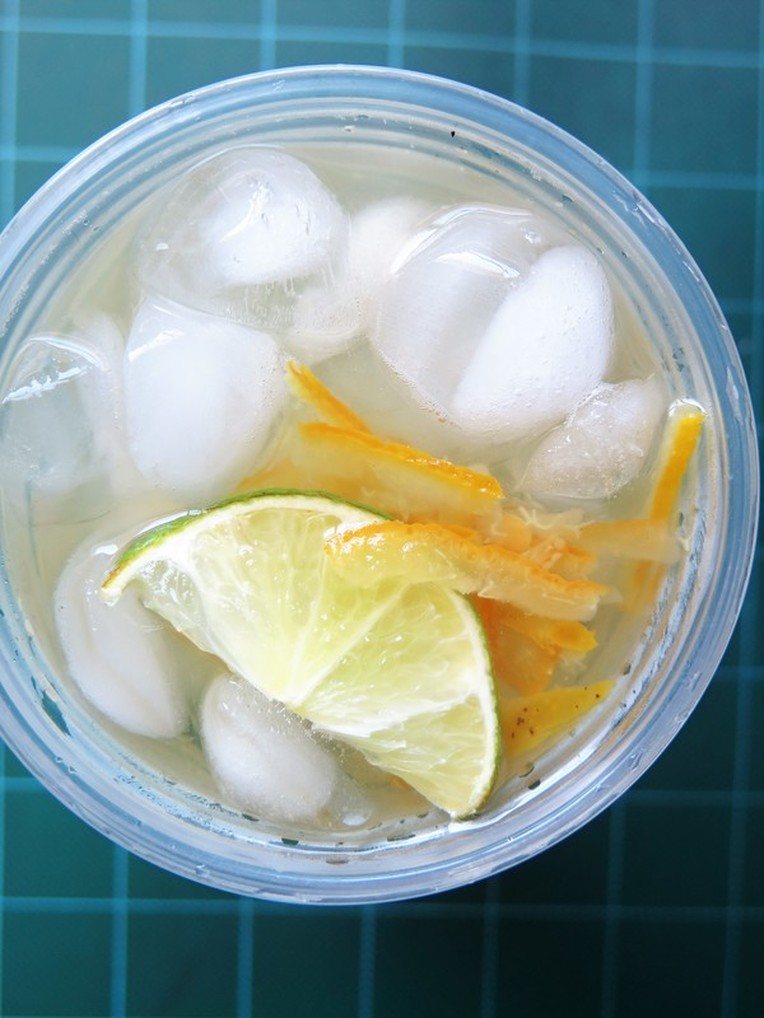
1) Place lime wedge and ice cubes in a cup. Puncture lime wedge to release juices.
2) Pour chilled green tea over the lime wedge and ice cubes until cup is one third full.
3) Dissolve yuzu and sour plum concentrate in hot water. Pour over tea.
4) Fill the remainder of the cup with green tea. Stir to combine well.
5) Serve and enjoy!​

Notes
- For this recipe, I have opted to use DAVIDsTEA's Organic Sweet Almond Green, a floral green tea with strong almond influence. However, feel free to use your desired tea variety. (This recipe could also be crafted with a bergamot-based black tea, though I have yet to experiment with this combination.)
- Based on personal preferences, a 1:1 ratio of yuzu and sour plum have been found to yield the most pleasing results. Should one deduce the need to increase either of these proportions, please feel free to do so, as this recipe is merely a guideline.
- For those adhering to a vegan diet, I would suggest double-checking the labels of the Honey Citron Tea and Sour Plum Concentrate, though chances of animal interference are low.
0 Comments

Curry Japchae

4/1/2017

0 Comments

 
The box of curry on our countertop has been beckoning for my attention for some time now. With some unattractive leftovers in the fridge and an enormous bag of unopened japchae noodes peeking out from behind, I set to work combining the two to create a predominantly Korean-inspired dish with an injection of Japanese-style yellow curry.
Picture
Picture
Picture
Ingredients

Japchae
- 1 bunch japchae (sweet potato) noodles
- 2 bell peppers, roughly diced
- 1 onion, chopped
- 1 shallot, chopped
- 1 small knob ginger
- 4 perilla leaves, thinly sliced
- 1/3 cup vegetable oil
- 2 tbsp sesame oil
- sesame seeds (opt.)

Sauce
- 1 quarter block Golden Curry mild curry roux *
- 2 tbsp bulgogi sauce
- 1-2 tbsp kimchi base sauce
- 1 tbsp cane syrup *
- 1 tbsp light soy sauce
- 1 tbsp whipped peanut butter
- 1 tsp rice wine vinegar
- 1 tsp cornstarch (opt.)
​
Directions:

1) Bring a pot of water to a roaring boil. Add in japchae noodles and mix quickly. Remove and rinse with cold water before it softens. (See note.) Set aside.
2) Blanch the diced peppers until partially cooked. The colours will become a tad more vibrant, but shouldn't be able to be easily pierced by a fork. Rise with cold water and set aside.
3) In a medium bowl, dissolve the curry block with a small amount of hot water. Add in all sauce ingredients and mix well. Set aside.
4) Heat vegetable oil in a large pot. Over high heat, stir fry chopped onion, shallot, and ginger until fragrant and slightly golden.
5) Add in japchae and peppers, stirring to make sure that nothing adheres to the bottom of the pot.
6) Quickly add in the sauce mixture and toss to coat the japchae evenly. Feel free to add water at this stage to make the mixing process easier.
7) Add in sesame oil and any other sauce modifications if desired. Add perilla leaves.
8) Reduce heat to medium and continue stirring until sauce thickens. If too much water was added during the previous steps, mix cornstarch with a small amount of water and add it into the pot.
9) Remove from heat once sauce has thickened.
10) Let cool and top with sesame seeds (if desired).
11) Serve and enjoy!

Notes
- Admittedly, I overcooked the japchae noodles, causing the strands to disintegrate and adopt a mushy texture once the sauce was mixed in. As such, I would advise cooking the noodles only briefly, or simply rinsing them once before stir-frying.
- Rice wine vinegar is an optional ingredient, however I find that the tartness helps to balance the creamness of the peanut butter and curry roux. If available, fresh lime juice would be an even better alternative.
- Feel free to substitute cane syrup with sugar or honey.
- This recipe is versatile and can be altered based on one's dining preferences. Bits of ham or sausage can be added to the pot for a source of protein. It can also be made vegan with curry roux that is free of animal byproucts - Golden Curry contains "edible oil and fat" (derived from unspecified sources).
- While japchae noodles themselves are gluten-free, please be aware that the curry roux used in this recipe contains wheat.
- I used a mild curry block for this recipe, however feel free to adjust the spiciness to your liking.

0 Comments

Jasmine Tea Latte

1/3/2017

0 Comments

 
Let's try something new this time! As opposed to my regular recipe posts, I've attempted a video tutorial depicting the steps I normally take to make a green tea latte.

Despite my usual preference for DAVIDsTEA's Ceremonial Matcha, I opted to try SteepedTea.com's variation as I had received it as a gift. The results were less optimal than my regular brew and retained a lingering floral flavour more reminiscent to Jasmine Tea than Matcha. Nonetheless, the final product was still tasty.

(Please be welcome to leave constructive criticism, as videography remains a relatively unexplored field to me.)
Picture
Picture
Ingredients

- 1 -2 tsp green tea powder
- 1 cup hot water
- 1/3 cup milk *
- 1 tsp honey (opt.)


Directions:

1) Sift green tea powder into a Pyrex measuring cup (or heat-safe container of choice).
2) Add hot water and whisk with an electric frother. Should your selected type of green tea powder already contain sugar (ie. drink mixes), it will dissolve easily and will not require the use of a frother to remove lumps.
3) Add in honey to taste. Alternate choices of sweeteners such as agave or maple syrup may also be used based off of personal preferences.
4) Heat and froth milk in a Stainless steel pitcher, then combine the tea and frothed milk in a mug. Top with additional green tea powder if desired.
5) Serve while warm and enjoy!


Notes
- A 1:3 ratio of milk and brewed green tea was used to obtain the final product, however feel free to adjust the amount of water used to the dissolve the tea powder based on preference. Less water will contribute to a more intense flavour, and vice versa.
- 2% milk was utilized in this recipe, though both dairy and non-dairy milks will work equally well. It should be noted that frothing time and temperature may require minor adjustments; the resulting consistency may also vary depending the quantity and type of milk used.
- Upon dissolving my green tea powder, it was discovered that the substance was not pure Japanese matcha as the label had stated. Consequently, latte art could not be easily created. Thus, it was more accurate to describe the finished beverage as a Jasmine Tea Latte instead, especially considering that its aroma was more floral than grassy.
0 Comments

Wafu-Style Salad & Green Tea Soba with Black Sesame Paste Sauce

4/2/2016

0 Comments

 
Creating combinations with uncommon flavour pairings is always an enticing mission. Fusion cuisine, when executed successfully, exude the same unique appeal.

The original mission was to create a creamy carbonara with the remaining ingredients in the fridge; but after the ingredients had been prepped, I came to the conclusion that they suited wafu-style dishes much more. A side salad with tangy vinaigrette dressing and a multi-toned bowl of Green Tea Soba with Black Sesame Paste Sauce resulted from this decision.
Picture
Picture
Picture
The dishes comprises of a significant number of components, through which preparation actually requires a lengthier prep time than the cooking process. It would wise to allow two hours for this project, with 30 minutes worth of slack should you find yourself unsure of the next steps. 
Picture
Picture
Ingredients

Pickled Radishes (for topping)
- 1 cup red radishes
- 3/4 lime
- 2 tbsp honey
- pinch of salt
- 2 tbsp granulated sugar

Wafu-Style Salad
- 1 head romaine lettuce
- 2 tomatoes
- 2 mini cucumbers, sliced
- 1-2 slices of deli ham (optional)
- 1-2 slices Swiss cheese (optional)
- 2 tbsp rice wine vinegar
- 2 tbsp corn syrup
- 1/4 cup soy sauce
- 1/4 cup water
- 2 tsp wasabi

Green Tea Soba with Black Sesame Paste Sauce
- 3 bunches green tea soba
- 3 carrots, diced
- 2 packages shirataki (optional)
- 10 cremini mushrooms, thinly sliced
- 1 head romaine lettuce
- 4 shallots, thinly sliced
- 1/2 cup black sesame seeds
- 2 tbsp white sesame seeds
- 2 tbsp sesame oil
- 1 tbsp rice wine vinegar
- 2-3 tbsp maple syrup
- 2 tbsp light soy sauce

Directions:

Part i:  Pickled Radishes
1) Thinly slice the red radishes and place into a medium-sized bowl.
2) Add in the juice of 3/4 of a lime, honey, salt, and sugar to taste.
3) Mix thoroughly and set aside for at least 1 hour to pickle.
4) Chill before serving.

Part ii: Wafu-Style Salad
1) Wash and thoroughly drain the romaine lettuce, discarding any wilted sections in the process. Chop into strips and allow to drain well as the other ingredients are prepared.
2) Slice tomatoes into wedges and discard the seeds. Set aside.
3) Use cookie cutters to form small decorative pieces of cheese for topping. (Optional)
4) Slice deli ham into 1-inch sections. Roll three sections and secure with a toothpick. Use the remaining two strips to cover the edges of the toothpick. (Optional)
5) Make the the vinaigrette dressing by combining the rice wine vinegar, corn syrup, soy sauce, water, and wasabi in a small bowl. Whisk to combine and chill before serving. (Alternatively, ponzu sauce could be used in place of soy sauce and rice wine vinegar.)
6) Arrange tomatoes, cucumbers, cheese cutouts, and deli ham on top of lettuce strips just before serving. Drizzle with wafu-style dressing and top with pickled radishes if desired.
7) Serve and enjoy!

Part iii: Black Sesame Paste Sauce
1) Soak black sesame seeds in water for approximately one hour. In a separate bowl, soak the white sesame seeds for an equal duration of time.
2) Drain well and spoon into a shallow pan. Over medium-high tea, toast until the white sesame seeds change colour. Be sure to keep the seeds in constant motion such that they do not burn.
3) Remove from heat and place into a food processor. Grind until the seeds are largely pulverized, adding in small amounts of water to ease the process if necessary.
4) Place mixture into a large bowl and add in sesame oil, rice wine vinegar, maple syrup, and soy sauce. Whisk well to combine.
5) Serve with Green Tea Soba.


Part iv: Green Tea Soba 
1) Cook green tea soba according to package directions. Strain and rinse with cold water once cooked. Set aside.
2) Rinse shirataki and slice into 1 cm-thick pieces.
3) Wash and thoroughly drain the romaine lettuce, discarding any wilted sections in the process. Chop into strips.
4) Arrange peeled and diced carrots onto a baking tray. Using a Bake/Steam function, cook for 12-15 minutes at 375 F. If your oven does not have this setting, steam until the carrot pieces have a gleaming orange surface. Ideally, the carrots should be 80% cooked. Set aside.
5) Over medium-high heat, sautee shallots in sesame oil until fragrant. Add in shirataki and approximately 1 tbsp soy sauce to taste. 6) Reduce heat slightly and add in lettuce strips and mushrooms. Continue sauteeing until the mushrooms become a light grey-brown hue.
7) Place at the vegetable sautee at the bottom of a shallow serving bowl and top with green tea soba. Arrange carrots, shirataki, and pickled radishes (if desired) on top. Drizzle black sesame paste sauce.
8) Serve and enjoy!


Notes
- The ingredient ratios in the serving and dipping sauces were adjusted to my preferred degree of tartness. Feel free to modify these proportions according to your preferences.
- These dishes can be rendered vegetarian by omitting the ham slices, and also vegan by substituting tofu cheese for Swiss cheese.
- The method for preparing the black sesame paste sauce was partially derived from Mama Cheung's Kitchen.
0 Comments

Hot Chocolate Yuan Yang

10/25/2015

0 Comments

 
It's that time of year again - winter. (Do I hear groans from my fellow Canadians?)

While Apple Cider and PSLs are the common choices for fall, I tend to lean more towards extra-caffeinated, milky drinks when having to wake up earlier to accommodate harsh weather/precarious driving conditions. We're out of Nutella for now, but there's never a shortage of tea nor sweetened condensed milk in the cupboards.

I looked toward my favourite food blogs to derive inspiration for an innovative toasty beverages, and was more than thrilled to try out Lady and Pups' creative rendition of hot chocolate inspired by Cantonese flavours.
Picture
Picture
Picture
Picture
Picture
Picture
(Recipe adapted from Lady and Pups' 'THE HOT TRIPLETS')

Ingredients

- 1/2 cup 1% milk*
- 1/4 cup evaporated milk
- 3 tbsp sweetened condensed milk*
- 1/3 to 1/2 cup espresso*
- 3 tsp loose leaf black tea*
- 1 heaping tbsp cocoa powder
- 1 handful of mini marshmallows*

Directions:

1) Spoon tea leaves into a filter bag, then place into a small saucepan with the milk.
2) Steep the tea over low heat while stirring constantly. Spoon in sweetened condensed milk, stirring after the addition of each tablespoon.
3) Once the mixture becomes a pale copper hue, remove the tea bag and add in the espresso and evaporated milk. Stir to combine.
4) Over low-medium heat, add in cocoa powder and stir until fully dissolved.
5) Remove from heat and strain the mixture to remove any clumps.
6) At this stage, one can opt for a chilled version of the drink by allowing it to cool to room temperature and placing in the refrigerator at this stage for approximately one hour. Serve over ice.
7) To restore a slight amount of heat into the drink, microwave for 20 to 25 seconds before using a milk frother to add texture.
8) Pour into a serving mug and top with marshmallows. If desired, char the surface of the marshmallow layer with a kitchen blowtorch.
9) Serve and enjoy!

Notes
- Feel free to substitute 1% milk with skim milk, or even 2% milk for a richer taste. I have not attempted to use non-dairy milks though, and thus cannot vouch for the taste or texture if substituted.
- Feel free to adjust the amount of tea leaves or espresso to fit your tastes. I generally prefer milder coffee and stronger tea flavours, but happened to be running low on Nepal Black. (Oops!)
- Evaporated milk is an essential element of yuan yang and would advise against substituting coconut milk/almond milk/cashew milk/etc. in its place.
- Sweetened condensed milk provides the hot chocolate with a dose of unique sweetness unlike any other, therefore it is the recommended sweetener in this case. However, if you must, other potential alternatives include granulated sugar or agave.
- The size of marshmallows used in the recipe is entirely based on preference; mini marshmallow were utilized for this recipe simply since I find that charring large marshmallows uniformly to be slightly more challenging.
- For best results, allow the marshmallows to melt halfway before consuming.
0 Comments

Honey Milk & Coffee Jelly Jars

6/13/2014

0 Comments

 
After having visited Sweet Note Desserts on a recent trip to Markham and having a taste of their renown Milk Bottle Desserts, I couldn't help but be inspired to create some chilled bottled desserts of my own.

As it was a rather impromptu lazy afternoon project, I couldn't be bothered to incorporate flavours such as sesame or hazelnut into it. Instead, I went for the incredibly easy options of honey milk (literally just milk sweetened with a hint of honey) and coffee (using regular instant coffee granules).
Picture
Picture
Picture
Picture
Picture
Picture
(The amounts used in this recipe are not exact as I didn't measure out specific quantities while preparing the jellies, however, the concept of the preparation process remains the same as for any jelly-based dessert.)

Ingredients

For the milk honey jelly:
- 1/2 cup skim milk *
- 1/8 cup of half & half cream
- 3 tbsp honey *
- 3-4 tbsp gelatin powder 
- 3/4 cup of water

For the coffee jelly:
- 2-3 tbsp instant coffee granules
- 1/3 cup brown sugar *
- 1/2 cup skim milk- 3-4 tbsp gelatin powder
- 3/4 cup of water


Directions:
1) For the coffee jelly layer, add water to the gelatin powder  and stir to dissolve completely. Set aside.
2) Combine the rest of the ingredients and add in the gelatin powder. Mix thoroughly and pour into jars of choice to set.
3) Refrigerate for at least three hours before adding another layer on top.
4) For the milk honey jelly,  add water to the gelatin powder  and stir to dissolve completely. Set aside.
5)  Combine the rest of the ingredients and add in the gelatin powder. Mix thoroughly.
6) Remove the jars containing the coffee jelly from the refrigerator and pour honey milk layer on top.
7) Let refrigerate another 3-4 hours or until set.
8) Serve chilled.

Notes
- I used skim milk and a hint of half & half cream for the honey milk layer, however, feel free to use milk of a higher fat concentration or even cream if a richer taste is preferred.
- The amount of honey/brown sugar added to the jelly can be adjusted to your preference. I generally prefer a milder taste and thus add only a small amount of sweetener.
- The amount of gelatin powder can be varied for a softer or harder jelly. Using 3-4 tbsp of gelatin powder resulted in an extremely firm jelly, so this amount can be reduced slightly for a softer effect. As I have not tested this myself, however, I cannot vouch for any varying outcomes you may receive in the dessert.
0 Comments

Easy Prune and Orange Scones

3/23/2014

0 Comments

 
At this point it's become to distinguish between whether I've simply become a broken record, replaying the same, unchanged list of things I have to prepare for this upcoming week, or whether the stress has finally gotten to me and I'm slowly crumbling down....like a flaky scone.

In all seriousness though, I decided to whip up this quick batch of scones as I had bought whipping cream earlier this month, intending to make some sort of fancy dessert. Of course, that never happened.
And since the whipping cream would be expiring before I was to finish the week, there seemed to be no better solution to using the carton up in a creative and tasty way.
Picture
Picture
Picture
Picture
(Recipe inspired by/adapted from Smitten Kitchen; egg was omitted and granulated sugar was traded in for honey)

Ingredients
- 1 cup all-purpose flour *
- 1 tsp baking powder
- 1/2 cup quick-cooking oats
- 2 tbsp wheat bran
- 5 prunes, chopped
- 1/3 cup cold butter, cubed
- 1/2 cup whipping cream
- 1/4 cup honey *
- zest of half an orange
- pinch of salt

Directions:
1) Preheat oven to 400 F.
2) Sift flour, baking powder, and salt together in a large bowl. Add in oats and wheat bran.
3) Cut in butter until full incoporated. The dough should resemble a coarse meal with a few lumps.
4) Add in prunes and zest, honey, and cream. Mix until a dough forms.
5) Form dough into ten mounds roughly half an inch (or 2.54 cm) in thickness.
6) Bake for 20 mins, or until the tops have browned slightly.
7) Let cool and enjoy!

Makes 10 small scones.

Notes
- To make this recipe gluten-free, substitute a gluten-free flour mix for the all-purpose flour.
- I used a liquid sweetener (honey) in this recipe since I wanted to keep the scones slightly moist on the inside. However, feel free to use other forms of sweetener if you would like a crispier finish.

Nutrition:
(Per scone)

Calories: 196.2
Fat:  11.0 g
     Saturated: 6.6 g
Cholestrol: 32.3 mg
Sodium: 71.2 mg
Potassium: 78.6 mg
Carbohydrates: 23.2 g
     Fibre:  1.4 g
     Sugars:  8.6 g
Protein:  2.4 g
---
Vitamin A: 8.7%
Calcium: 4.4%
Iron: 3.1%
Magnesium: 2.2%
Manganese: 8.8%
Zinc: 1.3%
0 Comments

High Fibre Morning Power Smoothie

1/26/2014

0 Comments

 
I think I speak for a large majority of people on this planet when I say I'm not a morning person.
And unless you can be overly energetic without some sort of caffeine at 6 in the morning like my mom, you're probably on the hunt for something to render your senses awake.

Well here's a healthier option to caffeine: a Fruit Smoothie. But not just any ol' fruit smoothie! This one adds in an extra dose of fibre to keep you digestive system regulatory.

While it's a little high in sugar (don't worry, they're natural fruit sugars!), this smoothie is chock-full of vitamins and only have 9.2 g of net carbs! In other words, drink to your heart's content!
Picture
Picture
Picture
Picture
Ingredients
- 1 cup water
- 1 cup unsweetened almond milk
- 1/2 cup strawberries, sliced
- 1/2 cup pears, diced
- 1/3 cup water
- 3 tbsp psyillium husk


Directions:
1) Combine psyllium husk with 1/3 cup of water. Set aside.
2) Add remaining ingredients into a blender.
3) At this point, the psyllium husk should have absorbed most, if not all, of the water. Mix well and scoop into the blender.
4) Blend until smooth.
5) Pour into glasses and enjoy! *

Makes 2 servings.

Notes
- It is best to place wet ingredients into a blender first to ease mixing.
- As psyllium tends to cause liquids to congeal, this smoothie is best consumed immediately after preparation. If you prefer to chill the smoothie before serving, or to prepare it in advance, simply add a small amount of water and shake well before consuming it.

Nutrition:
(For entire recipe)

Calories: 268.8
Fat:  4.4 g
     Saturated: 0.5 g
Cholestrol: 0.0 mg
Sodium: 135.1 mg
Potassium: 1206.3 mg
Carbohydrates: 53.1 g
     Fibre:  43.8 g
     Sugars:  29.2 g
Protein:  5.1 g
---
Vitamin A: 3.2%
Vitamin B-12: 50.0%
Vitamin B-6: 46.4%
Vitamin C: 101.9%
Vitamin D: 45.0%
Vitamin E: 4.7%
Calcium: 44.3%
Iron: 59.4%
0 Comments

Mint Chocolate Chip Scones

12/18/2013

0 Comments

 
Oh yes. I've finally done it.

Holiday scones. With mint chocolate chips. And candy canes on top.

This idea's been circulating through my gustatory system for days - no, WEEKS - and I've finally managed to put it into perspective before my last exam. WOOT!
Picture
Picture
Picture
Picture
Picture
Picture
Picture

Ingredients
- 1 cup oat flour *
- 3 tbsp granulated sugar
- 1.5 tsp baking powder
- 1 egg white
- 3.5 tbsp chilled butter
- 1/2 cup milk
- 4 tbsp mint chocolate chips
- a pinch of coarse sea salt
- 2 mini candy canes, crushed

Directions:
1) Preheat oven to 425 F.
2) Place dry ingredients and chocolate chips in a large bowl. 
3) Add in butter and combine until texture resembles a coarse meal.
4) Add in milk and egg white. Combine well until a dough forms.
5) Optional: Flatten the dough on a sheet of wax paper or floured surface. Cut out shapes of choice using cookie cutters.
6) Place scones onto greased baking tray, or one lined with parchment paper. Sprinkle crushed candy canes on top. 
7)Bake for 14-16 minutes or until the edges start to brown slightly.
8) Let cool and enjoy!
Notes
- In order to keep this recipe gluten-free, I opted for oat flour instead of regular flour. If oat flour is not available in your area,  you can grind your own in a food processor using a rolled oats.
- In this recipe, I used 1% skim milk to keep the fat content to a minimum. However, if you prefer a richer taste, feel free to choose the regular (non-reduced fat) option.
- If you do not have sea salt, feel free to use normal salt instead.
- The number of servings depends the size and shape of cookie cutters used, so exact nutrition information will vary. I used large star and Christmas tree cookie cutters, therefore the data below was calculated based on 9 servings.

Nutrition:
(Based on 9 servings)

Calories: 166.4
Fat:  7.5 g
     Saturated: 3.2 g
Cholestrol: 12.8 mg
Sodium: 138.4 mg
Potassium: 21.9 mg
Carbohydrates: 22.3 g
     Fibre:  2.7 g
     Sugars:  9.5 g
Protein:  3.3 g
---
Vitamin A: 3.9%
Calcium: 6.2%
Iron: 5.7%
0 Comments

Festive Cheese & Cranberry Scones

12/18/2013

0 Comments

 
I love Christmas, and I also love food.

Recently, I've been craving some biscuits for munching on while continuing on my long trek to my final (mechanics) exam.
And since my mom refilled the cheese inventory, I could finally try a hand at baking scones!

But wait, these aren't just any old scones!  They're Christmas tree-shaped scones! Honestly, just how awesome is that?! (≧∇≦)

Plus, they also pack in a punch of protein and a healthy dose of calcium. And like many of my recent creations, they're also gluten-free! ^ ^
Picture
Picture
Picture
Picture

Ingredients
- 1 cup oat flour
- 1 cup shredded part-skim mozzarella cheese
- 1 cup sweetened dried cranberries
- 2 tbsp calorie-wise mayonnaise
- 1 tbsp dijon mustard
- 2 tbsp Blue Menu sundried tomato and herb seasoning blend
- 2 tsp coarse sea salt
- 1 tsp baking powder
- 1/4 cup water (or as needed)

Directions:
1) Preheat oven to 425 F.
2) Place all dry ingredients, shredded cheese, and cranberries in a large bowl.
3) Add in mayonnaise and mustard. Mix until fully combined. The texture should resemble a coarse meal.
4) Add in water little by little until a dough forms.
5) Optional: Flatten the dough on a sheet of wax paper or floured surface. Cut out shapes of choice using cookie cutters.
6) Place scones onto greased baking tray, or one lined with parchment paper. Bake for 11-13 minutes or until the edges start to brown slightly.
7) Let cool and enjoy!

Makes 20 servings.

Notes
- In this recipe, I used part-skim mozzarella cheese and calorie-wise mayonnaise to keep the fat content to a minimum. However, if you prefer a richer taste, feel free to choose the regular (non-reduced fat) option.
- If you do not have sea salt, feel free to use normal salt instead.
- The number of servings depends the size and shape of cookie cutters used, so exact nutrition information will vary. I used large Christmas tree cookie cutters and had a small amount of dough left over, therefore the data below was calculated based on 5.5 servings.

Nutrition:
(Based on 5.5 servings)

Calories: 165.9
Fat:  5.8 g
     Saturated: 2.7 g
Cholestrol: 12.7 mg
Sodium: 552.3 mg
Potassium: 0.2 mg
Carbohydrates: 21.4 g
     Fibre:  2.4 g
     Sugars:  8.3 g
Protein:  7.3 g
---
Vitamin A: 3.2%
Calcium: 19.7%
Iron: 4.7%
0 Comments
    The Sweet
    The Savoury

    Archives

    July 2020
    March 2020
    January 2020
    April 2019
    August 2018
    June 2018
    April 2018
    February 2018
    December 2017
    November 2017
    August 2017
    July 2017
    May 2017
    April 2017
    February 2017
    January 2017
    December 2016
    April 2016
    March 2016
    October 2015
    September 2015
    July 2015
    January 2015
    December 2014
    June 2014
    March 2014
    February 2014
    January 2014
    December 2013
    November 2013
    October 2013
    September 2013
    August 2013


    Categories

    All
    Brownie
    Chocolate
    Christmas Recipes
    Easy Recipes
    Gluten Free
    High Fibre
    High Potassium
    High Protein
    Ice Cream
    Japanese Style
    Low Carb
    Low Cholestrol
    Low Fat
    Low Sodium
    Matcha
    Microwave Recipe
    Quick Recipes
    Savoury Recipes
    Sweet Recipes
    Vegan
    Vegetarian
    Yuzu


    RSS Feed

WHAT DOES "QUIRKY AESTHETICS" MEAN?

Quirky =  a term that commonly refers to something/someone distinctly different and unique
Aesthetics = the visual aspect of things


Together, Quirky Aesthetics refers to the things, events, and happenings seen and perceived by this blog's creator - quirky perspectives in a visual form.

Contact ME

​Subscribe

Join our mailing list today!
Join Now
© Quirky Aesthetics. All rights reserved. Last modified: August 10, 2015.